6 ways to fix SSD drive not showing error in Windows
SSDs have a common problem of not being recognized by the Windows operating system. If so, your SSD may not show up on This PC, File Explorer, and Disk Management, despite being properly connected to the computer.
Table of Contents
SSDs have huge benefits over traditional magnetic hard drives, which is why many people are upgrading to this superior storage solution.
SSDs have a common problem of not being recognized by the Windows operating system. If so, your SSD may not show up on This PC, File Explorer , and Disk Management , despite being properly connected to the computer.
This problem can be especially troublesome when setting up an SSD. Read the following article to learn how to fix SSD detection issues in Windows.
1. Make sure the SSD is installed properly
This may sound basic, but your SSD may not be installed properly, causing your computer to not detect the SSD. Fixes may vary depending on the type of SSD you have installed.
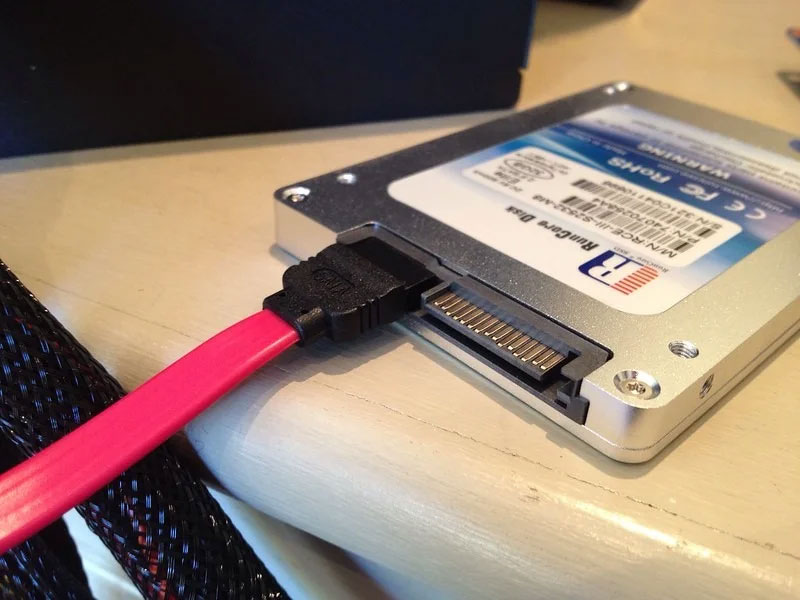
- For SATA SSDs, open your PC or laptop case and check that the power and SATA cables are fully inserted into the drive. Try using a replacement cable inside your computer or in your motherboard box.
- For an M.2 SSD, make sure you install it in the appropriate slot. For example, M.2 NVMe (single-track) SSDs, even if they can fit snugly in an M.2 SATA (two-track) slot, will not work in this configuration. You need to verify which M.2 SSD you have, then install it in the corresponding slot on the motherboard. You can also try installing the SSD in another M.2 slot if you suspect this slot is defective.

2. Check SSD settings in BIOS
It's also possible that you've installed the SSD properly but the PC still doesn't detect it. Enter the BIOS using the specific key displayed when the PC boots, then check that the BIOS settings are configured correctly to detect your new SSD.
First, check to see if your SSD is detected by the BIOS. You will have to navigate to the storage or configuration section of the BIOS, which will be different for different motherboard manufacturers. Confirm whether your SSD is listed in the drive list.

If it's not listed then the drive is faulty or you need to change some additional settings. Navigate again to the storage section in the BIOS and find the settings related to SATA configuration. If you are running a SATA SSD, you may need to try different options in the SATA configuration: AHCI, IDE or Compatibility mode. Save your changes and restart your computer. Check if SSD is visible in Windows.
3. Initialize the SSD
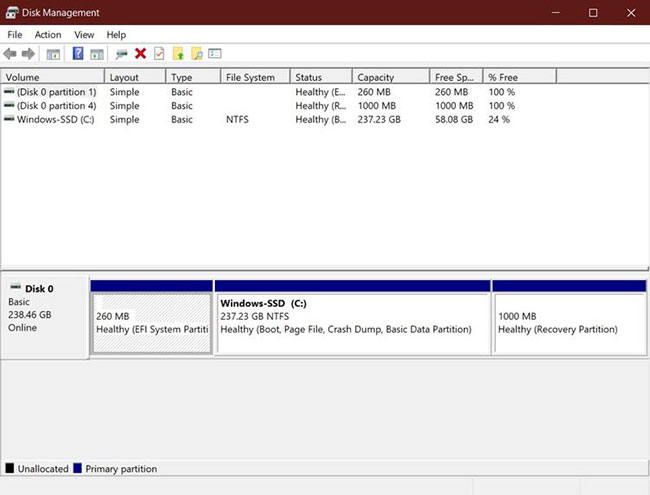
When you get a new SSD, you need to initialize it to use it in Windows 10. An uninitialized SSD will not show up in File Explorer or the Disk Management utility.
If you haven't initialized your SSD yet, you can do so in a few steps:
Step 1: Search for Disk Management in the Start menu search bar, right-click on the most suitable result and select Run as administrator .
Step 2: Right-click on the undetected SSD and select Initialize Disk.
Step 3: In the Initialize Disk dialog box , select the SSD you want to initialize and choose the partition type.
Step 4: Click OK to start the drive initialization process.
Step 5: After completing step 4, return to Disk Management , right-click on the SSD volume and select New Simple Volume .
Step 6: Follow the on-screen instructions to assign the SSD volume and drive letter.
After initializing your SSD, you should restart your PC so the changes can take place properly. After rebooting, Windows 10 will detect the SSD and you can access it through File Explorer.
4. Specify or change the drive letter
A common reason why Windows 10 does not recognize an SSD is a conflicting or missing drive letter. You can quickly resolve this issue by changing or assigning a new drive letter to the SSD in the Disk Management utility.
To change the SSD's drive letter:
Step 1: Search for Disk Management in the Start menu search bar, right-click on the most suitable option and select Run as administrator .
Step 2: Right click on the SSD and select Change Drive Letter and Paths .
Step 3: Click Add if the drive letter does not exist or Change to modify the existing drive letter.
Step 4: Select the new drive letter from the drop-down menu and click OK for the changes to take place.
After following the above steps, you can restart your PC and Windows will recognize the SSD. You can then access the SSD through File Explorer.
5. Update the memory device controller driver
Before moving on to deeper fixes, you need to make sure that your memory device controller drivers are up to date. Outdated drivers can cause the device to not function properly and lead to the reason why Windows does not detect the SSD.
To update the memory device controller driver:
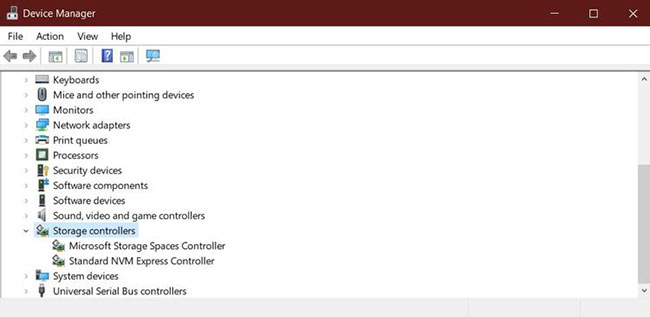
Step 1: Launch Device Manager from the Start menu.
Step 2: Search for Storage controllers and expand the group.
Step 3: Right-click on the memory device controller and select Update driver.
Step 4: Select Search automatically for updated driver software .
Windows will automatically install any available updates; You can then restart your PC and open File Explorer or the Disk Management tool to check if Windows 10 now detects the SSD.
6. Format the SSD
The last resort is to format the SSD to resolve any underlying conflicts. The only downside to this solution is that you will lose all the data on the drive if the drive you just installed is not a new drive.
Once you've backed up any data you want to keep, go back to Disk Management, right-click on the SSD and click Format . Name the drive and choose a file system (NTFS works fine for most people). Select the default allocation size, check the box next to Quick format and click OK to start the process.

Once the formatting process is complete, your drive will be viewable in File Explorer. If not, restart your computer and check again.
Wishing you success in fixing the error!
Was this article helpful?
Your feedback helps us improve.
Related Articles
 TOP 3 Ways to fix laptop hard drive not showing up when installing Windows5 minutes read
 7 simplest ways to fix USB not showing up on Windows 107 minutes read
 Some ways to fix lost DVD drive errors on Windows 103 minutes read
 How to fix Windows 11 search not showing up2 minutes read
 Instructions for 5 ways to fix the error of not recognizing the removable hard drive on Windows6 minutes read
 How to fix Snipping Tool keeps showing error3 minutes read
Reader Comments 0
Sign in with email or Google to join the discussion.