5 Simple Ways to Take a Screenshot of Your Macbook, Guaranteed to Be Clear
Taking screenshots on Macbook is extremely easy and simple. Because Macbook provides many of these features to make it more convenient for users during use.
Table of Contents
For those who love using Macbook, you will see that Apple always updates its features for a better, more sophisticated and more modern experience. Therefore, even the Macbook screenshot feature . There are many different ways to bring more efficiency to your work. Please refer to and pocket the tips below!
Introduction to Macbook screenshot feature
Taking a screenshot is a common operation. This is also a basic feature needed on Windows, users just need to use the Print Screen key to perform this process.

However, the Print screen key is not supported on Macbook like Windows operating system. Therefore, you cannot take screenshots like on a computer. Instead, we will apply with MacBook shortcuts.
Additionally, taking screenshots on a Mac is incredibly easy thanks to a great utility that comes pre-installed on the macOS system. This tool has more features than what you see on its main interface. Additional options will help you take screenshots on your Mac in your own way.
Easy ways to take screenshots on Macbook computers
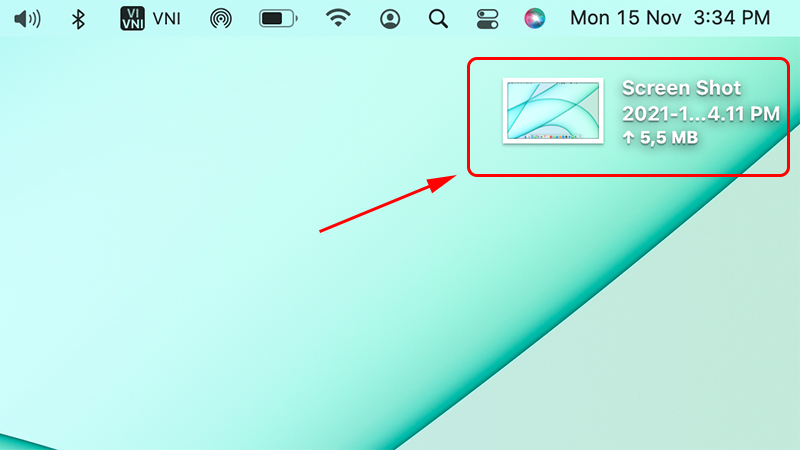
On a Macbook, you can easily take a screenshot of the entire screen or just a portion of it. The screenshot will then be automatically saved to the desktop. Here are the simplest ways for first-timers.
How to take a full screen photo
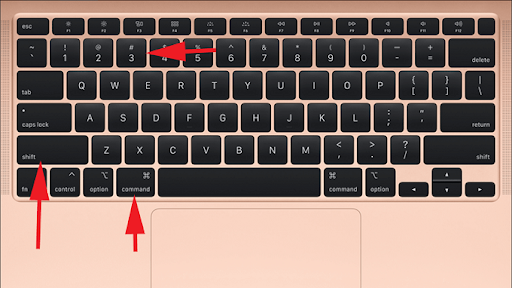
Taking a full screen photo is extremely simple. To do it, just press Shift + Command (⌘) + 3 at the same time and you're done. The photo after taking will be saved on the Desktop and will be saved as a .png file.
How to capture a custom portion of the screen
If you only want to save a piece of information or an image on your Macbook, do the following:
Step 1: Press the key combination Shift + Command + 4 at the same time . At this time, the mouse pointer will change to a cross.

Step 2: You will move the cursor to the area you want to take a screenshot. Drag the mouse to select the entire area to capture. Note, when dragging the mouse, you should hold the Shift , Option or Space key to change the way the selection moves.
Step 3: Once you have selected the area to take a screenshot. If you want to cancel, press the Esc key and release the mouse . This image when saved on the desktop has a .png file extension.

How to take a screenshot of the menu on Macbook
This method is also quite simple and quick to do. Specifically with the following steps:
Step 1: Click on the menu to display the menu content.
Step 2: Next, you select the combination Shift + Command + 4 + Space bar at the same time

Step 3: Drag the mouse to select the menu you want to capture and then release the mouse. If you want to cancel the capture, press the Esc key before releasing the mouse or trackpad. The menu screenshot is saved on the desktop with the .png file extension.
In the menu screenshot method, if you just want to capture the menu content but don't want to get the name of the menu, you can still do it. You just need to do the following: when the mouse pointer turns into a cross, press the Space key. The pointer will now turn into a camera icon. Move this camera over the menu bar to highlight it and click or touchpad to select menu capture.
How to take a screenshot of the Touch Bar on Macbook
How to take a full screen shot using Touch Bar is done by many people. Just 2 steps below and you will succeed:
Step 1: Use the shortcut key combination Command + Shift + 6
This is the shortcut key combination used to take a screenshot of the Touch Bar on the Macbook Pro. The Touch Bar will appear on the computer interface or depending on the user's location. The photo after being taken will have a default resolution of 2170 px x 60 px.
Step 2: Paste the image, save the image
To copy the captured image to photo editors or text editors, use the key combination Control + Command + Shift + 6.
How to take screenshots on Macbook through applications
Instead of shortcut keys, you can take screenshots of your Macbook through applications such as: Skitch, Teampaper Snap, Monosnap, Snagit,. By taking photos through applications, you can get sharper and more satisfying photos.
Brief summary of Macbook screenshot shortcuts
- Command+shift+3: capture full screen
- Command+Shift+Ctrl+3: Capture the entire screen and copy to Clipboard
- Command+shift+4 and drag the mouse with 3 fingers: Capture an area
- Command+shift+4+Onption: Capture an area from the center
- Command+shift+Ctrl+4: Capture an area and copy to Clipboard
- Command+shift+4+Space bar: Capture current window
- Command+shift+3: Take a screenshot to a file
- Command+shift+Control+3: Capture Macbook screen to Clipboard
- Command+shift+4: Capture a selection to a file
- Command+shift+Control+4: Capture a selection to the Clipboard
In addition, you can also edit the captured images as you like. Taking photos through the application will take time to download the application the first time you use it, but the next time you will use it immediately without waiting.
TipsMake has just shared with you some quick and simple ways to take screenshots on Macbook. In case using shortcut keys does not work, choosing to download an application to use is also a good way. TipsMake wishes you success!
Was this article helpful?
Your feedback helps us improve.
Related Articles
 The simplest and fastest way to take a screenshot on a MacBook in 2026.13 minutes read
 3 simple and quick ways to take a screenshot on your MacBook2 minutes read
 How to take MacBook screenshots with keyboard shortcuts4 minutes read
 5 ways to take screenshots on Macbook, using shortcut keys, taking screenshots with mouse cursor8 minutes read
 How to take a screenshot on MacBook without using software4 minutes read
 How to quickly take Windows screenshots on Macbook5 minutes read
Reader Comments 0
Sign in with email or Google to join the discussion.