Windows 10 has the same split screen function as on macOS
Another reason for you to experience Windows 10 immediately when you can.
If you use macOS, you must be quite interested in the Split View feature, when activated it will automatically split the screen for users to run 2 applications in parallel, very convenient for you because you can both watch Youtube and chat with friends or surf the web while typing text.
However, one thing you may not know is that the split screen feature has been provided by Microsoft on Windows since the current version of Windows 7 to Windows 10. MacOS, on the other hand, didn't have this feature until OS X El Capitan. And of course, until the current version of Windows 10, the split screen feature has been upgraded to a higher level, you can open 3 or more separate windows to increase the efficiency of work. Specific usage is as follows.

Go to Settings> System.
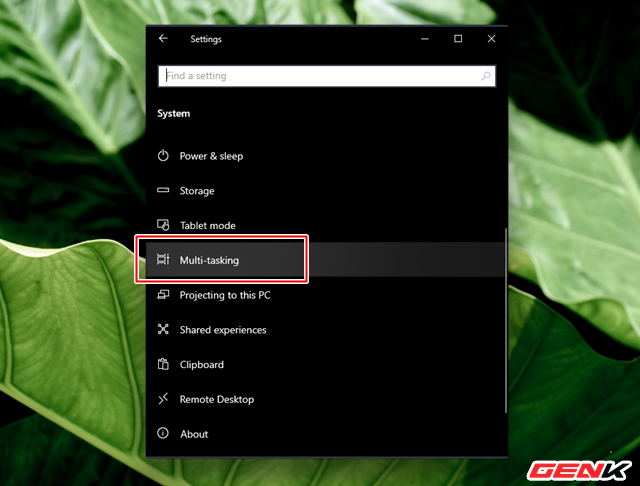
In System, find and click on Multi-tasking.
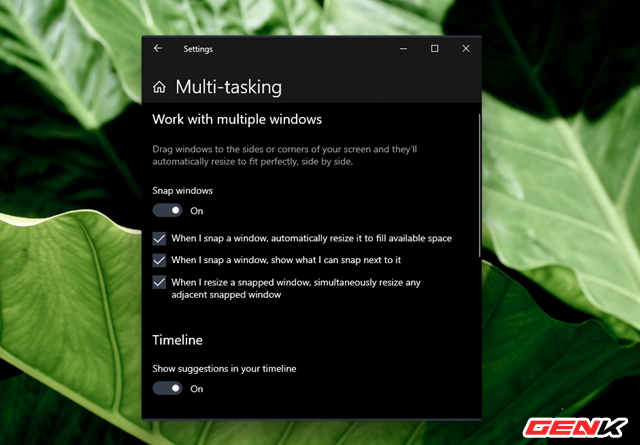
Set it to ON in the "Snap windows" line, then continue to tick the 03 options below as shown to enable screen sharing on Windows 10.

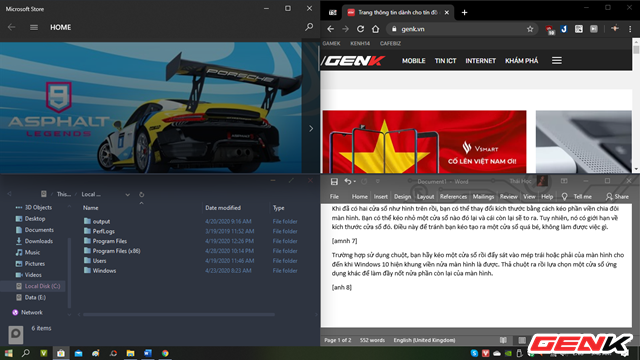
One of the easiest ways to split the screen in Windows 10 is to use an operation called Side-by-Side Snap. To use this, you only need to use the mouse, keyboard or . fingers (if the touch screen) to drag a window to the edge of the screen, it will automatically zoom in exactly half of the screen. With the other half of the screen, Snap Assist will suggest that you choose an open window to fill the note, or you can open a new application to fill this section.

Once you have the two windows shown, you can resize it by dragging the border to split the screen. You can minimize one window and the other will enlarge. However, it has limits on that window size. This is to prevent you from creating a window that is too small to do anything.

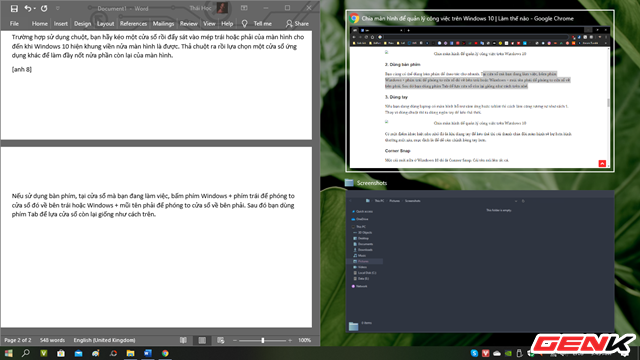
In case of using a mouse, drag a window and push it close to the left or right edge of the screen until Windows 10 shows a half-screen border. Release the mouse button and choose a different application window to fill the rest of the screen.

If using the keyboard, at the window you are working on, press Windows key + left key to zoom that window to the left or Windows + right arrow to zoom the window to the right. You then use the Tab key to select the remaining windows in the same way.
In addition, the split screen feature on Windows 10 is also equipped with a mode called Corner Snap. To activate, you can drag the drop window to the four corners of the screen. This way you will divide the working screen into 4 windows. If you have a monitor that supports high resolutions like 2K or 4K, this is great. You can work at a time with more windows.
Great is not it?
Was this article helpful?
Your feedback helps us improve.
Related Articles
 How to split screen on macOS3 minutes read
 How to use split screen on Mac with Split View9 minutes read
 How to quickly split the screen on a Windows 10, 11, and macOS laptop.8 minutes read
 How to split the screen on a Windows 11 laptop6 minutes read
 How to split screen on Windows 104 minutes read
 How to split a computer screen3 minutes read
Reader Comments 0
Sign in with email or Google to join the discussion.