What is the Tracert command? How to apply Tracert effectively?
On Windows, you already have a number of tools available to help them manage and test the network model. There are 2 Ping and Tracert commands. Specifically, how are they the same and different? Please read the article below of TipsMake.com.
In essence, they can all be used when you want to check the network connection from the machine you are using to a certain server, whether the network signal or not. More specifically:
- PING command : check internet connection between 2 computers. By sending the packets, then receive the feedback from the other side.
- The Tracert command seems a bit "super", used to check the path of packets of the Ping command.
Tracert (or Traceroute) is a Windows-based tool that allows you to support network infrastructure testing programs. In this article, we will show you how to use Tracert to fix real-world problems. This enhances the usefulness of the tool and shows you some uses when working with your own networks.
This TCP / IP utility allows you to specify packets that are directed to the entire network to a specific host according to your needs. Tracert works by adding "live time" (TTL) value to each successive packet sent. When a packet passes through a host, this host will reduce the TTL to a value and continue sending it to the next host. When a packet has a TTL to the destination host, the host removes the packet and sends an ICMP timeout notice. Tracert if used properly and correctly can help you find incorrect or non-existent routing points in your network.
Introducing Tracert
Tracert is the Windows-based command-line tool used to determine the path from the source to the destination of an Internet Protocol (IP - Internet Protocol) package. Tracert finds its way to the destination by sending Echo Request messages (requires reprogramming) Internet Control Message Protocol (ICMP) to each destination. After each meeting a destination, the Time to Live (TTL) value, ie the time it takes to send it, will be increased until the correct destination is reached. The path is determined from this process.
Looking at the following illustration, you can imagine how Tracert works in a production network.

How to use Tracert
As you can see in the illustration, we will send traffic from the checkpoint on Party B (Site B) to a server on side A (Site A). Packets will travel in a wide area network (WAN), splitting into two sides connected via T1 links and a back-up link to Integrated Services Digital Network (ISDN). To use the Tracert utility, you simply need to know the IP address of the destination host, how to use the Tracert correctly and what you need to find in the results.
Tracert is based on the Time to Live (TTL) field operation. By increasing the TTL and after each encounter with the router, its value decreases by one, the packet is sent to the next router. Each time a packet is sent from router to router, it is called a hop. When the TTL field has a value of 0, the router sends an ICMP "Time Exceeded" message (out of time) to the source. You can see an example with our following sample network in the illustration below. With source and destination IP addresses, . we will use the workstation on Site B and the server on Site A to perform the test.
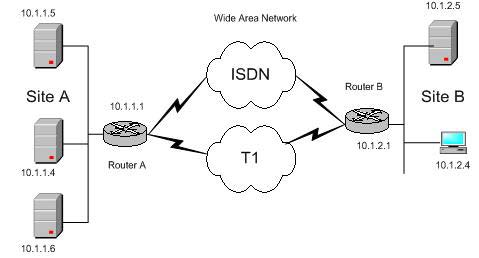
From this illustration you can see, the source IP is 10.1.2.4 and the destination IP (for example) may be 10.1.1.6. Routing routines take place from Site B to Site A, over a link with a higher capacity than T1 (1,544 Mbqs). ISDN links with 128 Kbqs capacity are reserved only in case the primary link fails.Tracert will show you the packets sent from Site B, at the machine with address 10.1.2.4, via the T1 link to the addressing device 10.1.1.1. how. You can also know how to send packets to the local LAN (10.1.1.0) and finally to 10.1.1.6.
When the packets have been sent, Tracert will use the first interface on the router it sees to report router leaps. So, consider our complete path before sending the packets.
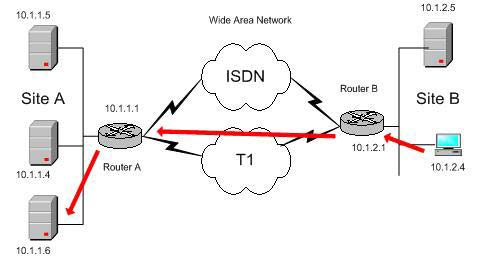
The path (highlighted in red on the image) is a list of routers between the source host and the destination host. A very important point to remember is that the interfaces on the left will be used when describing. The interface on the left is the interface of the router closest to the sending host in the path. In this example you can see the path through T1, from side B (Site B) to side A (Site A). Now let's see why this is important.
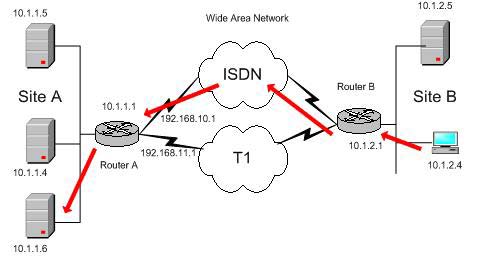
So what are the ways of tracert? When launching and using, tracert will report (print out) the list of the addresses of each host that it has passed on the way to the destination. This is really good because you can know more about this path. If you get the part near the interface, you will see a new setting of the IP address in the next illustration (192.168.10.1 and 192.168.11.1) 10.1 used for the ISDN and 11.1 links used for the join. T1 link. So why is this important?
When getting results from Tracert , some people who are not good at working with this tool will find it awkward. The default gateway to 10.1.1.1 of Site A is replaced by a WAN address. Just a router but another interface. This is mandatory when you want to check with Tracert because if you're mistaken, you won't know what you're reading.
For example, the path you see in the above illustration is from 10.1.2.4 to 10.1.2.1 (the default gateway of the LAN). It will then cross the WAN to 10.1.1.1. The only problem here is that you will not see the address appear. After T1 has the interface on router (11.1) of side A (Site A) and performs ISDN link (10.1), these two IP addresses are the most important in Tracert 's return results. This is because in this example T1 can be faulty and the path is now via ISDN. This works "as publicized". But what if you leave T1 online again (unless you feel your network speed at T1 drops from 1.544 Mbqs to 128 Kbqs), you should not use the ISDN link any more minutes. That's what we will check.
Check Tracert
Now, to use Tracert, simply open the Command Prompt screen. To do this, go to Start -> Run -> cmd -> tracert
( Note : you must type " tracert " because you can see that Traceroute only works on UNIX / Linux and other systems such as Cisco, etc.).
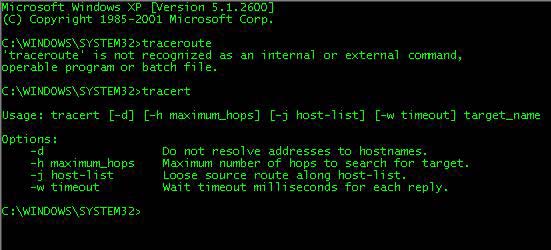
In the following example, after typing the " tracert " command and viewing the information displayed, you can see that the packets move through the two routers (as shown above) and then to the destination host 10.1.1.6. Here, the default gateway from Site B is 10.1.2.1 and the IP address of the WAN router via T1 and ISDN links (respectively) is 192.168.11.1 and 192.168.10.1.
Let's first see how things work when using T1.
 C:> tracert 10.1.1.6
 Tracing route to 10.1.1.6 over a maximum of 30 hops (Determine the path to address 10.1.1.6 through up to 30 steps)
 -------------------------------------------------- -
 1 2 ms 3 ms 2 ms 10.1.2.1
 2 25 ms 83 ms 88 ms 192.168.11.1
 3 25 ms 79 ms 93 ms 10.1.1.6
 Trace complete. (Determination process completed)
Now, if T1 fails and switches to ISDN, you'll see there is another 'path' and it's 'longer' than the original path.
 C:> tracert 10.1.1.6
 Tracing route to 10.1.1.6 over a maximum of 30 hops
 -------------------------------------------------- -
 1 2 ms 3 ms 2 ms 10.1.2.1
 2 75 ms 83 ms 88 ms 192.168.10.1
 3 75 ms 79 ms 93 ms 10.1.1.6
 Trace complete.
As you can see, using tracert will help you identify the network path as it points out through the network and most importantly, how to get the data through that path.
- Use Wireshark to analyze data packets in the network
Use Tracert options
Using Tracert , you should know some of the following options. The most useful is the first "-d" option. It is used when you want to remove the DNS solution. Server names are also very useful, but if it is not set or set up incorrectly, or you simply want to have the host's IP address, you should use the "-d" option.
tracert [-d] [-h MaximumHops] [-j HostList] [-w Timeout] [TargetName]
How to use Tracert to debug
Maybe sometimes the information displayed outside is unclear, so you don't understand. For example, when there are signs, what do you do? As mentioned above, an asterisk may be displayed incorrectly, because the ICMP package may have been delivered but something has hindered the notification process, often a certain principle in firewall or access control list.
You can use Tracert to find out where the packet is stopped on the network. In the following example, the default gateway has found that there is no valid path in any host. This means that both links (T1 and ISDN) are "collapsed" and no destination can come.
 C:> tracert 10.1.1.6
 Tracing route to 22.110.0.1 over a maximum of 30 hops
 -------------------------------------------------- ---
 1 10.1.2.1 reports: Destination net unreachable.
 Trace complete.
From this example you can see, when you send the Tracert test request to 10.1.1.6, the LAN port defaults to reporting that it cannot find the path. Looking at the following specific diagram can help you understand the problem more clearly.
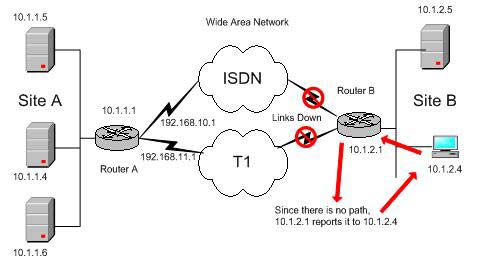
You can see, there is no path for the packet. The closest source router reports that there is no path from the source to other hosts.
Important notes about Tracert
Here are some important notes to help you better understand Tracert .
- Tracert does not always help you search for 'latency'. To determine the path and provide latency and missing packets for each router and link in the path, use the " pathping " command. You can refer to the pathping article previously introduced by TipsMake.com.
- Tracert can only be used if the Internet Protocol (TCP / IP) protocol is installed as a component in the properties of a network adapter in Network Connections. This is a TCP / IP utility that uses ICMP, a protocol within the TCP / IP protocol suite.
- In the modern Linux version, the tracerouter utility (not tracert even though some Linux systems allow you to use tracert ) uses a UDP datagram with a port number of 33434. Windows uses ICMP reprogramming (type 8) Better known for ping packages.
Summary:
In this article we have introduced you to the basic concept of Tracert . Tracert (also known as traceroute ) is a Windows-based tool that allows you to support network infrastructure testing. Specifically in this article, we show you how to use tracert to debug problems that occur in practice such as multiple paths or inactive links. This enhances the usefulness of the tool and shows you how to use it when working with your own network. This TCP / IP utility also allows you to determine the path of packets transmitted over the network to the specific host you specify. When a packet passes through a host, the host reduces the packet's TTL value and sends it to the next host. When the time has passed and the destination address has not been reached, the host receiving the packet will discard and resend the ICMP overdue notification. Tracert, if used properly, can help you find points in the network that are routed incorrectly or not exist. Tracert (or traceroute ) is a tool you must control if you plan to work on the network. It (and ping , pathping ) can be used to help you map and debug networks easily. You should learn more about these tools from the references.
See more:
- Top 10 basic network troubleshooting tools that IT people need to know
- Comprehensive network monitoring tool set
- 10 commands Windows 7 network administrators need to know