Use BranchCache in Windows 7
BranchCache is an integrated network tool in Windows 7 and Windows Server 2008.
BranchCache is a network tool integrated in Windows 7 and Windows Server 2008. This tool acts as a proxy whereby it only works when requested by the client.
BranchCache is very useful in case the connection from the branch office back to the headquarters is very slow. All downloads take place at low speed due to bandwidth connection problems. BranchCache is designed to support the operations of these branch offices.
BranchCache operation method
BranchCache works according to two mechanisms, Hosted Cache and Distributed Cache (distributed storage). In Hosted Cache mode, a Windows Server 2008 server located at the branch office will contain the stored files. In Distributed mode, a server at the branch office is not needed, instead copies of files are stored directly on the computer at the branch office.
When BranchCache is enabled, if there is a request for data to be sent over the network, a copy of the data or file will be downloaded from the internal Web site or a file server then it will be stored locally in the branch office. branch. When another user in the branch office also requests this file, that user will be able to access this data immediately when it is downloaded from the local storage area instead of having to download it from the head office. with limited speed bandwidth connection.
BranchCache only retrieves data from the headquarters upon request. Because it operates as a passive memory, it takes up little bandwidth between the headquarters and the branch office. BranchCache only stores read requests, so it never interferes with the user's file storage process. BranchCache (and file servers with Server Messaging Block - SMB) supports both HTTP and HTTPS. It also works with many network security tools such as Secure Sockets Layer (SSL), SMB Signing and Internet Protocol Security (IPSec).
Configure BranchCache
BrachCache requires us to use Windows 7 workstations and Windows Server 2008 R2 servers.
We can use Group Policy settings or the netsh command-line tool to perform branchCache client configuration tasks, including:
BranchCache must be installed on a Windows Server 2008 R2 server. We will have to install BranchCache using Server Manager to be able to configure a Web server or an application server currently using the Background Intelligent Transfer Service (BITS) protocol.
In addition, we must install BranchCache for the Network Files tool, and then configure the server to use Group Policy to configure a file server to work with BranchCache. In order for the Windows Server 2008 R2 system to function as a BranchCache workstation, we must first install BranchCache and then follow the configuration steps for the workstation.
Install BranchCache
1. Go to Start | All Programs | Administrative Tools | Server Manager . In Server Manager , right-click the Features node and select Add Features .
2. Then the Add Features wizard will launch, select BranchCache and then click Next .
3. On the Confirm Installation Selections page, click Install .
4. On the Installation Results page, confirm that BranchCache has been successfully installed and click Close .
Configure the file server using BranchCache
Use Group Policy to configure BranchCache
Configure workstation
BranchCache is very useful in case the connection from the branch office back to the headquarters is very slow. All downloads take place at low speed due to bandwidth connection problems. BranchCache is designed to support the operations of these branch offices.
BranchCache operation method
BranchCache works according to two mechanisms, Hosted Cache and Distributed Cache (distributed storage). In Hosted Cache mode, a Windows Server 2008 server located at the branch office will contain the stored files. In Distributed mode, a server at the branch office is not needed, instead copies of files are stored directly on the computer at the branch office.
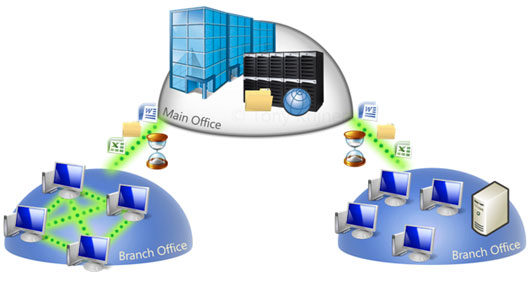
Figure 1: BranchCache operation model.
When BranchCache is enabled, if there is a request for data to be sent over the network, a copy of the data or file will be downloaded from the internal Web site or a file server then it will be stored locally in the branch office. branch. When another user in the branch office also requests this file, that user will be able to access this data immediately when it is downloaded from the local storage area instead of having to download it from the head office. with limited speed bandwidth connection.
BranchCache only retrieves data from the headquarters upon request. Because it operates as a passive memory, it takes up little bandwidth between the headquarters and the branch office. BranchCache only stores read requests, so it never interferes with the user's file storage process. BranchCache (and file servers with Server Messaging Block - SMB) supports both HTTP and HTTPS. It also works with many network security tools such as Secure Sockets Layer (SSL), SMB Signing and Internet Protocol Security (IPSec).
Configure BranchCache
BrachCache requires us to use Windows 7 workstations and Windows Server 2008 R2 servers.
We can use Group Policy settings or the netsh command-line tool to perform branchCache client configuration tasks, including:
- Enable BranchCache
- Choose one of two modes: Distributed Cache or Hosted Cache.
- If using Distributed Cache, we need to specify the size for the buffer storage area of the workstations. BrachCache can use up to 5% of the hard drive space.
- If using Hosted Cache mode, we must specify the Hosted Cache location to store.
BranchCache must be installed on a Windows Server 2008 R2 server. We will have to install BranchCache using Server Manager to be able to configure a Web server or an application server currently using the Background Intelligent Transfer Service (BITS) protocol.
In addition, we must install BranchCache for the Network Files tool, and then configure the server to use Group Policy to configure a file server to work with BranchCache. In order for the Windows Server 2008 R2 system to function as a BranchCache workstation, we must first install BranchCache and then follow the configuration steps for the workstation.
Install BranchCache
1. Go to Start | All Programs | Administrative Tools | Server Manager . In Server Manager , right-click the Features node and select Add Features .
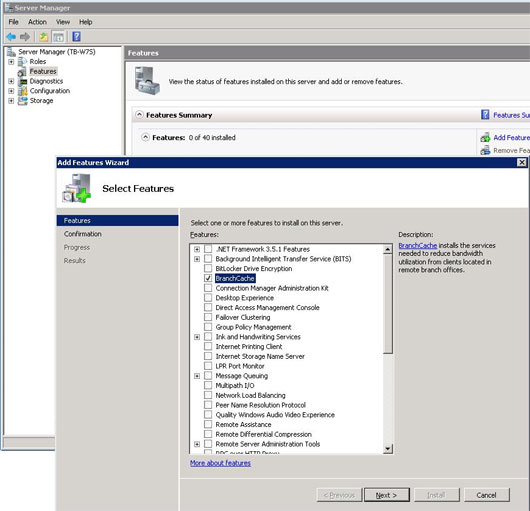
2. Then the Add Features wizard will launch, select BranchCache and then click Next .
Figure 2: Installing BranchCache.
3. On the Confirm Installation Selections page, click Install .
4. On the Installation Results page, confirm that BranchCache has been successfully installed and click Close .
Configure the file server using BranchCache
BranchCache for the Network Files service of the File Services function server needs to be installed before we can enable BranchCache for all file shares. After we have finished installing BranchCache for the Network Files service, use Group Policy Management Console to enable BranchCace on this server. We can enable BranchCache for all shares on a file server or only selected shares.
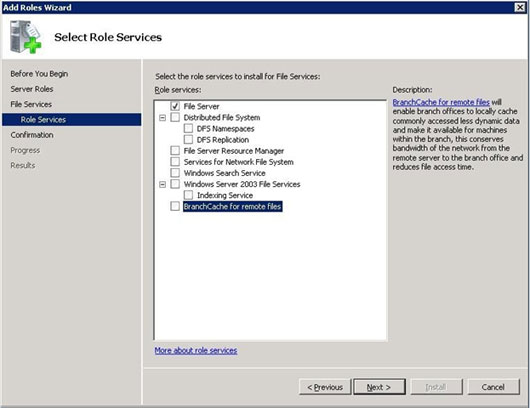
BranchCache for Network Files is a service of the File Services function server. Use the Add Roles wizard of Server Manager to install Role File Services and BranchCache for the Network Files service.
BranchCache for Network Files is a service of the File Services function server. Use the Add Roles wizard of Server Manager to install Role File Services and BranchCache for the Network Files service.
Figure 3: Installing Role File Services and BranchCache for Network Files service.
Use Group Policy to configure BranchCache
To configure BranchCache with Group Policy we need to do the following:
1. Open the Group Policy Management Console . Go to Start | All Programs | Administrative Tools | Group Policy Management Console .
2. Select the domain in which we will apply the Group Policy object or select Local Computer Policy.
3. In the Actions menu, select New to create a new Group Policy object (GPO).
4. Select a name for this new GPO and click OK .
5. Right-click the newly created GPO and select Edit .
6. Go to Computer Configuration | Policies | Administrative Templates | Network , then choose Lanman Server .
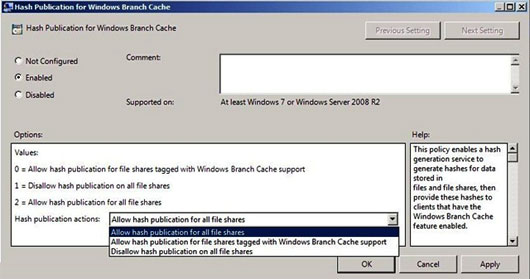
7. Double-click Hash Publication for BranchCache . In the dialog box that appears, select the Enabled option. In the options area, select one of the Hash publication actions (the act of creating a hash) later:
- Allow hash publication for all file shares (Allow Hash Publication for all file shares).
- Allow hash publication for file shares tagged with 'BranchCache support (Allow Hash Publication for shared files with BranchCache support).
- Disallow hash publication on all file shares (Block Hash Publication on all file shares).
Figure 4: Configuring BranchCache with Group Policy.
Configure workstation
When the Windows Server 2008 server is configured, we must enable BranchCache on the client. By default, BranchCache is disabled on workstations. Perform the following actions:
1. Go to the Start menu | Computer Management .
2. When Computer Mnanagement window saw appears, in the left panel select the Services and Applications section .
3. In the right pane, double-click Services , then navigate to BranchCache , open the properties window of this service and change the startup mode to Automatic in the Startup type field. Then click OK and launch the BranchCache service.
1. Go to the Start menu | Computer Management .
2. When Computer Mnanagement window saw appears, in the left panel select the Services and Applications section .
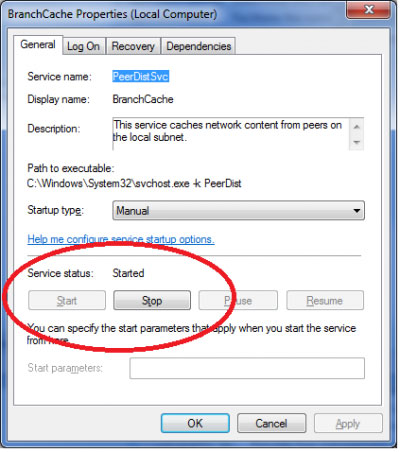
3. In the right pane, double-click Services , then navigate to BranchCache , open the properties window of this service and change the startup mode to Automatic in the Startup type field. Then click OK and launch the BranchCache service.
Figure 5: Properties dialog of the BranchCache service.
Now that the BranchCache service is running, it will work with the host to transfer data to workstations quickly and efficiently.
Was this article helpful?
Your feedback helps us improve.
Related Articles
 5 features to prepare for Windows 75 minutes read
 Here's how to uninstall Windows 10 to return to using Windows 7 or 8.19 minutes read
 The chart for the 10 most amazing versions of Windows10 minutes read
 Windows revolution and breakthrough changes through each version9 minutes read
 Summary of several logout methods on Windows 8 and Windows 103 minutes read
 Looking back at 27 years of 'evolution' of Windows7 minutes read
Reader Comments 0
Sign in with email or Google to join the discussion.