Table of Contents
This guide covers tips for using galaxy tab 10. 1 (part 2) with practical context and easy-to-follow details. Use it to understand the subject and apply the information confidently.
How to Change or Create Wallpaper on Galaxy Tab 10. 1
One of the elements that show the style of each person on their tablet is through the wallpaper of the device. Although you support high quality wallpapers, they are not popular because they are too popular and anyone who owns a Galaxy Tab 10. 1 can use it.
Here's how to change the wallpaper or even create your own wallpaper.
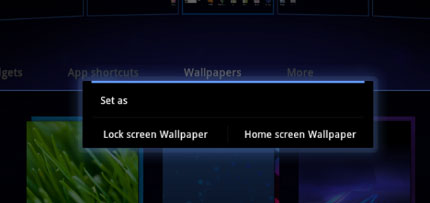 You also need to select the desktop and standby screen
Step 2: Select the wallpaper you want to use. These images will move behind the main screen. Meanwhile, the old background image remains the same. In addition, you will also need to choose between standby screen and wallpaper.
Step 3: If you cannot find the image you want, you can access the Android Market and select the appropriate wallpaper.
 You can freely express your style
Note: You should pay attention to choosing the wallpaper on Android Market, although advertised as having support for tablets but there are also many images that are incompatible with your device making them stretched or distorted. .
Step 4: Use the selected background image and you can freely express your own style.
How to Use the "Build-in Task Manager" Function on Tab 10. 1
When it comes to Android, the battery power saving theme is always the most concerned topic, which is why so many people use the "Task manager" function to manage running apps, this They can easily turn off unnecessary apps.
In addition to searching for a quality program that is not guaranteed on the network, why not try using a program offered by Samsung Android. Here are the guidelines that we can manage more effectively:
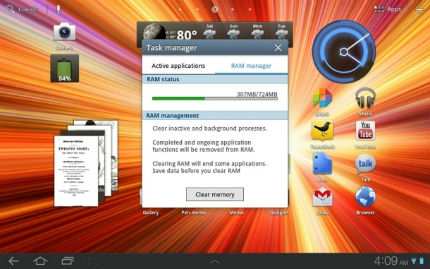 Freeing up RAM can turn off some apps
Access Task Manager Without Widget
Select and hold the Home icon at the bottom of the screen until the Task manager window appears. You can turn off all active apps or manage your device's RAM by displaying the amount of RAM being used on the total RAM.
Adjusting the amount of RAM being used can turn off some of the main apps so you have to be very careful.
Bringing the Management Program to the Computer's Desktop
Step 1: Select the icon (+) in the upper right corner of the screen and then select an empty spot on the desktop.
Step 2: Select the Wiget Tab in the next screen that appears.
Step 3: Find the Wigets that are considered the management program in the list.
Step 4: Drag these WIget out of your device's desktop.
Step 5: Drag and drop these Wigets to a convenient place to use on the desktop.
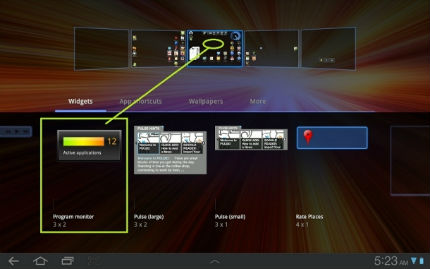 Choose suitable Wigets
When necessary, apps can be easily terminated to free up RAM for other needs.
How to Take a Screenshot of the Galaxy Tab 10. 1
Tab Galaxy 10. 1 is one of the few tablets that supports screen capture. Here's how you can use these images without connecting to other devices.
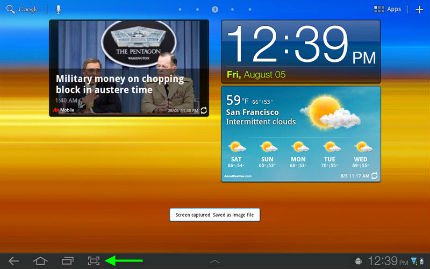 Screen capture icon of Tab Galaxy 10. 1
Step 1: In the Taskbar, you will see a screen capture icon next to the recently used apps icons. Clicking on this icon will allow you to take a screenshot and you may see a popup window pop up indicating that the screenshot has been saved.
Step 2: To find these pictures again, select "My files"
Step 3: Drag the scroll bar and select the folder named "ScreenCaprure".
Step 4: Select the photo you want to share then select the share icon on the right corner of the screen.
Step 5: Choose the method you want to share the photo with.
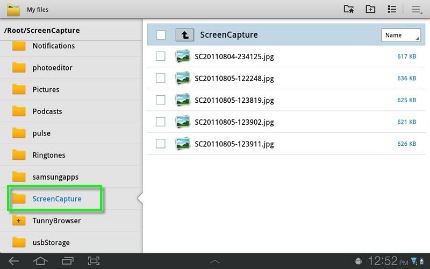 You can find photos in the ScreenCapture folder
And you can share screenshots without having to connect more with any device.
FAQ
What should I check before following these steps?
Confirm device and software compatibility, save important data, and make sure you have the required permissions, files, and account access.
Why might the process not work?
Common causes include outdated software, missing permissions, incompatible hardware, an unstable connection, or completing a step in the wrong order.
Can I undo the changes if necessary?
That depends on the tool or setting. Use built-in restore options when available, keep a backup, and record the original configuration first.
Related Articles
 Tips for Using Galaxy Tab 10. 1 (Part 1)6 minutes read
 Some Useful Tips to Take Advantage of Features on Galaxy S7 (P2)7 minutes read
 Summarize Interesting Tips on Galaxy S9 Users Should Not Ignore10 minutes read
 Some Useful Tips to Take Advantage of Features on Galaxy S7 (P1)8 minutes read
 Just Bought Galaxy S20? Here Are Some Tips You Need to Know to8 minutes read
 How to Fix Samsung Galaxy S8 to Restart Automatically6 minutes read
Reader Comments 0
Sign in with email or Google to join the discussion.