The secret to skin beauty in Photoshop
Everyone must be startled when comparing the bride and groom photo album with ... real people because the editor has made the skin white, no acne and wrinkles with some easy-to-implement tools .
Surely everyone is "startled" when comparing the bride and groom photo album with . real people because the editor has made the skin white, no acne and wrinkles with some easy tools perform.
 The first is the step to remove melasma, bruises, acne . If the skin suffers from the above disadvantages, you need to remove them first. On the Photoshop window download the image to be edited. You'll use the Healing Brush Tool to do this.
- Open a new layer on the Photoshop window by going to the Windows menu> Layers . The Layers panel appears, click the Create a new layer button. Rename this layer to Vetnam (burnt trace) for example by double-clicking the visible Layer 1 line.
- Click the Healing Brush Tool on the vertical menu bar.
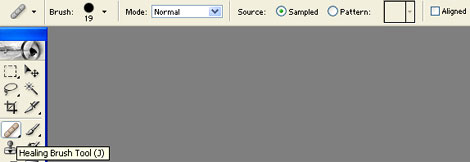
 The black dot and the number 19 indicate the size of this "broom", if the selection is small, choose a lower number. This tool works according to the principle of taking color (source) right on the image (choose Sampled) or another available pattern (Pattern) to apply to the area to be applied.
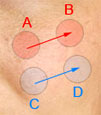
Selecting Aligned allows you to continue painting the source area when clicking multiple times. For example, using C (source color) to erase acne in A, Photoshop will remember the distance and angle from A to C. If you want to remove acne at B, the color source D will be covered with B (at the same angle, same distance ). This option is suitable for small selections.
- Click on the small black triangle to display the parameter table, select the following:

Item Hardness to 0% because it needs to create softness when editing.
- Select the original skin model by pressing the Alt key and pressing the left mouse button. Then, press or move the left mouse button to remove the bruise. Note that the nearest skin area should be chosen as the base color for the same smooth brightness.
Next is the skin smoothing step with the following steps:
- Create a new layer above the Vetnam layer, name it Lamminda.
- Press Ctrl_Alt_Shift_E key combination to combine existing layers in this Lamminda layer window.
- Go to menu Filter > Noise > Median . Leave the pixel number so high that you feel the skin is smoothed and click OK .
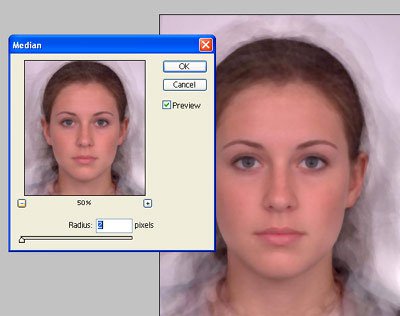
After smoothing the skin, you will see the details become more blurry. However, eyes, nose, mouth . need to sharpen as follows:
- On the layer window, click the Add layer mask button to add a "mask" to the image.
- Press D to white foreground color (foreground), black background color (background).
 - Press X to swap colors back and forth between foreground and background.
- Select the Brush Tool on the vertical menu.
Adjust this Tool 's parameter to 50 pixels; hardness is 100%.
- Make sure to activate layer mask, not photos. Identification signs: there is a double border frame and a square mask with a round button.
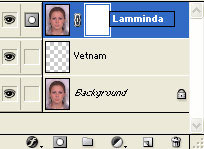
- Press the key to enter Quick Mask. The goal of Quick Mask is to hide the blurred parts, which need to be sharpened. Reducing details like eyes, nose, eyebrows, lips . in detail.
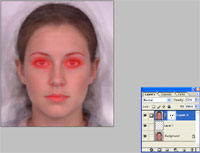
- Click to exit Quick Mask, right-click the Quick Mask window (double-border frame), select Apply Layer Mask to finish the job.
Note while redoing the details:
- Always resize the brush so that it doesn't spread to other areas. Can be resized by shortcut: [ to reduce and ] to increase. Sharpness increases by pressing Shift and], decreasing by pressing Shifft and [ .
- Large area with 100% hardness. Small area only to 0%.
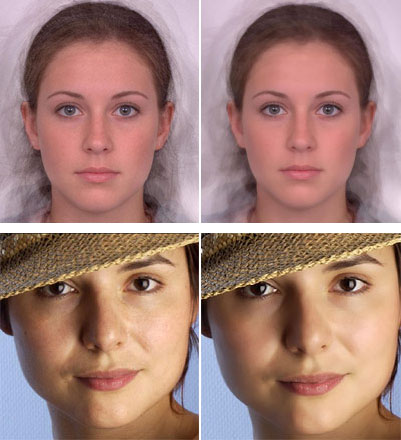
- How to smooth skin with Photoshop
- 5 bad habits make your hands older than your face to 10 years old
- Learn the secrets of beautiful Japanese girls' body care and beauty
- 14 beautiful tips or you will wish to price as much as you know sooner
- Understand the benefits and use of vitamin C for skin care
- 'Color magic' from the technology of beauty treatment


 How to create clipping mask in GIMP
  How to create spherical images in GIMP
  How to sign a document with GIMP
  How to create movie posters in GIMP
  How to Color Inside the Lines in FireAlpaca
  How to swap and combine faces in GIMP