Steps to enable security features on Microsoft 365
Microsoft 365 has come a long way when it comes to security. Previously rudimentary security systems can now offer features such as automatic scanning of email attachments, protection against phishing and ransomware.
Users with the Microsoft 365 Business plan get even more advanced security features at their disposal. However, most features must be activated manually. Here's how to make sure Microsoft 365 is secure in use.
How to set up multi-factor authentication
Multi-factor authentication (MFA) is by far one of the easiest and most effective ways to secure your Microsoft 365 account. It basically means that whenever you log in, you will be asked to enter a code received via SMS or through an authenticator app on your phone.
So even if your password is compromised, no one can access your account unless they have the authentication code.
To take advantage of MFA, it needs to be enabled through the Microsoft 365 Admin Center and can only be done by the administrator of your organization or business.
How to enable MFA using Microsoft 365 Admin Center
1. Open Microsoft 365 Admin Center and sign in.
Step 2. On the navigation bar towards the left, click Show All and go to Admin centers > Azure Active Directory .
Step 3. In the Azure Active Directory admin center , click Azure Active Directory again .
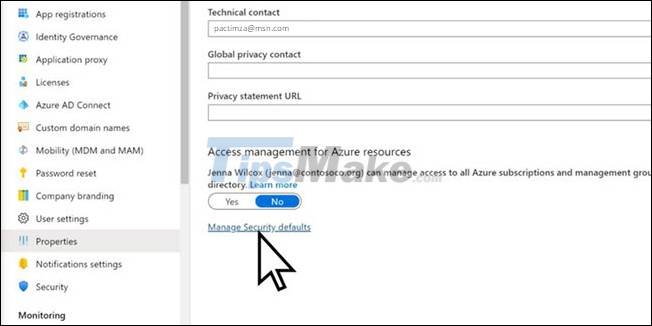
Step 4. On the navigation bar, scroll down and click Properties.
Step 5. At the bottom of the page, find and click Manage Security Defaults .
Step 6. Change the slider to Yes and then click Save.
After enabling security default features, MFA is automatically enabled for all users.
The next step is to set up a Microsoft 365 account for MFA, which means deciding if you will use SMS or an authenticator app to receive your code.
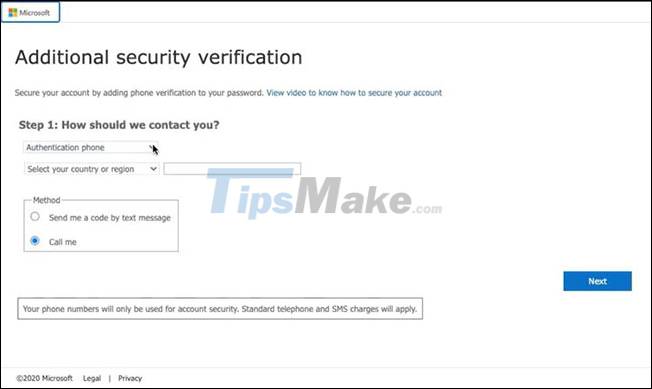
Step 1. Once MFA is enabled, sign in to your Microsoft 365 account as usual.
Step 2. When you click Sign In , you will get a prompt asking for more information. Click Next.
Step 3. Now, you will be asked to choose an authentication method. Choose whichever works for you and go to Save.
How to enable anti-malware in Microsoft 365
Another great security feature in Microsoft 365 is anti-malware. This feature automatically blocks certain types of attachments from running in Outlook. This is important because your computer can be easily hacked using attachments infected with malware.
Attachments typically end in .js, .exe or .bat, all of which are blocked when you turn on anti-malware protection.
To use this feature, simply visit the Microsoft 365 Admin Center:
Step 1. In the navigation bar on the left, click Show More .
Step 2. Now, click on Admin Centers > Security & Compliance .
Step 3. Then, select Threat Management > Policy .
Step 4. On the Policy dashboard , click Anti-malware.
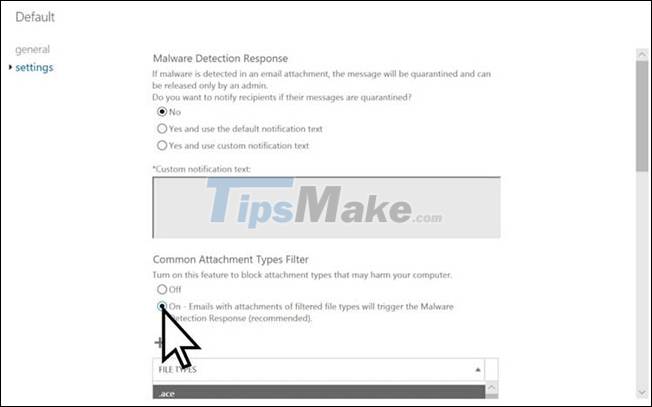
Step 5. Double-click Default to open the default policy.
Step 6. Click Settings and under Common Attachments Type Filter , click the On button .
Step 7. Click Save.
This will prevent you from receiving and sending the file types listed in the window.
You can also choose to receive notifications whenever an attachment is blocked. In addition, you can also choose whether the sender is notified of blocked attachments.
How to customize anti-phishing in Microsoft 365
Phishing is one of the most common ways to infect computers. In a Phishing attack, the email or file is designed to look like it's from a trusted or familiar source, but instead it tries to collect confidential data. This includes usernames, passwords, and credit card numbers. In fact, there are many types of Phishing attacks that you need to be aware of.
Although Microsoft claims that Microsoft 365 has built-in anti-Phishing protection, there are quite a few settings that you will have to enable manually to take full advantage of it.
To customize anti-Phishing options, do the following:
Step 1. Go to Microsoft 365 Admin Center .
Step 2. In the navigation bar on the left, under Admin centers , click Security.
Step 3. Now, expand Threat Management and click Policy.
Step 4. On the Policy panel , select ATP anti-phishing .
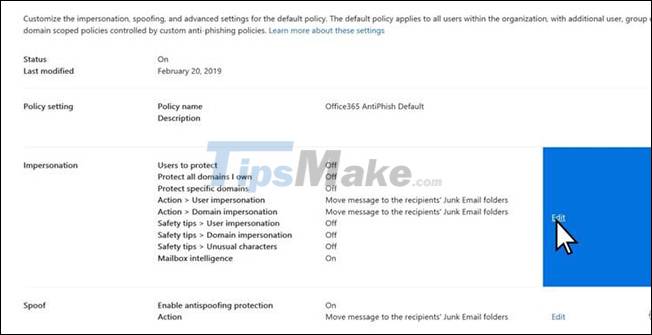
Step 5. In the Anti-phishing window , click Default policy .
Step 6. In the Impersonation section , click Edit.
Step 7. On the navigation bar, you can select Add users to protect or Add domains to protect .
Step 8. You should click Add domains to protect , then enable Automatically include the domains I own .
Step 9. In the navigation bar, click Action.
Step 10. Choose what Microsoft 365 should do when it detects email sent by an impersonated user or domain.
Step 11. Now click on Mailbox intelligence in the navigation bar and make sure the toggle is on.
Step 12. Click Review your settings and then select Save.
After enabling these settings, your Microsoft 365 account will be better protected against phishing emails.
How to enable Smart Lockout in Microsoft 365
Smart Lockout prevents users from logging in after multiple failed attempts. Simply put, if you enter your password incorrectly a specific number of times, you will be banned from logging in for a fixed period of time.
The lock time increases proportionally to the number of login attempts with an invalid password. This is useful when hackers try to use brute force techniques to hack user accounts. However, due to the way Smart Lockout works, if the same bad password is entered multiple times, the account will not be locked.
The Smart Lockout feature can be enabled through Azure Active Directory. You should keep in mind that this feature requires you and other users to have an Azure AD P1 license or higher.
Step 1. Go to Azure portal and login with admin credentials.
Step 2. Expand the navigation bar on the left and click Azure Active Directory .
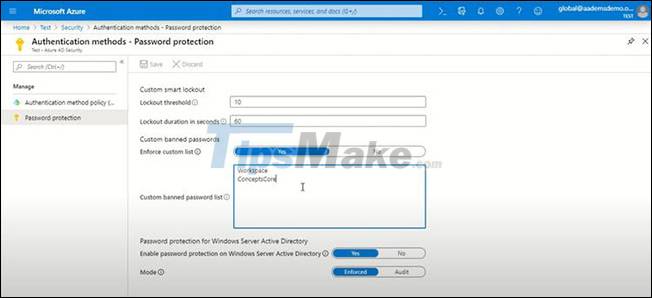
Step 3. Now click Security and navigate to Authentication methods > Password protection .
Step 4. Here you can set the Lockout threshold which will determine the number of failed login attempts before Smart Lockout is activated.
Step 5. Set Lockout duration in seconds to define Smart Lockout duration.
Step 6. Click Save and exit.
Hope you are succesful.
- How to enable Site Isolation security feature on Chrome
- Enable PUA protection in Windows 10 to prevent the installation of potentially unwanted software
- How to enable / disable the Security tab of files and folders on Windows?
- Link to download Microsoft Security Essentials 4.10.0209.0
- How to enable Local Security Authority (LSA) protection in Windows 11
- Why is encryption a must-enable Windows security feature?
- Search and activate hidden features in Windows 10 with Mach2 tool
- Enable security Click to Play Plugins on all browsers
- Tips for using Microsoft Office to increase work efficiency
- Some features in Microsoft Office will stop working if not updated.
- Microsoft 365 is about to disable outdated file access authentication protocols
- Microsoft quietly extends support for M365 apps on Windows 10
- 8 Cheapest Cloud Storage Providers
- Why upgrading to Microsoft 365 might not be worth it?
- Microsoft Defender VPN will stop rolling out to Microsoft 365 subscribers
- Microsoft 365 Android PDF Viewer shows ads, even with subscription
- Why use LibreOffice instead of Microsoft 365?
- New phishing tool targets Microsoft 365 and Gmail accounts


-
 How to use Zperiod to automatically balance chemical equations.
-
How to center a table in Google Docs
-
How do I use the Learn Step by Step mode in Perplexity?
-
Instructions on connecting Gmail to n8n via Google Cloud Console
-
Instructions on how to fill in PDF files on iPhone using PDFgear
-
Instructions on installing and using Yenka to simulate science experiments.
 How to use Zperiod to automatically balance chemical equations.
 How to center a table in Google Docs
 How do I use the Learn Step by Step mode in Perplexity?
 Instructions on connecting Gmail to n8n via Google Cloud Console
 Instructions on how to fill in PDF files on iPhone using PDFgear
 Instructions on installing and using Yenka to simulate science experiments.
-
Application
-
Web Email
-
Website - Blog
-
Web browser
-
Support Download - Upload
-
Software conversion
-
Social Network
-
Simulator software
-
Online payment
-
Office information
-
Music Software
-
Map and Positioning
-
Installation - Uninstall
-
Graphic design
-
Free - Discount
-
Email reader
-
Edit video
-
Edit photo
-
Compress and Decompress
-
Chat, Text, Call
-
Archive - Share
-
-
System
-
Mac OS X
-
Hardware
-
Game
-
Tech info
-
Technology
-
Science
-
Life
-
Electric
-
Program
-
Mobile