Single sign-on VPN with Windows 7
In this article, I will show you how to use Windows 7 to log in to the domain using a single sign-on mechanism via a virtual private network connection.
Table of Contents
TipsMake.com - In this article we will show you how to use Windows 7 to log in to the domain using a single sign-on mechanism via a virtual private network connection .
VPN configuration Single Sign On in Windows 7
Let's start with a computer that has Windows 7 installed and has not joined the domain. First, log in with local administrative certificates on the computer.

Figure 1: Step 1 of the VPN configuration Single Sign On on Windows 7
Once you have logged in to the Windows desktop, open the Network and Sharing Center . The next step is to create a VPN connection, starting by clicking the Set Up A New Connection Or Network link .

Figure 2: Step 2 of the VPN configuration Single Sign On on Windows 7
In Set Up A Connection Or Network wizard, click the Connect To A Workplace option . If a computer user is using a dial-up modem instead of a VPN over the Internet, select the fourth option on this wizard page and continue the following steps.
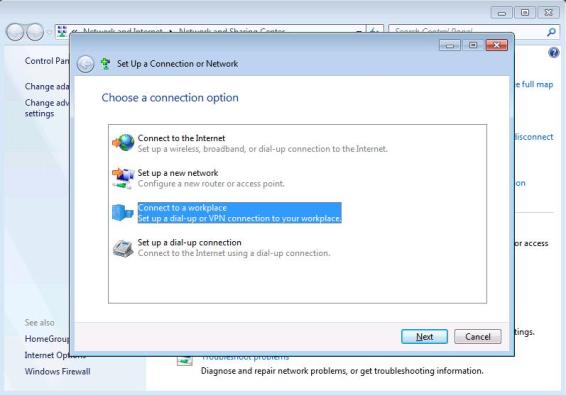
Figure 3: Step 3 of the VPN configuration Single Sign On on Windows 7
In Connect To A Workplace wizard, click the Use My Internet Connection (VPN) option :

Figure 4: Step 4 of the VPN configuration Single Sign On on Windows 7
On the next page, specify the address of the FQDN or IP for the VPN server that the user will use to connect to the corporate network, type the connection name as shown below. In addition, you must check the Allow Other People To Use This Connection check box. If a computer user uses a smart card to log in, select the Use A Smart Card check box. Finally, if the computer you are configuring is not currently connected to the Internet, you can select the Don't Connect option to establish a new VPN connection but will not initialize it until later.

Figure 5: Step 5 of the VPN configuration Single Sign On on Windows 7
On the next page, enter the certificates that will be used to log in to the domain.
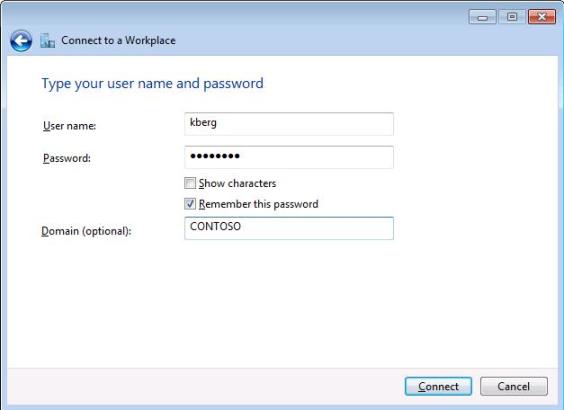
Figure 6: Step 6 of the VPN configuration Single Sign On on Windows 7
Finish the wizard to set up a new VPN connection. Once done, the user can click the Network icon in the notification area of the taskbar, when a popup window will appear and show the newly created VPN connection:

Figure 7: Verifying the VPN connection
To complete this setup, it is necessary to join the computer that is configured to the domain. If the computer is in the office, this can be done by connecting the computer to the LAN, clicking Start , right-clicking Computer to open the System Control Panel. Then click Change Settings and join the domain. If the computer is somewhere outside the office, such as in a hotel, you need to use the LAN connection in the hotel or nearby wireless network to access the Internet, then click the Network icon in the notification area, Click My VPN Connection in the window that appears, click the Connect button, provide domain certificates when prompted, set up a VPN connection to the corporate network, and then log in to the desktop and join the computer to the domain.
Sign in with VPN SSO
Now if you're out of the office and need to access corporate intranet resources through a VPN connection, simply turn on your computer and wait until the login screen appears:

Figure 8: Step 1 of the process of logging in with VPN SSO
Then press Ctrl + Alt + Del and the login screen appears as below:

Figure 9: Step 2 in the process of logging in with VPN SSO
Instead of typing in the password, click the Switch User button and the blue button appears in the lower right corner of the screen. See this button in the picture below, if you hover over this button, the words " Network Logon " will appear:

Figure 10: Step 3 in the process of logging in with VPN SSO
Click the blue Network Logon button on the new login screen called My VPN Connection . Now you can use the username and password to login:

Figure 11: Step 4 of logging in with VPN SSO
After logging in, press Enter , a dialog box will appear indicating that the VPN connection is being set up for the remote network:

Figure 12: VPN connection is being established
When the VPN connection is established, the specified certificates are automatically used for the login on the desktop.
Conclude
In this article, we have shown you how to set up Windows 7 so that mobile users only need to enter certificates once when setting up a VPN connection with the corporate network and then logging in to the machine. their calculation. The unique Single Sign On VPN feature included in Windows 7 is a very useful feature that can save costs for the company because it does not have to buy third-party VPN client software for this purpose.
Was this article helpful?
Your feedback helps us improve.
Related Articles
 Don't complain about why you're single, this is the answer for you5 minutes read
 How to Sign Out of Windows 103 minutes read
 Secure your Windows Live account with Sign-in3 minutes read
 How to fix 'We can't sign into your account' error on Windows 103 minutes read
 The future of Access and Identity Management (IAM), a field that is extremely important on the Internet5 minutes read
 How to enable or disable Secure Sign-In on Windows 105 minutes read
Reader Comments 0
Sign in with email or Google to join the discussion.