Setting up and connecting Remote Desktop in Windows 7
Microsoft's Remote Desktop Manager feature in Windows 7 can easily allow users to connect from one computer to another in the same network, and share documents, documents . In the article below, We will show you a few basic steps in the process of setting up and using this feature in Windows 7.
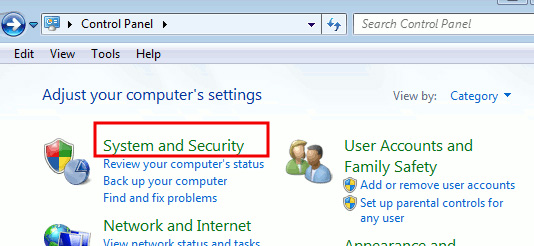
First, select Start> Control Panel> User Accounts> System & Security:
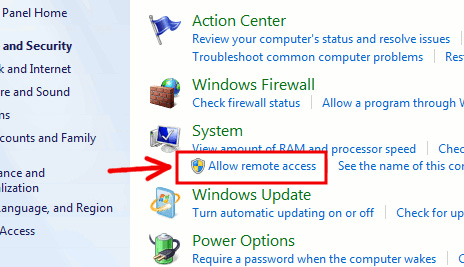
In the System section, select the Allow Remote Access tab as shown below:
Once we have enabled Remote Desktop feature, we will have 2 options:
- Choose Allow connections from computers running the version of Remote Desktop and click Apply , suitable for the case where you have multiple Remote Desktop enabled.
- If only one Remote Desktop version is active, select Allow connections only from computers running Remote Desktop with Network Level Authentication .
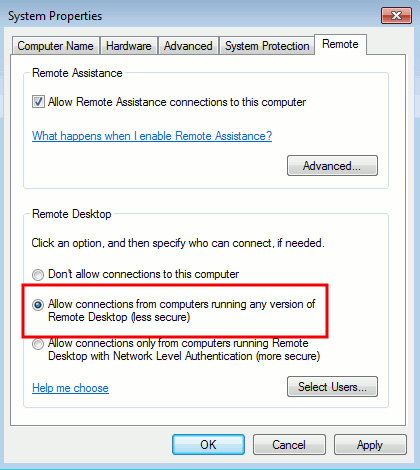
Then click Select Users and Add :

Next, select the user account that is allowed to connect to the Remote Manager by clicking Advanced> Find Now, the drop down list will be displayed for selection, including user accounts, computer names or domains. After selecting, click OK:

Click OK 3 times to apply the change and exit all windows, then move on to the next step. If you want to remove Remote Desktop access from certain accounts, do the same thing as above, but this time we click Remove .
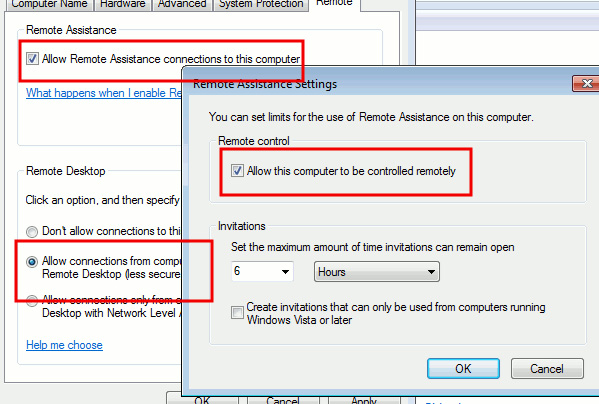
For other computers, when they want to connect, they must have permission to access. And to set it up, open Start> Control Panel> System> Advanced System Settings , select the Remote tab and check the Allow Remote Assistance connections to this computer box. At the bottom of the window, select Allow connections from computers running any version of Remote Desktop and finally, click the Advance button to open another window, where we will select Allow this computer to be controlled as shown below and click OK :
However, before you can connect to the Remote Computer, you need to configure and change the technical information of the Router and the Firewall system in the operating system:
- Connecting via router to a single computer, you need to change Port Forwarding function to allow connection ports on 3389, then enter the IP address provided by ISP.
- Connect to many different computers via the router, for each computer you want to connect to, you need to set up different Port numbers to avoid conflicts.
- If there is a firewall, we will have to change it to allow the signal to connect to the port that is being opened on the router.
When you have completed the above steps, the rest of us are just using the Windows Remote Desktop Connection utility (open Start and type remote to search), the window as shown below will show:
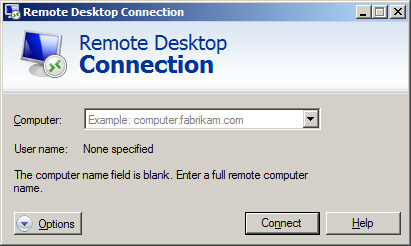
Enter the computer name, IP address or domain to connect to, click Connect and enter the required information at the next display window. Good luck!
You should read it
- ★ How to Hear Audio from the Remote PC when Using Remote Desktop
- ★ 10 ways to open the Remote Desktop Connection tool in Windows 11
- ★ Remote Desktop controls other computers in the LAN
- ★ Install Remote Desktop Web Connection on Windows XP
- ★ Instructions for activating and using Remote Desktop on Windows 10 computers