Run remote Linux workstation in Windows
I recently introduced you to a remote connection to Windows 7 desktop from a Linux computer, and in this article we will show you how to do the opposite.
You may think that this is a rather complicated issue, but we are confident that after reading through this tutorial, everything will be simple for you. However, you may first ask yourself 'Why do I need this?'. This is a matter of governance. How many times have you had to run back and forth, waste time and waste a lot of time to solve a problem on computers. In the previous post, we showed you how to remotely connect to Windows 7 workstation from Linux, and in this article, with instructions on how to run the Linux workstation in Windows, we are sure that you will have it Everything needed to administer from a central location is easier.
Assumptions
First we will assume that both Windows and Linux workstations are working well and that both are connected on the same LAN. For simplicity, we will use the IP address 192.168.1.x. And obviously it will be easier (in this case), the IP addresses will be static addresses (otherwise you will have to find the IP address for your workstations).
Software used
Only two software need to be used:
- x11vnc: Installed on a Linux computer for use as a VNC server.
- TightVNC: Installed on a Windows computer for use as a VNC client
The installation of Windows software takes place quite simply. You just need to download the installer and double click on them. However for many Windows users, installing Linux software may not be so easy.
Obviously, Linux installation will depend on what your distribution is. But basically, all you need to do is follow these steps:
- Open Add / Remove Software tools (such as ynaptic, Ubuntu Software Center, gnome-packagekit, .).
- Search for 'x11vnc ' (without quotes).
- Select the installation result.
- Click Apply to install.
If you are more comfortable with the command line, you can install Linux software as follows:
- Open a terminal window
- Type in the command line command sudo apt-get install x11vnc (this command will depend on the distribution you use).
When all software is installed, go to the next step.
Linux side
On the Linux side is quite easy. All you need to do is launch the x11vnc server. If you look at the instructions page for x11vnc (issue man x11vnc command) you will see some options for the server. One of the options that you should consider is -forever . If you do not add this option to the command, your x11vnc server will " die " as soon as the client exits the session.
So the command you need to run from the terminal is:
x11vnc -forever
You will not see the prompt again, even if you add the & character , x11vnc will not return a prompt to you. Because of this problem, you should add a line like x11vnc -forever to the end of your /etc/rc.local file. This will ensure your x11vnc server will run at startup.
Windows side
This is the time of connection. You have installed TightVNC on your Windows machine, so go to the Start menu and launch TightVNC. You will now see a small window (as shown in Figure A), which allows you to enter the connection address as well as enable the Options window.

Figure A: Select the Connection Profile that best suits your connection type
In the Options window (Figure B), there are several items you need to configure. Unless you need a configuration, leave the default options.
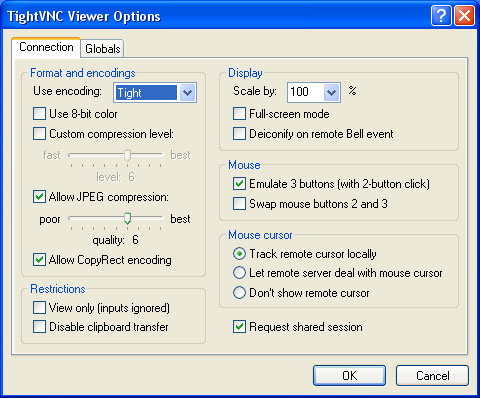
Figure B: You can set TightVNC in View mode, which is an effective mode to connect the client to a non-interactive session.Good for training purposes.
After completing the configuration step, click the Connect button and the connection will be executed (Figure C). The speed of TightVNC will run depending on your network speed.
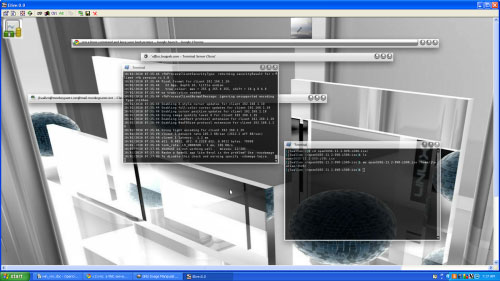
Figure C: Select options and create a connection
Conclude
- VMware Workstation Player - Download VMware Workstation Player
- Compare VMware Workstation Pro and VMware Workstation Player
- Configure Windows Remote Desktop from the command line
- What is a workstation? What is a Workstation workstation that is different from a regular computer?
- 7 ways to run Linux software on Windows
- 5 best remote desktop applications for Linux to access remote computers
- 6 best Linux distributions for Windows users
- Remotely connect to Windows 7 desktop from Linux computer
- What is a workstation laptop? How is a workstation laptop different from a regular laptop?
- Top 7 best workstation laptops 2020
- Newelle: AI assistant makes Linux desktops smarter.
- Want to try Linux? Installing Ubuntu or Fedora is enough for beginners.
- Linux on the Desktop: Still Not Booming Despite Continuous Wins
- 6 best Linux desktop environments in 2024
- 6 best Linux desktop environments in 2022
- 5 reasons to use Linux desktop instead of WSL
- 5 major developments in Linux desktop in 2022
- Microsoft finds a bug that leads to a 'blue screen' on windows 11
- How to check the desktop environment you are using on Linux
- Shared 11 tricks on window 10
-
 Why are many people abandoning Windows to switch to a combination of Linux and macOS?
-
Tips for playing games on a Linux desktop
-
4 Fedora-based Linux distributions that are even better than Fedora.
-
Stop choosing between Windows and Linux — dual booting offers more benefits than you think.
-
3 Linux 'battles' that shaped the operating system you use today
-
3 hidden Linux features that will save you hours every week.
 Why are many people abandoning Windows to switch to a combination of Linux and macOS?
 Tips for playing games on a Linux desktop
 4 Fedora-based Linux distributions that are even better than Fedora.
 Stop choosing between Windows and Linux — dual booting offers more benefits than you think.
 3 Linux 'battles' that shaped the operating system you use today
 3 hidden Linux features that will save you hours every week.