Remote access: OS X included tools
Network Administration - Both OS X 10.5 and 10.6 have a powerful Screen Sharing program. This is a program that allows users to access other 10.5 and 10.6 systems, it is backwards compatible with VNC (virtual network computing) protocols. However, if it's just me, the program is not good at making connections over the Internet; It is best for connecting to computers using the same router, by Bonjour.
Paired with Back to My Mac, Screen Sharing becomes much more powerful - just the computers you want to connect to are under your personal control. That's because Back to My Mac requires a MobileMe account, and every computer you want to use must be logged into the same account.
In addition to being built into OS X, Screen Sharing also has the ability to manage multiple monitors in a pretty good way. The installation is also relatively fast and simple. If you enable File Sharing on the remote system, you can transfer files through the same connection.
The biggest drawback of OS X's tools is that they require MobileMe registration. Back to My Mac is also quite picky for routers it can work with. Unlike other remote access options, they do not allow you to choose a low resolution remote screen (low bandwidth mode); however, you can enable compression options, which can reduce the required bandwidth and image quality.
Setting
Assuming you already have such an account, activate Back to My Mac in the MobileMe preference window. In the Back to My Mac tab, click Start to activate the service; A blue dot will appear when successfully registering your computer with MobileMe servers. On systems you want to access remotely, you also need to enable Screen Sharing in the Sharing preference window.
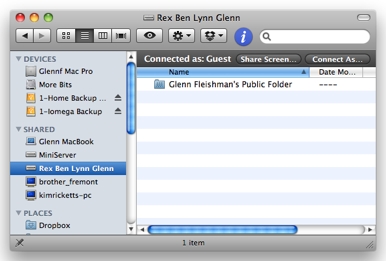
When active, any remote computer registered for the same MobileMe account will appear in the Shared section of the Finder sidebar. The Finder combines computers available via Bonjour on the local network and through Back to My Mac on the Internet in the same list.

In its sidebar, the Finder will show you a list of available computers. Selecting one of those computers with Screen Sharing turned on, then you will see the Share Screen button.
To access one of these computers, select it from the Sidebar list, then click the Share Screen button. (The upper right corner of the Finder window, but in the Column view it is located below the computer icon). You will then be able to control the screen of the remote system. If you don't see Share Screen as an option, the screen-sharing service may not be enabled on that remote system or there is a problem with the network connection.
When you click Share Screen , the Screen Sharing program will launch and a connection will be made. If the remote system has the same username and password with the computer that made the connection, you may not be prompted to login. In all other cases, you will be asked to enter a valid username and password for the remote computer. (You can save them in Keychain for future connections).
With a successful session open, you will have useful options.
Enlarge. You can shrink a remote screen (or set of screens) to match the open sharing window by selecting View> Turn Scaling On , or clicking the Scaling button in the Screen Sharing toolbar.
Quality. You can conserve bandwidth by choosing View> Adaptive Quality . This allows for screen compression, depending on the speed of the connection and how often updates are made. Another option, Full Quality , uses more bandwidth but retains honesty.
Screen If the remote system has two screens attached, you can use the View menu or pop-up on the toolbar to select which screen will display or all the screens displayed.
Send or receive Clipboard. Options Edit -> Get Clipboard and Edit -> Send Clipboard allows you to exchange the contents of local and remote clipboard.
Snow Leopard's Screen Sharing version has improved more than Leopard by capturing all the shortcuts as part of the remote session; in Leopard, pressing Command-Tab will rotate programs on the local computer, taking care not to perform rotation on the remote computer.
Troubleshoot
If Back to My Mac does not work, you can open the Back to My Mac tab in the MobileMe preference window. If you see the connection status has a green dot, click Stop, then wait a bit and click Start again. This will fix the problem for you. (Note that clicking Stop will disconnect the attached drives or remote network shares using Back to My Mac).