Network basics: Part 13 - Creating groups
In the previous article of this series, I showed you how to use Active Directory Users and Computers console to create and manage user accounts. In this section, we want to continue introducing you to groups..
Brien M. Posey
In the previous article of this series, I showed you how to use Active Directory Users and Computers console to create and manage user accounts. In this section, we want to continue introducing you to groups.
In a domain environment, user accounts are essential. User accounts allow a user to be distinguished from other users on the network. This means you can fully check the user's online actions and also give the user account a set of permissions, assign the user a unique email address, and get all other necessities of each person.
Our advice is that even if you manage a very small network, you should handle this small network as if it is a large network, because you will not know if your network will expand into a large network when Come on. Using good management technologies right from the start will help you avoid future nightmares.
We have seen the consequences of fast and undesirable development for real-world networks. About 15 years ago, the author of this article was hired as a network administrator for an insurance company. At that time, this network was very small. It only has a number of connected workstations. The person who was responsible for the network did not have much IT experience before and was fired. Without an IT platform, without a good understanding, he has configured the network so that all configuration settings exist for all basic users.
At that time, this was no problem because there were not many users and it was easy to manage different accounts and permissions. Within a year, there were over 200 computers connected to the network. This time the author has left the company for a few years but there are still thousands of people who are using a network that was originally designed to manage user units in a few dozen people.
You can imagine the feelings of network users right now. Some weaknesses begin to appear, some related to hardware performance, but almost all of the main reasons are effective management of user accounts of a limitedly established network from the beginning. . Indeed, the network has become such a mess that all user accounts have been deleted and recreated from the rubble. Obviously, the rapid growth that is not as expected can cause problems, but you may still be wondering why in the real world everything becomes so unmanageable for all talents. So much to delete them.
As we mentioned earlier, all configuration and security settings are user-based. That means that if a certain administrator asks him who has access to network resources, we will have to see the accounts to see if any user has access to that resource. When there are only a few users, this checker only needs to see if these users have access to it (only takes about 20 minutes). However, for a large network of hundreds of people, doing so will take too much effort.
The assumption that the events we described happened decades ago. When the IT industry has not grown, those events may still appear and be done normally. However, when network operating systems like before no longer exist, the lesson about those historical days still needs to be repeated.
All issues we have described can be prevented if the groups are used here. The basic idea behind these groups is, a group can consist of multiple user accounts. When the security settings are assigned at the group level, you should never assign permissions directly to the user account but instead you should assign permission to a group, then create for the user one member in those groups.
We have realized that this can be a bit complicated, so we will demonstrate this technique for you. Suppose that one of your file servers has a folder named Data , and you need to agree for a user to access this Data directory. Instead of assigning permission directly to the user, create a group.
To do that, open the Active Directory Users and Computers console . When the interface is open, right-click the Users item, select the New | command Group By doing so, you will see a screen similar to the one shown in Figure A. At a minimum, you must assign a name to a group. For ease of management, let's call this group Data , because this group will be used to protect the Data folder. Now, don't care about the scope of the group or its type settings. We will introduce these settings in the next part of this series.

Figure A: Enter the group name you are creating
Click OK , and the Data group will be added to the user list as shown in Figure B. Note that the group icon uses two heads, indicating that it is a group, a one-person symbol used for user accounts.

Figure B: Data group is added to the user list
Now double-click on the Data group, you will see the group's properties sheet. Select the Properties page tab, click the Add button. You can now add user accounts to the group. Additional accounts are group members. You can see what is in this tab through Figure C.
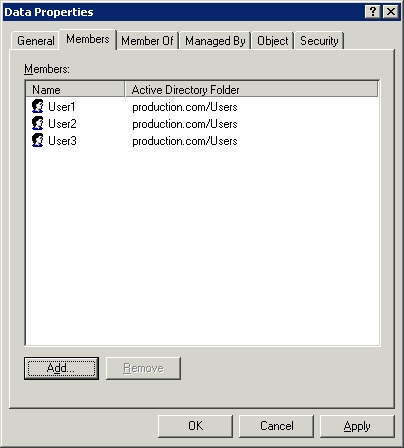
Figure C: The Members tab lists all members of the group
This is the time to bring the group to work. To do this, right-click the Data folder, select the Properties command. You will then see the folder's properties sheet appear. Go to the Security tab of this page, click the Add button. When prompted, enter the name of the created group and click OK . You can completely set a set of permissions (terms) for the group. Any terms applicable to the group are also applicable to the members of the group. You can see in Figure D, there are some permissions that apply to the directory by default. It is best to remove these permissions (Users group) from the access control list to prevent clause conflicts.
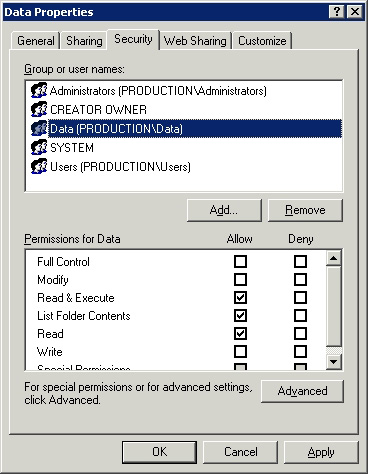
Figure D: Data group is added to the access control list of the directory
Remember that we have mentioned how much effort we have previously to find out which users have access to resources? When groups are used, the process becomes much simpler. If you need to know which users have access to the directory, see which groups have access to that folder first as shown in Figure D. Once you have identified the group that has access to the folder, who to find Having access to the directory is as simple as checking the list of group members (as shown in Figure C). Any time other users need access to the directory, add their name to the group membership list. Otherwise, you can also delete the permissions for the directory by deleting the user's name from the member list.
Conclude
In this article, I have shown you how to create security groups in a Windows Server 2003 environment. In the next part of this article series, I will continue the discussion by showing you how to choose group types. How different.