Network basics: Part 12 - User account management
In the previous part of this article series, I talked about the Active Directory Users and Computers console. Although in that section introduced how to connect to the domain selected by this interface, there is a problem
Brien M. Posey
In the previous part of this article series, I talked about the Active Directory Users and Computers console. Although that section introduced how to connect to the domain to be selected with this interface, there is one more problem that I want to mention is how to use this console in daily management tasks . In this section, we will show you some basic techniques for preserving user accounts.
Create a user account (User Account)
One of the most visible uses in Active Directory Users in the Computers console is to create new user accounts. To do so, open the entry corresponding to the domain that contains the user, select the Users item. After doing so, a detailed panel of the interface will display all existing user accounts in the domain (as shown in Figure A).
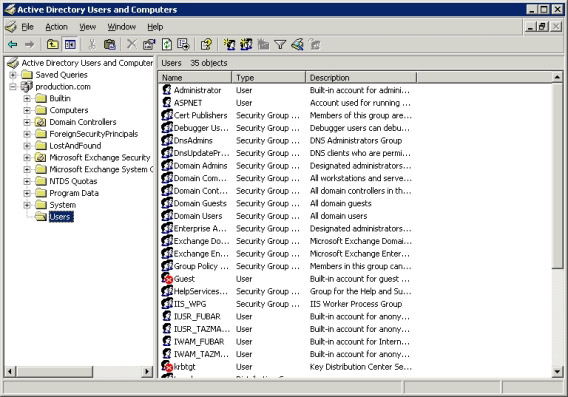
Figure A: Select the Users section, the console will display
all user accounts in the domain
Now right-click on the Users section and select New. You will then see submenus, from which this submenu can select different types of objects you can create. Technically, Users are just one item and you can include many types of objects. However, it is not good if you do save multiple objects other than user objects in the Users section. In the case of this article, select the Users command from the submenus. A dialog box will appear as shown in Figure B.

Figure B: The New Object - User dialog allows you to create new user accounts
As you can see in the picture, Windows initially only required some basic information about the user. Although this window asks many other things like names and surname, it is technically not necessary. The necessary information you need to provide is the username of the user. Although other schools are only optional, we still recommend that you fill out these fields.
The reason to fill in all of these fields is because the user account is no more than an object that will reside within Active Directory. Components like name and last name are attributes of the user object you are creating. The more attribute information is available, the more useful the information stored inside the Active Directory. After all, Active Directory is a database where you can query information. In fact, many applications work by extracting various properties from Active Directory. Once you have filled in these fields, click the Next button, and you will see the next screen that appears as shown in Figure C below.
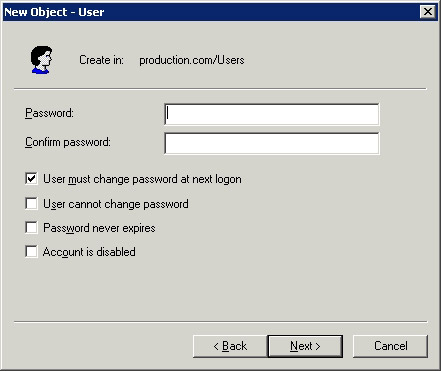
Figure C: Need to assign a password to the new account
Assigning a password is completely simple, all you need to do is type and re-enter a password. By default, users are often asked to change their password for the next login. However, you can avoid this situation by clearing the 'User Must Change Password at Next Logon' checkbox. There are also many other checkboxes that prevent users from changing all their passwords. You can optionally set an infinite duration for passwords or disable the entire account.
One thing to note is that the screen to set the above password is not all. When you assign a password to a new user account, this password must follow your company's privacy policy. If the password used does not have the necessary requirements given by the group policy applicable, this user account will not be created.
Click Next and you will see a screen that displays all the options you have selected. Confirm all the information is correct, then just click Finish and a new user account will be created.
Edit and add account properties
As mentioned above, we have seen the importance of filling different attributes when creating a new account. You can see that many screens related to creating new accounts don't really have many properties. However, the Active Directory also includes dozens of associated properties related to these users' accounts.
There are several properties that you can be very easy to use and useful. We encourage the properties that are resident that relate to basic contact information. In fact, some companies often create company directories based on information stored in this Active Directory attribute, it is still a good idea to migrate user account information in Active Directory. For example, for the purpose of restarting a server, a user still logs in to the application residing on the server. If there are user contact information stored in Active Directory, you can search the user's phone number easily and call this user to ask them to log out.
Before I show you how to set Active Directory properties, we want to emphasize that the same technique can be used for changing existing properties. For example, if a female employee is married, she can change her last name (traditionally some countries). You can use the techniques that we will introduce to change the content of the relevant required properties.
To access different user account properties, simply right-click the selected user account, then select Properties. After doing so, you will see a screen as shown in Figure D.
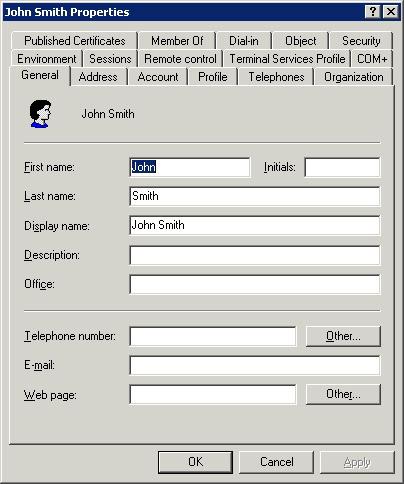
Figure D: The user property page is used to save the property
and configuration information for user accounts.
As can be seen on the image, the General tab can allow users to change the name or display name. You can also fill in (or change) some other fields like description, office, phone, email, or website. If you are interested in storing more detailed information about users, you can browse through the Address, Telephones, and Organization tabs. These tabs have all the fields for storing more detailed information about users.
Reset user password
You can see on Figure D there are many different tabs. Most of these tabs are related to security and configuration for user accounts. One component that most new admins seem to have discovered when looking at these tabs is that there is no option to reset the user's password.
If you need to reset a user's password, you must close this window. After doing that, right-click on the user account and select the Reset Password command in the right-click menu.
Conclude
In this section, we have introduced you to the process of creating a user account, setting the various Active Directory properties related to that account, and resetting the account's password. In the next part of this article series, I will continue the discussion by showing you the other Active Directory Users and Computers console capabilities.
Was this article helpful?
Your feedback helps us improve.
Related Articles
 The basics of Cisco Switch Management - Part 25 minutes read
 Network basics: Part 19 - Sharing level terms8 minutes read
 User management in Unix / Linux10 minutes read
 Network basics: Part 13 - Creating groups9 minutes read
 Guide 5 ways to delete User accounts on Windows 105 minutes read
 Network basics: Part 1 - Network hardware devices10 minutes read
Reader Comments 0
Sign in with email or Google to join the discussion.