Manually set up pictures representing Folder on Windows 10
On all operating systems, folder (Folder) is a useful file format that helps you to categorize, manage and organize files by genre, such as music, video, photos, and documents. regular version,… in an easy and convenient way.
Especially, many of you have a habit of using it as a place to store, hide important documents, study materials from abroad . and do not want to let anyone know.
But as you know, on Windows 10 operating system, there is the feature to use thumbnails of the first 2 files as thumbnails for the whole folder, which accidentally reveals the files that you want to hide in there.
So how to do this? Do not worry because in this article I will guide you how to manually set thumbnails for any folder on Windows 10!
#first. How to manually set an avatar for the Folder on Windows 10
Specifically, as shown below, I have to keep 2 files DiscordSetup.exeand MediaCreationToolin folder F in the partition of drive D: when viewing this folder outside drive D: you will see the thumbnail image of the two files themselves.
From this thumbnail image, we can also imagine what types of files are contained inside this folder, right. But as I said at the beginning of the article, this feature also exposes the files you keep in that folder.

Unfortunately, on Windows 10, there is no setting to disable this feature. Fortunately, there is a way to manually set up custom thumbnails for all folders.
Doing:
+ Step 1: How to do it is very simple, first right click on the icon of the folder you want to set your own thumbnail image => then select Properties, here I take the example of this folder F Please !
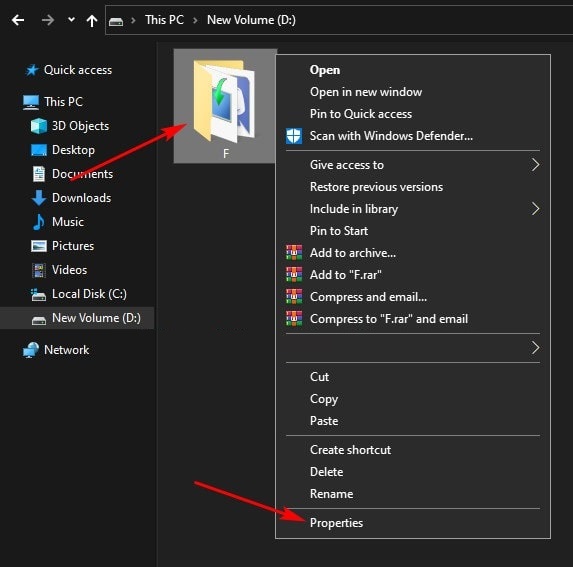
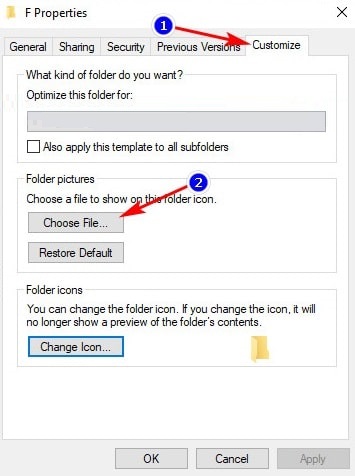
+ Step 2: In the window Propertiesof this folder, switch to tab Customize=> and click the button Choose File…in the section Folder Picturesto select the image as the thumbnail for the selected folder.
Also you can refer to the article to change the folder color on Windows 7/8 / 10, which is quite fun: V
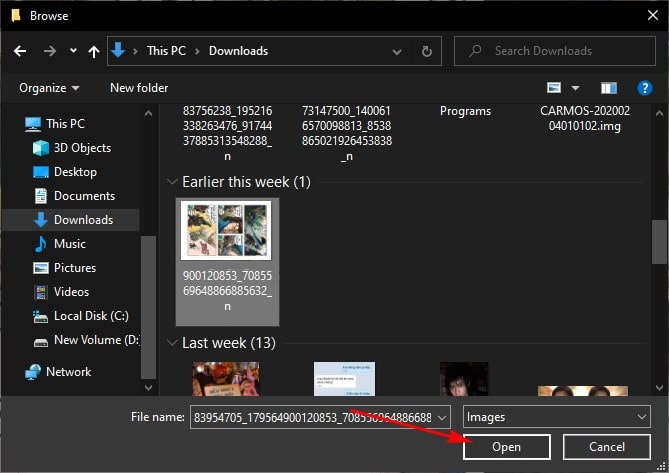
+ Step 3: Navigate to the folder containing your images, click on the image you want to set as avatar => then click Open.
The images here support all formats, so if you are concerned about the format, don't worry, usually we just use popular formats like JPG, PNG, ICO, . never mind.
I have already tried the GIF animation, it can be used but when displaying it, it is still a still image.
=> After selecting, click OKto apply the change and this setting will take effect without having to restart Windows 10 or Windows Explorer.
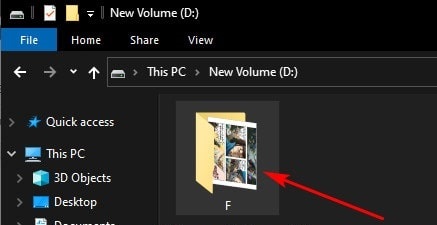
And here is the result, as you can see, the image you just selected has been applied to the thumbnail image of folder F in drive D: instead of the thumbnail image of the 2 files *.exeyou keep inside.
Plus, this thumbnail will show up even if there are no files inside the folder you placed.
#2. How to restore avatar of folder to default
And if you do not want to use the thumbnail that you set yourself, and you want to restore the thumbnail image to default then very easy, the fastest way is to copy all the files. in that folder to another folder and then delete it.
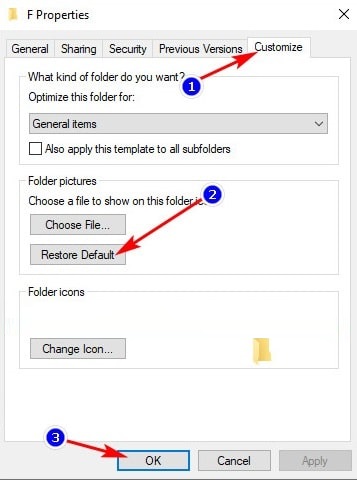
But if the files in that folder are important and large, you can also restore them by reopening the window Properties=> switch to tab Customize=> and press Restore default=> and then select OKis done.
So the process of manually setting up pictures representing folders on Windows 10 operating system has been completed. Also quite useful, right guys.