Table of Contents
Bootstrap 5 tooltips display a short text label near a button, link, or form control when the element receives hover or keyboard focus. They work well for brief supplementary hints, but should not contain information required to complete a task.
Tooltips are opt-in and depend on the Popper positioning library. Load bootstrap.bundle.min.js, which includes Popper, and initialize each tooltip with JavaScript.
Create and initialize a tooltip
Add data-bs-toggle="tooltip" and data-bs-title to an interactive element. Then create a Tooltip instance after the element exists in the document.
<button type="button"
        class="btn btn-primary"
        id="downloadButton"
        data-bs-toggle="tooltip"
        data-bs-title="Download the report as a PDF">
  Download
</button>

<script>
  const button = document.getElementById('downloadButton');

  if (button) {
    bootstrap.Tooltip.getOrCreateInstance(button);
  }
</script>
Bootstrap also accepts a standard title attribute, but data-bs-title makes the component-specific purpose explicit. A tooltip with an empty title will not appear.
Initialize every tooltip on a page
If several controls use tooltips, select all matching triggers and initialize them together:
const tooltipTriggers =
  document.querySelectorAll('[data-bs-toggle="tooltip"]');

tooltipTriggers.forEach((element) => {
  bootstrap.Tooltip.getOrCreateInstance(element);
});
Run this code after the markup has loaded. If your application later adds new tooltip triggers, initialize those new elements as well.
Set the tooltip position
Use data-bs-placement with top, right, bottom, or left. In right-to-left layouts, Bootstrap mirrors the horizontal directions.
<button type="button"
        class="btn btn-secondary"
        data-bs-toggle="tooltip"
        data-bs-placement="top"
        data-bs-title="Tooltip on top">
  Top
</button>

<button type="button"
        class="btn btn-secondary"
        data-bs-toggle="tooltip"
        data-bs-placement="bottom"
        data-bs-title="Tooltip on bottom">
  Bottom
</button>

<button type="button"
        class="btn btn-secondary"
        data-bs-toggle="tooltip"
        data-bs-placement="left"
        data-bs-title="Tooltip on the left">
  Left
</button>

<button type="button"
        class="btn btn-secondary"
        data-bs-toggle="tooltip"
        data-bs-placement="right"
        data-bs-title="Tooltip on the right">
  Right
</button>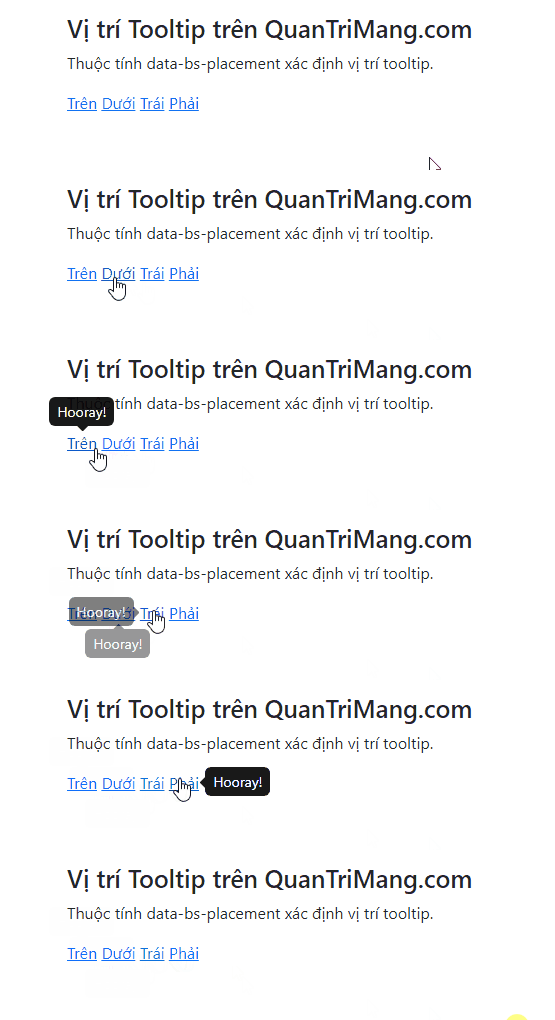
The requested direction is preferred rather than fixed. Popper can move the tooltip when there is not enough space, preventing it from being clipped at the viewport edge.
Prevent clipping in complex components
Tooltips inside responsive tables, input groups, and containers with overflow rules may be clipped. Append the generated tooltip to the document body:
const tooltip = new bootstrap.Tooltip('#downloadButton', {
  container: 'body'
});
You can also set a custom boundary in JavaScript when the tooltip must stay inside a specific part of the interface.
Add a tooltip to a disabled button
Disabled elements do not receive focus or pointer events, so they cannot trigger tooltips directly. Put the trigger attributes on a focusable wrapper:
<span class="d-inline-block"
      tabindex="0"
      data-bs-toggle="tooltip"
      data-bs-title="Select at least one file first">
  <button type="button"
          class="btn btn-primary"
          disabled>
    Upload
  </button>
</span>
An inline explanation is often clearer than a tooltip for a disabled action. Use the wrapper technique only when the reason is short and the wrapper's extra keyboard stop is justified.
Customize tooltip colors
Bootstrap 5.2 and later supports a scoped custom class. Assign it with data-bs-custom-class, then change component CSS variables:
<button type="button"
        class="btn btn-secondary"
        data-bs-toggle="tooltip"
        data-bs-custom-class="shortcut-tooltip"
        data-bs-title="Keyboard shortcut: Ctrl+S">
  Save
</button>
.shortcut-tooltip {
--bs-tooltip-bg: #0d6efd;
--bs-tooltip-color: #fff;
--bs-tooltip-max-width: 240px;
}Use HTML content cautiously
Plain text is the safest and most readable choice. Bootstrap can render allowed HTML when data-bs-html="true" is enabled, and it applies a built-in sanitizer by default. Do not insert untrusted user input as tooltip markup or weaken the sanitizer without a clear security review.
Accessibility checklist
- Attach tooltips to elements that already support keyboard focus, such as buttons and links.
- Do not use hover as the only way to reveal important information.
- Keep the text short and supplementary.
- Use a visible label when a control's purpose would otherwise be unclear; a tooltip is not a replacement for one.
- Hide a tooltip before removing its trigger element from the DOM.
- Use a popover or modal when the content needs headings, actions, or more than a brief phrase.
For a larger overlay with a title and supporting text, use a popover. If the content requires focus management or a decision, see the Bootstrap modal guide. You can test the markup in one of these free HTML editors, and consult the official Bootstrap tooltip documentation for all methods and options.
Related Articles
 Lesson 42: Large Grid in Bootstrap 54 minutes read
 Lesson 38: Grid Systems from Stacked to Horizontal in Bootstrap 54 minutes read
 Lesson 30: Flexing in Bootstrap 59 minutes read
 Lesson 15: Pagination in Bootstrap 54 minutes read
 Lesson 4: Typography in Bootstrap 512 minutes read
 Lesson 29: Utilities in Bootstrap 59 minutes read
Reader Comments 0
Sign in with email or Google to join the discussion.