Learn about the gold standard in Apple Jamf Now device management
Device management can be extremely time consuming for any group. Unmanaged devices can also threaten the entire organization..
Device management can be extremely time consuming for any group. Buying new equipment, manually executing all the settings and downloading all the required applications can be an extremely tedious process. Unmanaged devices can also threaten the entire organization.
Take a closer look at how Jamf Now (jamf.com) can streamline Apple device management in your organization.
What is Jamf Now?
Jamf Now is a management solution created specifically for Apple devices. Jamf Now is ideal for small businesses and allows you to set up, protect and manage all devices from a dashboard. Devices can be configured quickly, consistently and applications can be deployed centrally.
After a device is paired with your Jamf Now account, you can view details such as the serial number, the amount of available memory and its model. You can send the latest operating system updates to a unit or manage a group of devices using Blueprint. Jamf Now also allows you to set limits on the device to prevent users from changing certain settings. This is a very powerful feature to ensure the devices in your organization meet security needs and follow the guidelines set out.
Jamf Now can also be used to help employees retain their personal Apple ID and request assistance. For example, if an employee loses an iOS device, you can lock the device and set a custom message on the screen. Lost devices can also safely erase all remote data from within your Jamf Now account.
How does Jamf Now work?
Jamf Now works by first establishing a trust between your Jamf Now and Apple accounts (discussed in the upcoming steps). If you plan to use Jamf Now to manage your company's device, make sure you use the company's dedicated Apple ID. If you change the Apple ID paired with Jamf Now, you will need to re-register all your devices.
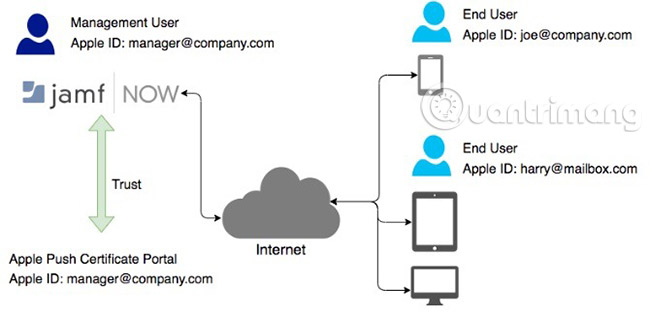
After establishing the trust, you need to add devices to your Jamf Now account so they can be managed. Jamf Now supports two management levels: Monitoring and registration. The monitored devices will be controlled at a much higher level than the registered devices only. The company's equipment is usually under Supervision supervision.
Some of the most powerful Jamf Now features require Supervision levels like:
- Restriction - Restricted (iOS)
- Lost Mode
- Activation Lock Bypass (Unlock activation)
- Wallpaper (Wallpaper)
Registered devices are often used for organizations that have a policy of Bring Your Own Device.
You may also be interested in some of the more business-oriented features like Apple Business Manager, which allows you to purchase hardware and applications in bulk, then distribute them to your entire workforce. This is not required, but you will also ask Apple ID to be associated with Apple Business Manager. Sign up for free but you will need a registered company and an email account of the organization. Yahoo account or Gmail will not work! If you require supervisory management, you must connect DEP to your Jamf Now account.
This guide will include how to set up your Jamf Now account to easily manage your device. To successfully deploy the device, you need:
- Email address to create Jamf Now account.
- Same email address to connect to the APN.
How to set up a Jamf Now account
Step 1: Set Jamf Now
Setting up Jamf Now accounts is really simple.
1. Visit Jamf Now website and create a free account.
2. Check the inbox and activate the email, then click the Activate your account link to start the setup process.
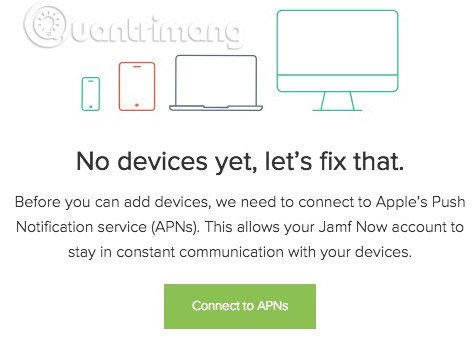
Step 2: Connect to the APN with Jamf Now
Apple's Apple Push Notification service (abbreviated as APN) is the way Jamf Now keeps in touch with all your Apple devices safely. Push notification is text messages (but not SMS) to send new information to users. When you activate and log in to your Jamf Now account, the screen will first prompt you to connect to the APN.
Pair your Jamf Now account with Apple ID in 4 steps.
1. Create a Certificate Signing Request (CSR) - request a certificate registration - from Jamf Now.
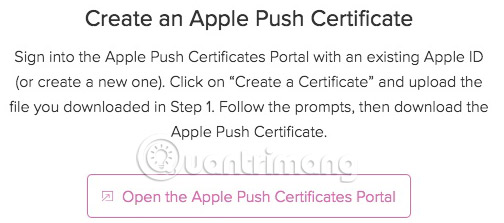
2. Create Apple Push Certificate (Apple Push certificate) in Apple Push Certificate Portal.
3. Upload Apple Push Certificate to Jamf Now.
4. Save your Apple ID with Apple Push Certificate.
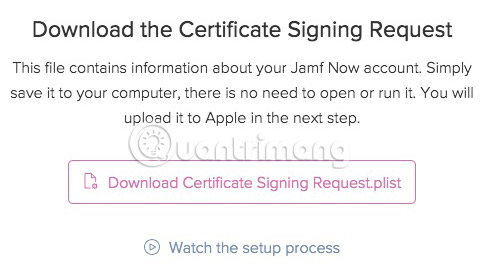
Jamf Now provides you with links, reminders and videos at every step to make this process as simple as possible.
After you download the CSR, click Next and click the Open the Apple Push Certificates Portal link .
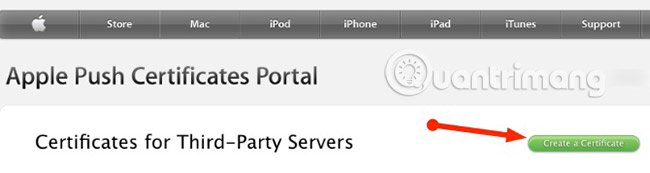
After you log in to the Apple Push Certificates Portal , click Create a Certificate .
At the Create screen , click Choose File under the Vendor-Signed CSR . Next, click the Upload button .
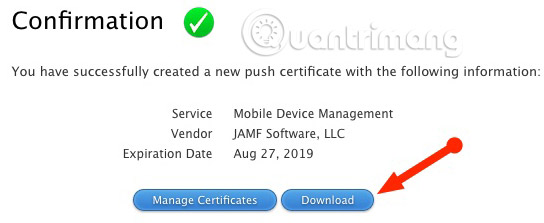
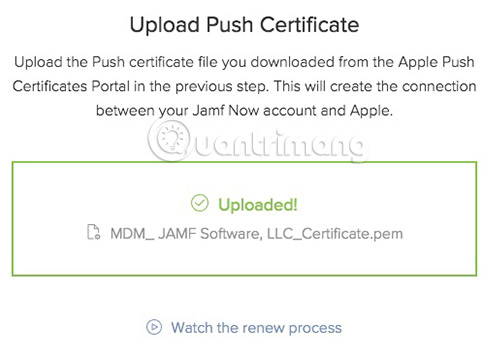
The Apple Portal will confirm that your new certificate has been created and available for download. Download the certificate and return to the Jamf Now account to take the final steps. Browse for the certificate you downloaded from Apple Portal (with .PEM extension). Jamf Now will confirm that the upload was successful and the connection process between Jamf Now and Apple is complete!
The final step to save Apple ID is not required but is recommended. Apple Push Certificates are valid for one year. Saving Apple ID will allow Jamf Now to prompt you to use any Apple ID when you need to renew your certificate. Now you can start registering the device in your Jamf Now account!
Step 3: Select applications to deploy
Another great feature of Jamf Now is the ability to provide devices with certain applications. This helps users and IT groups not to download these applications manually for each user when registering.
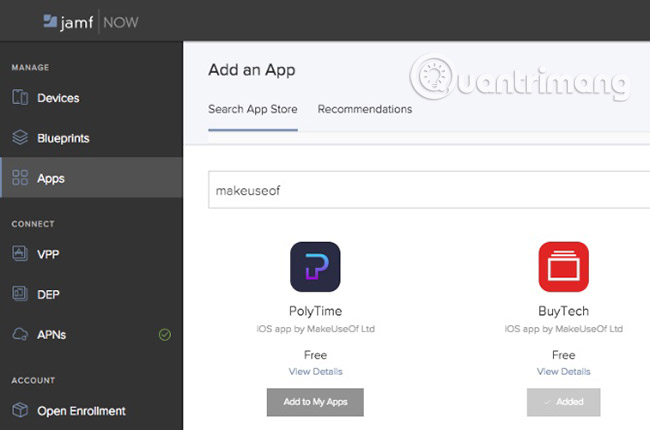
For example, suppose you want to add the Invoice Mini application from the App Store to all your devices. To do this, click the Apps tab , then select Add an App and search for the application name or developer name. After you find the application you are looking for, click Add to My Apps . You can now assign applications to any Blueprint (blueprint, blueprint) that will be created in the upcoming steps.
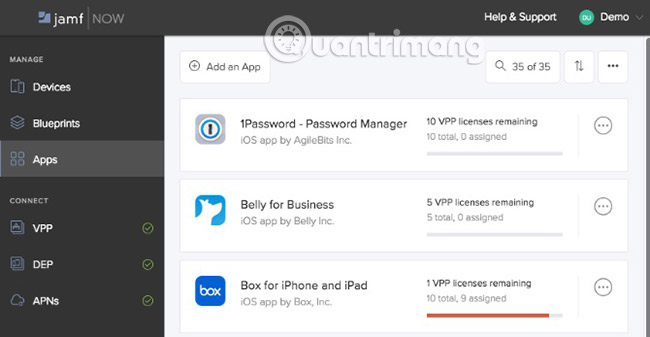
Jamf Now also supports Volume Purchase Program (VPP) - Apple bulk purchase program (part of Apple Business Manager). This means that applications that require a license can be purchased and assigned to your organization. If an employee quits, you will be able to retrieve the license and link it to another user. Great!
Step 4: Configure the device using Blueprint
Blueprint is one of Jamf Now's most powerful features. They are language cookie cutters used to easily set up and configure devices, as soon as they are registered. You can create a detailed blueprint from scratch or start using one of the templates provided by Jamf Now.
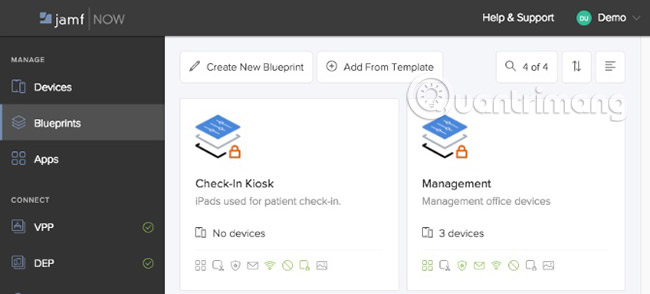
From defined applications (configured in the previous section and prevented users from changing their wallpaper), Blueprint allows detailed control and security at the device level.
Deploy Wi-Fi network
Suppose you have an office and a new Wi-Fi network dedicated to all employees in the sales department. Instead of going to each device and manually adding new Wi-Fi networks, all you need to do is edit Blueprint that those devices are assigned to.
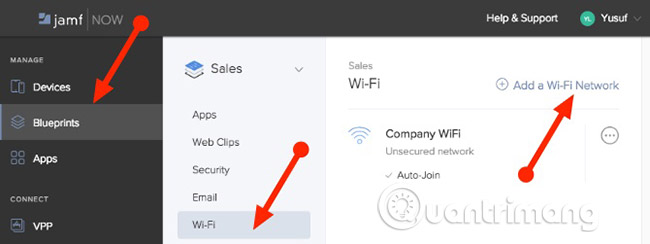
1. Select the Blueprints tab .
2. Select Sales Blueprint.
3. Click the Wi-Fi tab .
4. Click Add a Wi-Fi Network .
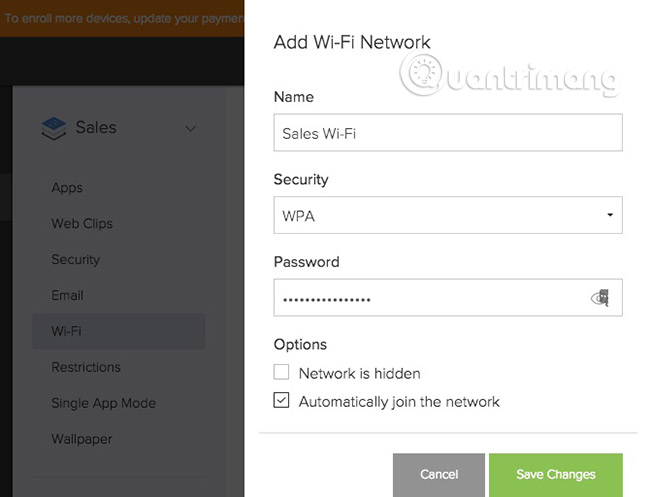
This will display the Add Wi-Fi Network menu. After entering the Name (SSID), security level and password for the new Wi-Fi network, click Save Changes.
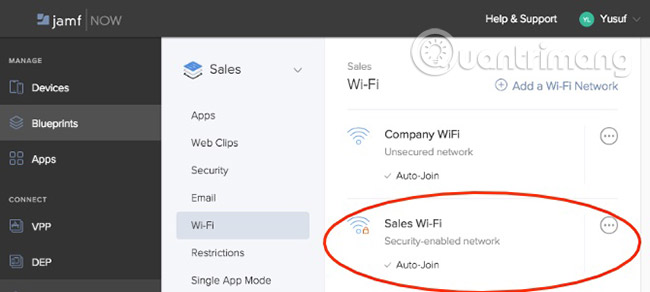
This new Wi-Fi network will be pushed into all devices currently in Blueprint. The device will also automatically connect to the new Wi-Fi network. No need to transfer passwords for any user or manually configure each device!
Restriction
Restriction is said to make Jamf Now special. Jamf Now supports some restrictions for iOS devices that help you keep data safe and prevent users from changing certain settings. Some Supervision requirement settings are mentioned in the next section.
To add or remove restriction:
1. Log into your Jamf Now account and select the Blueprints tab .
2. Click Restrictions.
3. Select the area you want to restrict, such as Security and Privacy.
4. Enable or disable any settings you want to push to the device.
5. Click Save Changes.
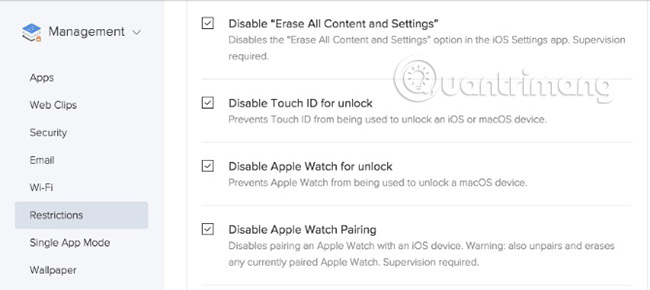
All devices already in Blueprint will now have new restrictions pushed into it. For example, suppose you selected Disabled Touch ID to unlock Blueprint management, Touch ID will be disabled for all devices that belong to Blueprint.
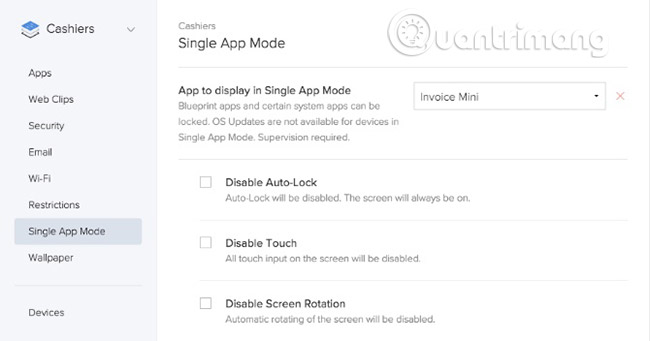
Blueprint can also be used to activate Single App Mode . For example, if you are deploying some iOS devices and you want to lock them into a certain application, Single App Mode is a great way to achieve this. Blueprint will ensure all devices in your organization comply with all restrictions and turn manual processes into a more flexible process.
Step 5: Register and monitor the device
In order for devices to be managed by Jamf Now, they need to be registered to your account. There are two methods of device registration: Open Enrollment ( Open Registration) and Supervision. As mentioned, Open Enrollment is a lower form of management than Supervision.
For both cases, a device may have gone through the Apple setup process, created an Apple ID and connected to the network. The main difference is that the monitoring device is automatically registered as part of Apple Setup Assistant.
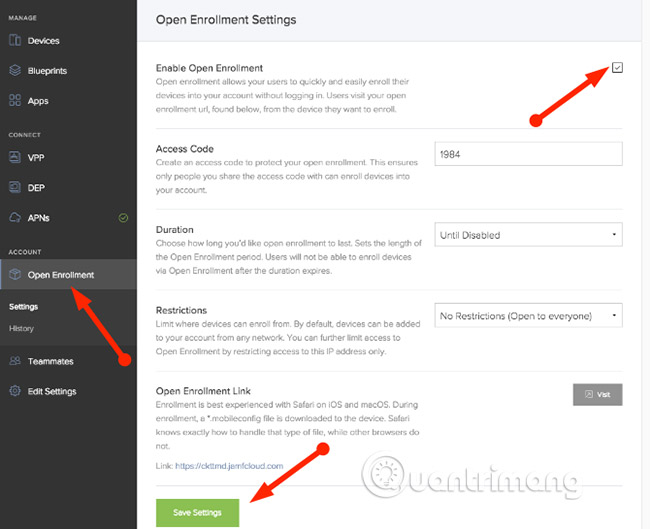
Open Enrollment
The first registration method is called Open Enrollment. This works by providing users with the URL and access code to complete the registration process. This is perfect for organizations that have a policy to Bring Your Own Device (BYOD).
To set up Open Enrollment:
1. Log in to Jamf Now.
2. In the Account section , click Open Enrollment.
3. Click the Enable Open Enrollment checkbox .
4. Select an Access Code.
5. Save the Open Enrollment Link registration link .
6. Click Save Settings.
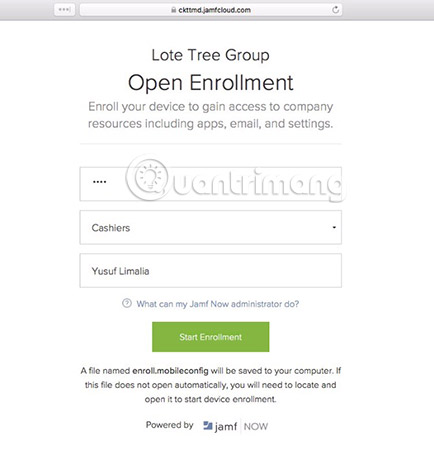
To register any device using Open Enrollment:
1. Open Safari on your iOS or macOS device.
2. Navigate to Open Enrollment Link saved above.
3. Enter the selected Access Code above.
4. Select a Blueprint.
5. Enter a name for this device.
6. Click Start Enrollment.
Once again, Safari knows exactly how to handle the downloaded configuration file.
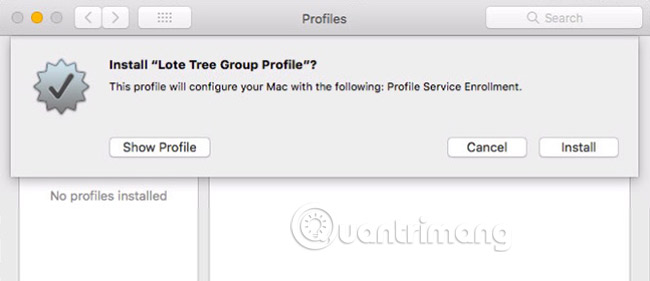
Now, your device will ask you to confirm, if you want to install a new profile. Just click Install in the dialog box that appears.

This device is currently registered and will appear in the Jamf Now dashboard to be ready to manage!
Supervision
The second management method is Apple Device Enrollment. Device Enrollment allows an organization to purchase Apple devices and automatically register them to Jamf Now the first time the device is started. As mentioned, you will need an Apple Business Manager or Apple School Manager account to take advantage of Device Enrollment.
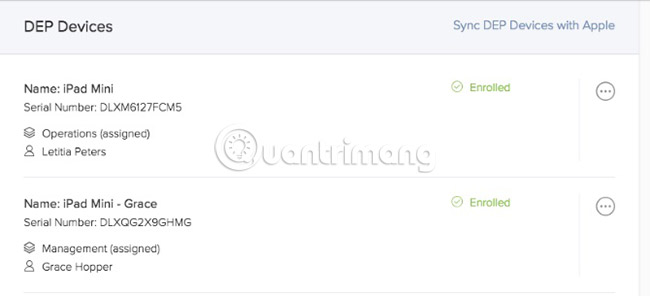
Once you have set up Device Enrollment (formerly DEP), any device you purchase via Apple or an Apple authorized dealer will appear in your Jamf Now account. This is done through the device's unique serial number. All you need to do is specify Blueprint for the device.
Device Enrollment allows you to send the device directly to a new employee and automatically subscribe to Jamf Now based on the device's unique serial number. Users only need to open the device box and follow Apple's built-in Setup Assistant. Great!
Device Enrollment allows higher level management called Supervision. Supervision is the proposed management level for devices that your organization purchases.
Step 6: Device management
From the dashboard page, the Apple devices of the entire organization are at your fingertips. At a glance, you can see the devices that need attention and you can fix and fix problems quickly and efficiently. Some details are also included such as operating system version, available memory capacity and device assignment.
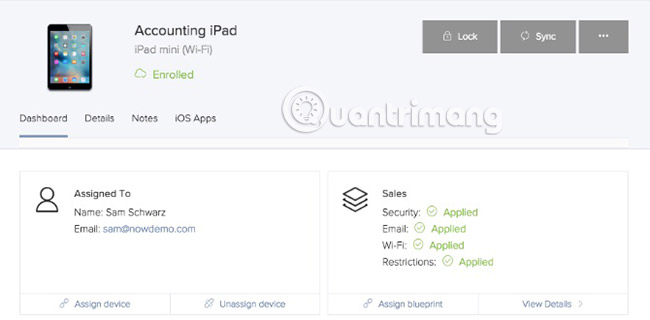
From this screen, you can also lock the device, assign content tags to track the device and even delete the device remotely. Remember that Jamf Now does not handle backups of devices. This must still be done via iTunes or iCloud.

If someone loses their device:
1. Select the device from the Devices tab .
2. Click Lock.
3. Enter an optional message and phone number.
4. Click Lock.
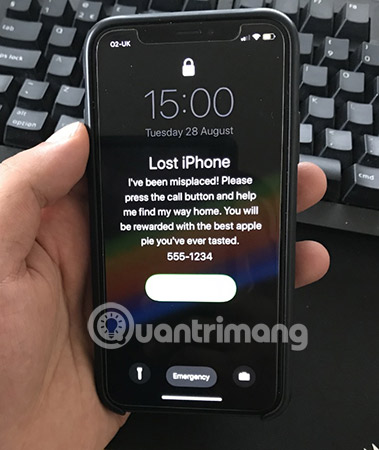
Jamf Now instantly locks iPhone remotely, as well as displays your message and phone number. The process is similar if you want to delete or delete the device remotely.
Remote application installation
Another particularly useful feature is the ability to install remote applications directly on the dashboard!
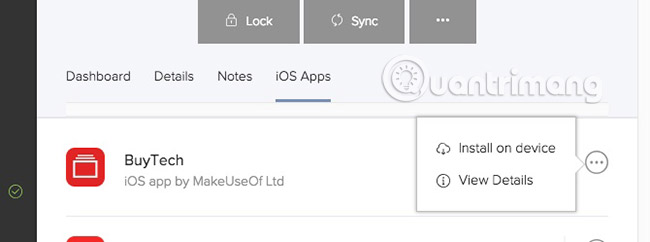
After you have added the application to your Jamf Now account with the steps mentioned in the above section:
1. Select the device from the Devices tab .
2. Select iOS Apps.
3. Open the context menu next to the application you want to deploy.
4. Click Install on device .
A confirmation message will be sent to the user. After the user accepts, the application will be downloaded and installed. Managing device groups is done in the Blueprints section that the article mentioned above. Compared to manual changes on every single device, this brings surprising benefits.
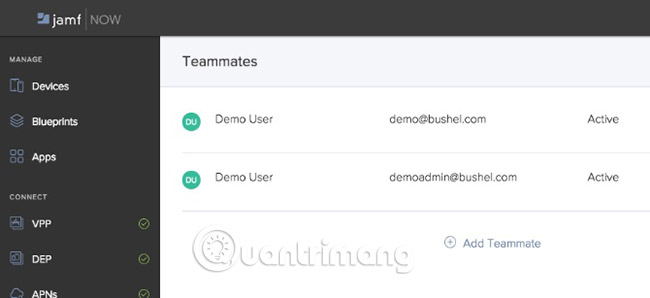
Regarding the objects of IT groups, Teammates tab allows multiple members to manage an organization. The only thing to note is that all team members have the same rights.
Save time, high security and ease of deployment make managing devices from Jamf Now especially useful, if you are deploying Apple devices to your organization. The user interface is beautifully designed and very easy to use even if you are not an IT expert.
Jamf Now offers a full-featured demo for you to try and decide if Jamf Now is right for you. If it's appropriate, create a free Jamf Now account now!
See more:
- Manage devices connected to iCloud on iPhone in 3 steps
- Comprehensive management of iCloud from computer
- Manage mobile devices using iOS 5 remote with Find My iPhone