Detailed instructions on how to use Webhook Trigger in n8n
Detailed instructions on how to set up Webhook Trigger in n8n to receive and automate data from third-party applications..
In the n8n automation ecosystem, Webhook Triggers are considered the most important "starting point." They allow your workflow to "listen" and respond instantly when an event occurs from third-party applications like Facebook , Google , or your internal system.
This article will guide you on how to set up SEO- friendly Webhook Triggers , making your workflow more professional and fully automated.
What is Webhook Trigger n8n and why should you use it?
What is a Webhook Trigger?
Webhooks are a method that allows applications to communicate with each other in real time. Instead of having to periodically check for data (polling), Webhook Triggers act as an always-open "gateway," waiting for data to be sent.
Why should you use webhooks?
- Instant response: The workflow runs as soon as new data is received.
- Save resources: There's no need to waste resources constantly checking data if there are no changes.
- Integration of everything: Any service that supports "Webhook" or "HTTP POST/GET" can connect to n8n through this Node.
Steps to set up Webhook Trigger in n8n
Follow the detailed steps below to activate your automatic data flow:
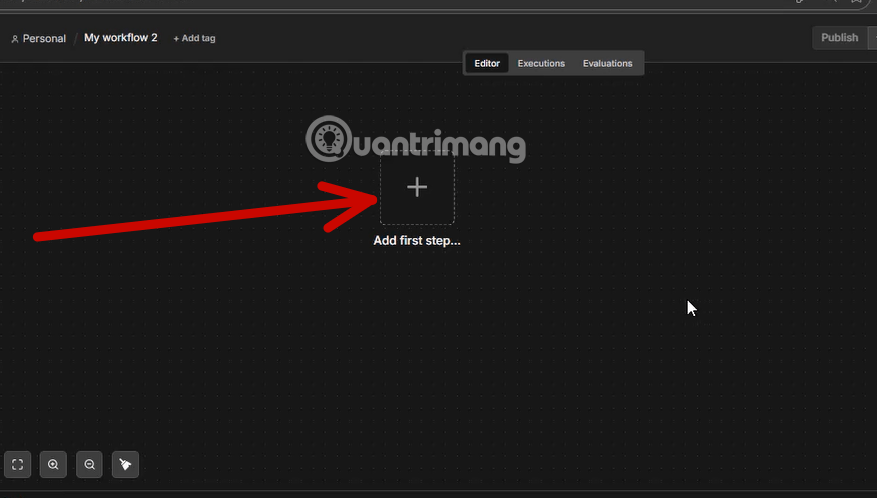
Step 1: Initialize the first step
In the n8n workflow design interface, click the 'Add First Step' tab to begin building the process.
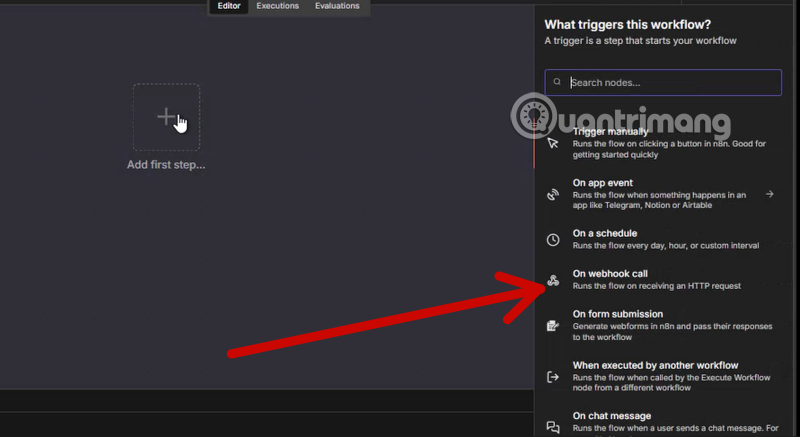
Step 2: Select the Webhook event
From the list of trigger options, find and select 'On Webhook Call' . This is the type of node that will be at the top of the workflow to receive data.
Step 3: Configure technical specifications
Now it's time to set up your "gateway." You need to keep the following points in mind:
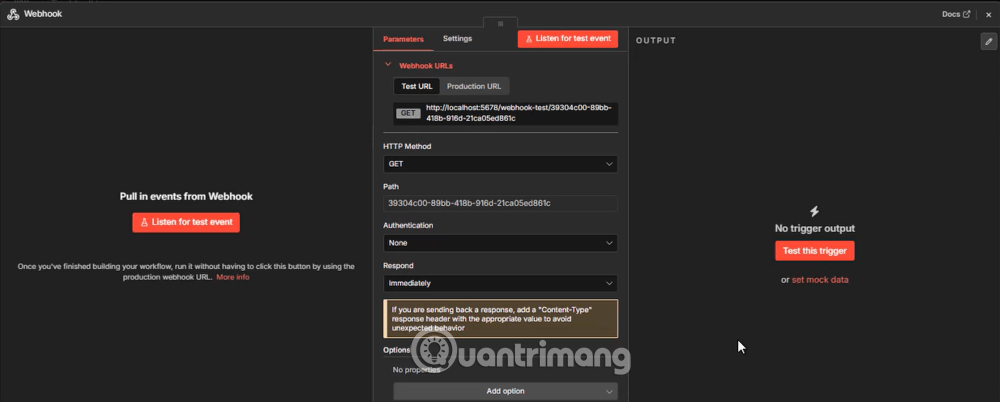
- HTTP Method: Select the method for receiving data (usually POST for large amounts of data or GET for simple data via URL).
- Path: Edit the final path of the URL (Example:
my-webhook-endpoint). - Authentication: Set up security (None, Basic Auth, Header Auth) to ensure only trusted sources can activate the workflow.
You can find more information about this Webhook Node in the section "Explanation of Core Components in Webhook Node" that we have placed below.
Step 4: Copy the Webhook URL
Nhấp vào Webhook URL để sao chép nó. Bạn sẽ cần dán URL này vào dịch vụ hoặc chương trình bên thứ ba mà bạn muốn gửi dữ liệu từ đó tới n8n.
Lưu ý: n8n cung cấp Test URL (để thử nghiệm) và Production URL (khi workflow đã hoạt động chính thức).
Bước 5: Chạy thử nghiệm (Listen For Test Event)
- Nhấn vào nút 'Listen For Test Event'. Lúc này, n8n sẽ chuyển sang trạng thái chờ đợi. Bạn hãy thực hiện một hành động ở ứng dụng bên kia để gửi dữ liệu về n8n.
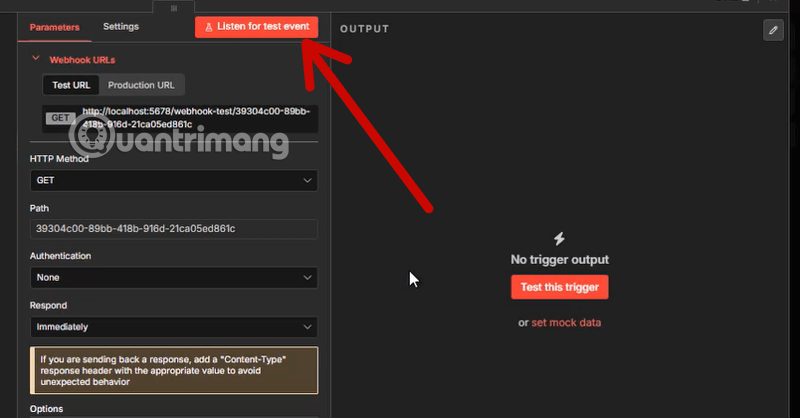
Sau vài giây, khi dữ liệu được gửi đến thành công, n8n sẽ hiển thị cấu trúc dữ liệu nhận được. Nhấn 'Close' ở góc trên bên phải để quay lại không gian làm việc chính.
Bước 6: Kích hoạt Workflow
- Cuối cùng, Webhook Trigger đã được kích hoạt. Bây giờ bạn có thể nối thêm các Node tiếp theo (như Gửi Email, Lưu vào Google Sheets) dựa trên dữ liệu vừa nhận được.
Giải nghĩa các thành phần cốt lõi trong Webhook Node
Để sử dụng Webhook hiệu quả, bạn cần hiểu rõ các khái niệm sau:
1. Webhook URLs (Test URL vs Production URL)
- Test URL: Sử dụng khi bạn đang xây dựng và nhấn nút "Listen for test event". n8n sẽ đợi một tín hiệu gửi đến để hiển thị dữ liệu mẫu.
- Production URL: Sử dụng sau khi bạn đã nhấn "Save" và "Activate" workflow. Đây là link cố định để chạy thực tế.
- Copy link để dán vào phần "Webhook URL" của ứng dụng gửi dữ liệu (nếu có).
2. HTTP Method (Phương thức)
- Nếu bạn nhận dữ liệu từ một Form hoặc AI: Thường chọn POST.
- Nếu bạn chỉ muốn kích hoạt bằng cách click vào một đường link: Chọn GET.
- Lời khuyên: Đa số các tích hợp API hiện nay dùng POST để truyền được nhiều dữ liệu (như nội dung bài viết, ảnh.).
3. Path (Đường dẫn)
- Dãy ký tự loằng ngoằng trong ảnh là mặc định của n8n. Bạn có thể xóa đi và đặt tên dễ nhớ hơn.
- Ví dụ:
tao-anh-aihoặcwebhook-tu-dong. - Khi đó link của bạn sẽ gọn hơn:
http://localhost:5678/webhook/tao-anh-ai.
4. Authentication (Xác thực) - Rất quan trọng
Dựa vào Ảnh 1 (Cấu hình API Key), nếu bạn muốn workflow của mình bảo mật (chỉ ai có Key mới gọi được):
- Chọn Header Auth.
- Trong mục Credential, bạn tạo mới và đặt tên là
X-API-KEY. - Giá trị chính là đoạn mã Google Gemini API Key mà bạn đã bôi đỏ trong ảnh 1.
- Nếu bạn muốn làm nhanh để thử nghiệm, có thể để là None, nhưng ai có link cũng có thể chạy workflow của bạn.
5. Respond (Phản hồi)
- Immediately: n8n trả về mã thành công ngay khi nhận được tín hiệu.
- When Last Node Finishes: n8n will complete the processing (e.g., creating the image using Nano Banana) before returning the results to the original application.
- Recommended choice: If you want the application to send requests and receive results immediately, choose
When Last Node Finishes.
6. Data connection methods (Main objective)
After you've filled in the information and clicked "Listen for test event" , you need to submit a test request. When the data appears in the OUTPUT column (on the right) :
- That data will contain the information you need.
- You will use the following nodes (such as the OpenAI Node or the HTTP Request Node) to retrieve this information.
- In the prompt section of the following nodes, you use a formula
{{ $json.body.noi_dung }}to retrieve the content from the webhook passed in.
Advantages of the Webhook feature in n8n
- Unlimited scalability: Connect with thousands of applications beyond the n8n's built-in list.
- Raw Data Processing: Receiving all the data from the sender allows you to customize the processing in depth within the workflow.
- High flexibility: You can create your own APIs with just a few clicks.
Webhooks are like an always-open door . Instead of n8n having to ask 'Is the data available yet?', when an event occurs (such as an order or a message), the other application will proactively 'knock on the door' and throw the data into n8n to run the workflow for you immediately.