Instructions on how to remove the laptop keyboard for quick cleaning
TipsMake will guide you how to safely remove the laptop keyboard to clean or replace it in case the laptop keyboard is defective.
Table of Contents
Normally, after a long time of use, laptop keyboards will appear to have buttons that are loose, broken, or paralyzed due to many different reasons. To fix these errors, you need to remove the laptop keyboard to clean or replace. So if you still don't know how to remove the laptop keyboard so that the laptop doesn't get damaged, don't skip the last TipsMake article.
When should keyboard buttons be removed and replaced?
After a long period of use, dust will appear on the keyboard, especially in the gaps between the keyboard buttons. Thereby affecting the interaction between the keyboard and circuit board. Besides, incidents such as accidentally spilling water on the keyboard, falling food crumbs or small insects, etc. can cause the keyboard to fail and not be able to operate stably as usual.
Not only that, pressing keys quickly, strongly and many times on certain keys also causes key paralysis and key confusion. At the same time, it contributes to reducing the lifespan of the keyboard.
For situations where the keyboard is covered in dust or foreign objects are stuck in it, users can clean the keyboard using normal methods such as blowing dust, using a dust brush, etc. However, in cases where it is necessary to remove To clean or repair keyboard buttons, technical expertise is required. This must be done carefully and meticulously, otherwise it will damage the keys and the laptop.

Things to know before removing the laptop keyboard
- Before removing the laptop keyboard, you need to know what type of laptop you are using. Because each laptop manufacturing brand will have its own keyboard structure corresponding to different disassembly methods. For example, with a floating keyboard, users can easily remove each key for cleaning. In contrast to a recessed keyboard, you must remove all the keys to be able to clean them.
- When removing the keyboard, you need to turn off the laptop and disconnect the device from the power source (battery, charger, electrical outlet). In addition, you can use anti-static gloves or a grounding strap to avoid electric leakage when removing the keyboard.
- To ensure that the process of removing the keyboard does not affect the laptop, you should draw a diagram of the underside of the laptop body. Mark the location of the screws and bolts to prevent confusion when reinstalling.

Prepare tools to disassemble and assemble the keyboard
To disassemble and assemble the keyboard, you need to prepare the following tools:
- Screwdriver : To quickly disassemble and assemble the keyboard, users need to prepare a set of screwdrivers with a full set of different heads and sizes.

- Tweezers : This tool will help you easily remove or insert soft cables into the keyboard.

- Spudger : This is a tool used to separate two laptop components that are joined together by joints without causing them to be scratched. Spudgers are usually made of plastic. If you don't have this tool, you can replace it with a plastic card or thin wooden plate.

- Thermal paste : To clean the keyboard, you will definitely need thermal paste to cool the laptop and help keep the keyboard cleaner.

How to safely remove, install and change laptop keyboard buttons
Normally, when a problem occurs with a laptop keyboard, users need to remove the keyboard from the computer to check, clean, then reinstall or replace it depending on each specific case.
How to safely remove a laptop keyboard
To safely remove the laptop keyboard, users need to follow the following steps:
- Step 1 : First you need to turn off the laptop power. If you remove the keyboard while the computer is still running, it will cause damage that will be difficult to repair and restore.
- Step 2 : After the computer is turned off, next you need to determine the position of the keyboard cover. This cover is often used to cover the screws that help secure the keyboard. Normally, if the laptop is running, the LED light of the keyboard cover will light up to help users identify it easily. In case you cannot determine the location of the keyboard cover, this type of cover is usually located at the top of the keyboard and right below the laptop screen. You just need to use your hand to pull up the cover to easily remove the keyboard.
- Step 3: Next, use a flat-head screwdriver to start removing the laptop keyboard. You need to put the screwdriver in the correct slot of the cover and then gently push the 2 screws on the back of the machine. Next, you continue to remove each screw on the back of the computer first, then use a flat-head screwdriver to push the keyboard cover up along the edge of the computer.
- Step 4: You need to lift the keyboard gently in the direction of the laptop screen. Besides, because computer keyboards are often made from thin plastic, you should remove the keyboard carefully to avoid damaging the keyboard. Next, look behind the keyboard and you will see the wires and cables connecting the keyboard to the laptop circuit board. Therefore, when removing the keyboard, you should gently pull the cable plug and pull it in a vertical direction so as not to affect the computer system.
- Step 5: Next you need to remove the laptop screen cable by pulling the cable plug vertically upward to unplug the keyboard cable from the computer's motherboard.
- Step 6: Finally, when you are sure that the keyboard is no longer attached to any connecting wires, you can completely remove the keyboard from the computer.
How to install and change laptop keyboard buttons
A computer keyboard is usually composed of 3 parts: the plastic button, the key bone and the key frame (used to fix the key bone and plastic button). Before disassembling and changing keyboard buttons, you need to turn off the laptop power to ensure the safety of the device and its internal components.
In case the top part of the key (the plastic button part) comes off.
This is a fairly common keyboard error. To reinstall the key, simply follow these steps:
- Step 1 : Place the key in the correct position on the keyboard. Then you look at the back of the key and you will see small joints.
- Step 2 : Place the key in the correct position, then use your hand to gently press the key down.
In case the key bone is broken
The key bone is a very fragile and easily broken part, so when reinstalling the key bone, users need to be very careful. It's best to prepare a small clamp to make the operation more convenient.
- Step 1 : Use clamps to pick up the broken key bone and put it back into the key frame. Note that you should install the key bone correctly with the joint of the key frame to help firmly fix the key button.
- Step 2 : Place the top plastic button on the key bone in the correct direction of the character, then use your hand to gently press the key down so that the key is firmly attached to the key bone.
- Step 3: Finally, just restart the computer to check if the key works.
In case the key is broken, it must be replaced
In case the key bone is broken, you can handle this situation by replacing another key bone with a similar structure to the broken key bone. Or you can replace the broken key with rarely used keys on the computer, such as the home button, slash key, etc. The operation is as follows:
- Step 1 : First, remove the plastic button and key bone of the key that needs to be replaced. By using a flat head screw, gently pry the plastic key diagonally from top to bottom. This will help minimize the risk of key fractures during disassembly.
- Step 2 : Continue to remove the key bone and key frame. This is an operation that requires the performer to have expertise and meticulousness. Therefore, the best way is to bring your laptop to a reputable center for repair support.
- Step 3 : Finally, you just need to reinstall the key bone to its original position.
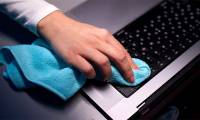
How to clean laptop keyboard properly and safely
To clean the laptop keyboard, you need to prepare and do the following:
Preparation tools:
- A soft bristle brush or brush.
- A soft eyeglasses cleaning cloth.
- A bottle of LCD screen cleaning solution. If you don't have it, you can replace it with pure water or vinegar mixed with clean water in a 50:50 ratio.
- Dust blower or small dust blower.
- Cotton swab for cleaning.
Doing:
- Step 1: First, use a dust blower to blow all the dust out of the key slots.

- Step 2 : Next, use a soft bristle brush to gently sweep the key slots from top to bottom or from left to right to remove remaining foreign objects.

- Step 3 : Finally, use a cotton swab to lightly dip into the screen cleaning solution, then gently sweep into the small slots on the keyboard to completely remove dirt from the laptop keyboard.

Common keyboard errors and quick fixes
During use, the laptop keyboard may have the following errors:
Laptop keyboard is messed up
A misspelling error is an error where when you press one letter, the computer displays another word.
Cause : Software problem or motherboard error.
Solution : When the computer keyboard has this error, users should not repair it themselves at home to avoid more serious damage to the computer. Instead, bring your laptop to a reputable center so that technicians can repair it for you.

Keyboard paralysis
Keyboard paralysis is one of the biggest nightmares for users. Because when the keyboard is paralyzed, you will not be able to type text or send emails to partners or customers because the key presses sometimes work sometimes.
Cause : Asexual users spill water, food, dirt, etc. on the keyboard.
How to fix : To fix this error, you need to clean the laptop keyboard using a computer cleaning kit including brush, vacuum cleaner, cotton swab, etc. Or you can remove the entire key out to clean again.

Error of not being able to type numbers on the keyboard
This is one of the very common errors among users. There are many causes leading to this situation. For example, the user forgets to turn on Numlock or because the laptop mouse button is turned on, the user cannot access the number keys.
To fix this error, you need to find out the exact cause of the error to have a suitable solution.
Keyboard touch error
Even though your fingers do not touch the keyboard, the keys run on their own and cannot be operated. Those are symptoms of laptop keyboard touch errors.
Cause : Because the laptop keyboard has not been cleaned for a long time, dirt has stuck to it or the keyboard bones have broken.
Solution : To handle this problem, the best way is to remove the keyboard to clean it completely. If the error is due to a broken keyboard bone, you should replace another keyboard bone.

Error typing numbers as letters, press letters for numbers
The error of typing numbers into words is that when we type numbers like '1234567890', the word 'ãaêđ̣́ôêâ' will appear.
Cause : There are two main causes of this error: when installing Windows, you chose the keyboard type as Vietnamese. Or because during use, you accidentally pressed the Alt + Shift key combination , causing the system to automatically switch the keyboard language from English to Vietnamese.
Solution: If you want to change it back, just press Win + Space or Alt + Shift . Then click on the word VIE in the bottom right corner of the screen and select ENG – English .

On the contrary, the error of typing letters into numbers is that when we type any letters, the numbers '0123456789' appear.
Cause: Some laptop models have quite small keyboards so they do not have a separate numeric keypad. Instead, manufacturers have integrated the number typing feature on the keyboard to help users type numbers more easily. However, while using it, you accidentally turned on Numlock mode on your laptop, which led to this error.
How to fix: To fix this error, you just need to turn off NumLock mode on the keyboard and you're done.

Epilogue
Above are instructions on how to simply remove the laptop keyboard for cleaning that you need to know every time a problem occurs with the laptop keyboard. Hopefully, through the above sharing, you will be able to disassemble and replace the keyboard easily at home.
Was this article helpful?
Your feedback helps us improve.
Related Articles
 Instructions for cleaning laptop keyboard without turning off the computer (safe & effective)6 minutes read
 3 quick and easy ways to lock your Acer laptop keyboard at home.11 minutes read
 Instructions for cleaning the keyboard yourself, cleaning Laptop keyboard4 minutes read
 4 Simple and Quick Ways to Lock Your Windows Laptop Keyboard6 minutes read
 Instructions for handling when the laptop keyboard key is broken4 minutes read
 How to clean the most clean computer keyboard5 minutes read
Reader Comments 0
Sign in with email or Google to join the discussion.