Table of Contents
Compatibility note: This tutorial uses Photoshop CS6. The core tools remain familiar in newer releases, although panel locations and some options may differ.
TipsMake has introduced you to the Photoshop CS6 interface to help you get acquainted with it. Next, we will learn how to create and save files through this article.
What is a file in Photoshop?
In Photoshop, a file, also known as a Document, is a workspace created with attributes such as size, resolution, color system, etc. Through these preset settings, you can create images and design files with those attributes. Subsequent editing and design operations can only be applied within that workspace.
To create a properly formatted file, you will need to understand the basic concepts. These include:
Working file size
This is the actual size of the file when exported as an image, PDF, etc. This size includes both width and height . The convention when writing about image file sizes is to specify width first, then height.
For example, the size of a Facebook advertising banner is 900x603px , meaning the image file is 900px wide and 603px high.
Working file ratio
The file aspect ratio is determined by the width divided by the height. In design, when referring to a file with a certain size, people are talking about the file's aspect ratio.
For example, if you need to design a file with dimensions of 1x2m, it means you need to design the file at a 1:2 scale , not create a file with dimensions of 1x2m.
If you create the file with incorrect proportions compared to the client's requirements, the quality of the final product may be affected depending on the extent of the discrepancy.
Photoshop file resolution
This is the pixel density per unit length. Resolution depends on the number of pixels per inch. For designs intended for online publication, you can set the pixel density to 72 pixels per inch . However, files intended for printing require a pixel density of 150 to 300 pixels per inch.
How to create a file in Photoshop CS6
You can create files in Photoshop CS6 in two different ways: create files with predefined dimensions or create files with pre-set image dimensions.
To create a new file, you will need to follow these steps.
Step 1: On the main interface of Photoshop CS6, click on the File menu, then select New to create a new file.
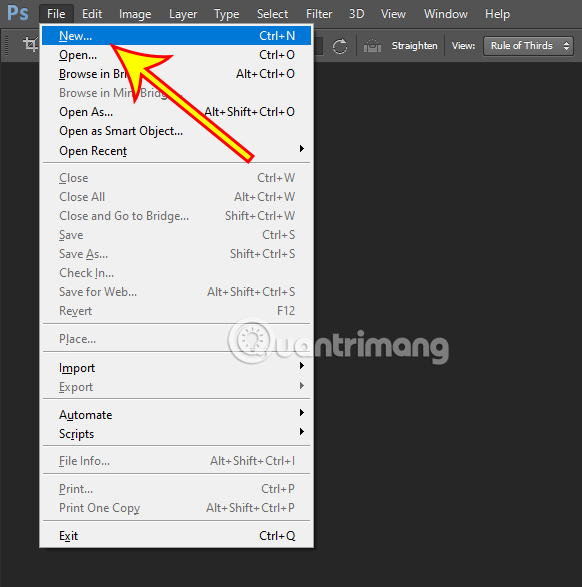
Alternatively, you can also quickly press the shortcut Ctrl + N instead of the above action.
Step 2: A customization window will appear. In this window, you will need to set the parameters for your file. Specifically, this includes:
- Name: Name for the file.
- Preset: Preset size modes are already available in Photoshop CS6. If you want to customize the size yourself, you can select Custom.
- Size: Allows you to select a pre-set ratio or size. This option will not be available if you select Custom in the Preset section.
- Width/Height: Allows you to set the file size. You can also customize the unit of measurement you want.
- Resolution: Set the pixel density.
- Color Mode: Set the color system for the file. If your file is for use with electronic devices, use RGB mode. When using it for printing, switch to CMYK.
- Background Contents: Set the background color for the file.
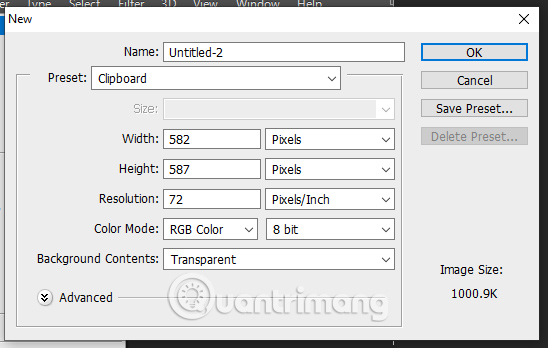
Step 3: After setting the parameters to suit your needs, click OK to create your working file.
You can also press Enter on your keyboard to quickly create the file.
How to open a file in Photoshop CS6
If you want to open a PSD file to continue editing or use an existing image, you can follow these steps.
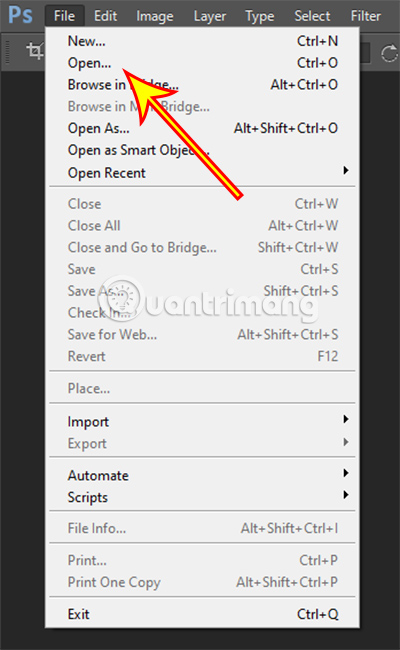
Step 1: Click on the File menu and select Open , or press the keyboard shortcut Ctrl + O.
Step 2: A new window will appear. Navigate to the location where you want to open the file, then double-click the file , or you can click on the file and select Open.
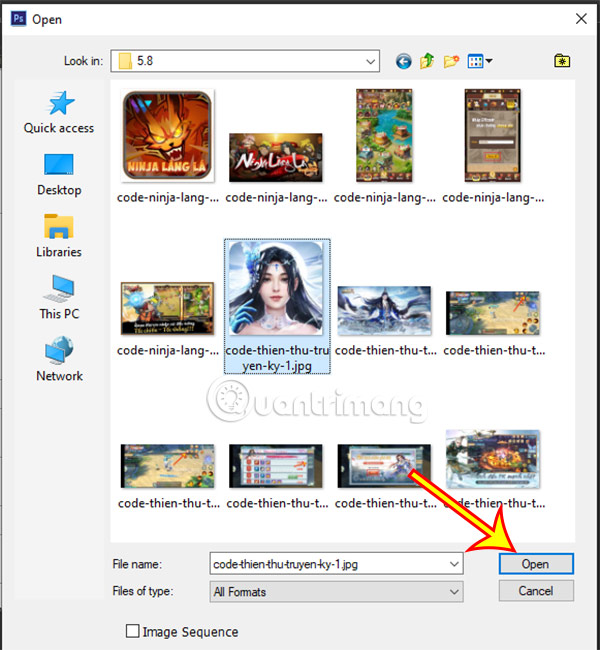
So, with just two simple steps, you can easily open the file you need.
How to export and save files in Photoshop CS6
After creating the file and completing the design process, the final step is to export it. There are two ways to export the file: as an image file or as a PSD file.
Exporting as a PSD file allows you to reopen and edit the content later if desired. However, with image files, you will no longer be able to edit them.
To export the image file, you will do the following:
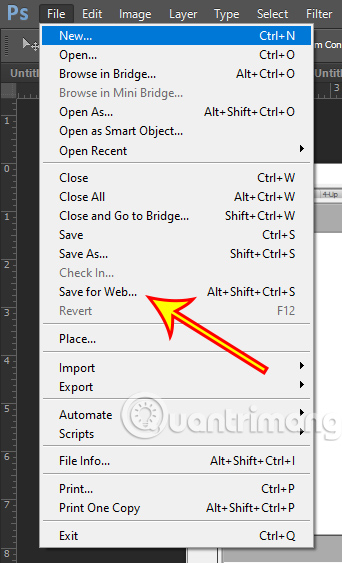
Step 1: Go to File and select Save for Web.
Step 2: Select the file format and then click the Save button.
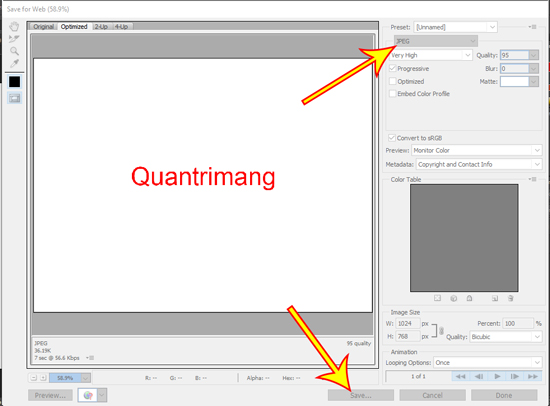
Step 3: A window will appear where you need to enter the file name, the save location, and finally click OK to complete the image export process.
If you want to save the PSD file, you need to follow the steps below.
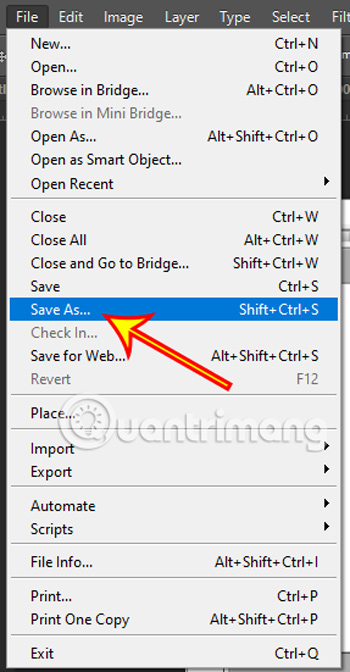
Step 1: Click on File, then select Save or Save as.
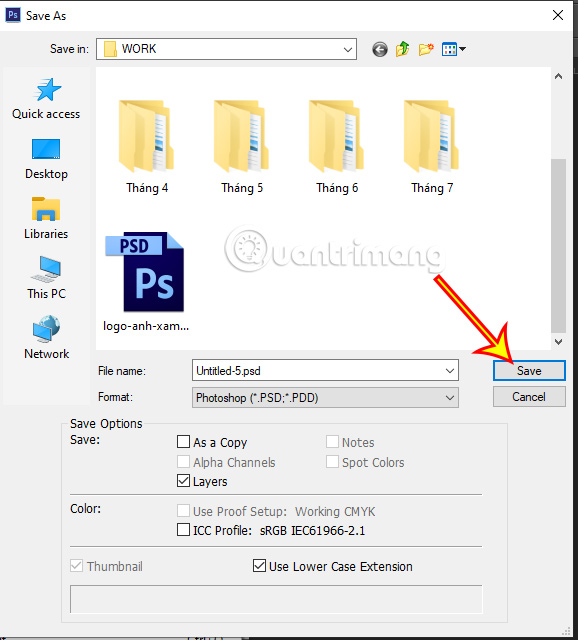
Step 2: A new window will appear; choose where to save the file and then click OK to complete the PSD file saving process.
Through this article, TipsMake.com has guided you in detail on how to create and save files in Photoshop CS6. In the following articles, we will learn how to open existing files in Photoshop and understand the keyboard shortcuts in this software.
Related Articles
 Steps to Save Photoshop Files as PDF3 minutes read
 How to Save Photoshop Files 20 Times Faster4 minutes read
 How to Create Stunning 3D Pop-out Effects in Photoshop10 minutes read
 How to Export Printing Files in Photoshop5 minutes read
 How to Fix Errors Were Detected While Saving Files in Excel 20104 minutes read
 How to Convert Canva Files to Photoshop3 minutes read
Reader Comments 0
Sign in with email or Google to join the discussion.