Table of Contents
Compatibility note: This tutorial uses Photoshop CS6. The core tools remain familiar in newer releases, although panel locations and some options may differ.
Photoshop CS6 is one of the most popular photo editing software programs available today. If you're just starting to learn about graphic design, photo editing, etc., understanding the interface and functions of each tool in Photoshop CS6 is essential.
To begin exploring the features of Photoshop CS6, the first thing you need to do is download the application.
You can click on the icon below to access the Photoshop CS6 download link.
After installing Photoshop CS6, open the application and begin exploring its toolbars.
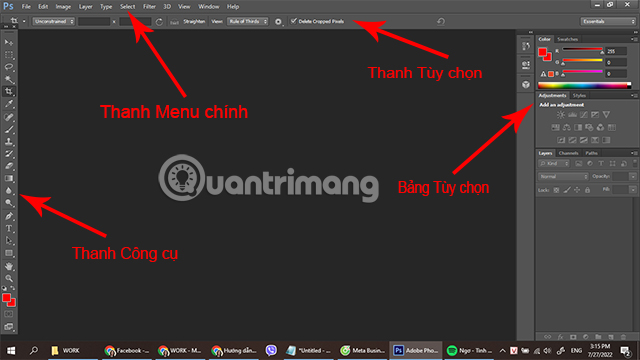
In this article, we will gain a better understanding of the Main Menu Bar and the Toolbar. We will gradually explore the Options Bar and Options Panel through various sections of Photoshop CS6.
Details of the main menu bar in Photoshop CS6
In the main interface of Photoshop CS6, the toolbar at the top is called the Menu Bar. This Menu Bar contains the following sections:
- File: This section contains options related to image files, such as New – create a new image file; Open, Open As – open an existing image file; Save, Save As – save the image file…
- Edit: Includes image editing operations such as Copy/Paste ; Transform/Free Transform – changing the size of the collage; Fill – adding or deleting details or objects in the image…
- Image: Users can select operations such as Mode – color system conversion; Adjustments – advanced color adjustments; Image Sizes – image size.
- Layer: This includes operations related to different image layers such as New – creating a new layer; Duplicate Layer – copying and creating a new layer; Merger Layer – merging layers…
- Type: Contains tools such as Language Option - Change language ; Font Preview Sizes - change font size and font…
- Select: Includes operations such as Select All, Deselect, Reselect … which are used to customize areas while designing and editing images.
- Filters: Includes useful filters and image editing tools such as Blur – to blur images; Sharpen – to increase the sharpness of image details; Liquify – to resize images…
- View: Image display size options – Zoom Out/Zoom In; display rulers to adjust image size…
- Window: Manages the display of toolbars and working windows on the screen, such as Layer, Adjustments, History, etc.
- Help: Users can check information about their current Photoshop version or find Photoshop tutorials in this section.
Details of the Photoshop CS6 toolbar
The toolbar is the part you'll use most often when editing and designing images using Photoshop CS6. These tools include:
| Icon | Tool Name (Keyboard Shortcut) | Function |

|
Move (V) | Used to move layers and selections within an image. |

|
Elliptical Marquee (M) | Create a rectangular or square image selection area. |

|
Lasso (L) | While still a selection tool, it's more advanced, allowing users to create selections with custom shapes, high complexity, and many distinct details. |

|
Quick Selection (W) | It's a quick image selection tool with similar operation to the Brush tool , using the Magic Wand Tool or Quick Selection Tool. |

|
Crop (C) | The tool allows users to rotate or crop images as desired. |

|
Eyedropper (I) | Tool to select any color in the image |

|
Spot Healing Brush (J) | This tool helps conceal imperfections, edit selected image areas with flaws, and hide or remove unwanted details in photos. |

|
Brush (B) | This tool, also known as a brush, allows users to draw strokes or lines of color, just like using a paintbrush or pencil. |

|
Clone Stamp (S) | This tool copies a region of an image and then pastes it onto another region of the image. |

|
History Brush Tool (Y) | This tool allows users to retrieve old details from an image by hovering their mouse over the image file. |

|
Eraser (E) | The eraser tool makes it easy to erase the selected object and restore the previously saved object. |

|
Gradient Tool (G) | Tools for color blending, gradients, background fills, creating reflection effects, lines, etc. |

|
Blur, Sharpen, Smudge | This tool helps you blur/sharpen/create scratches on the selected area of the image. |

|
Dodge Tool (O) | This tool helps to brighten or darken the selected area of the image. |

|
Pen tool (P) | The Path tool connects two anchor points, allowing you to create a precise selection area around the object you want to edit. |

|
Type Tool (T) | A tool for inserting text or a paragraph into an image. |

|
Path Selection Tool | Quick selection tools for areas of an image that need editing, such as Layers, Text, etc. |

|
Shape(U) | This tool allows you to create or draw elliptical, circular, square, or other types of icons. |

|
Hand Tool (H) | Tools for moving, dragging, dropping, and rotating images within the window. |

|
Zoom (Z) | A tool to help zoom in or zoom out the image size. |

|
Color picker | A tool for obtaining color codes, adjusting colors, and filling background or text colors as desired. |
Hopefully, through this article, readers have gained a clearer understanding of the toolbars and main interface of Photoshop CS6. From there, we can be ready to familiarize ourselves with the next lessons in Photoshop.
Related Articles
 How to Use Photoshop from Az for Beginners6 minutes read
 How to Use Photoshop CS5 - Part 1: Toolbox12 minutes read
 49 Smart Photoshop Tips You Need to Know (Part 3)15 minutes read
 49 Smart Photoshop Tips You Need to Know (Part 1)13 minutes read
 49 Smart Photoshop Tips You Need to Know (Part 2)9 minutes read
 10 Photoshop Beginner Skills Need to Know16 minutes read
Reader Comments 0
Sign in with email or Google to join the discussion.