Table of Contents
This guide provides a practical overview of instructions for using the office lens application to convert image with clear explanations and useful details. It focuses on the information users are most likely to need.
OCR (Optical Character Recognition) optical character recognition technology has been greatly improved in recent years. We can now scan any document into an image file, which can then be converted into text and characters easily. And it's even more convenient when we can use this technology right on our mobile phones.
How Instructions for Using the Office Lens Application to Convert Image Works
In mobile applications that support transferring image files into writing on Android, Office Lens is the most effective application to do this. The steps below explain how to use the Office Lens application to convert image files into text on Android.
The first thing to do is download the Office Lens application to your Android device. If your device uses Android 6.0 or higher, you will be asked to use the Camera on the app. Note that you need to log into Microsoft account as this is an application developed by Microsoft so after the conversion, the app will automatically transfer files to OneDrive account.
After downloading the app, you will need to scan the document you want to convert into text. Open the Camera section inside the app, here, you will see some useful options on the top right corner of the screen like scanning documents, scanning white background, scanning image files and scanning business cards. Select the Document item, then press take a picture.

After the photo has been taken, you can edit and crop the image as you wish, then click the tick icon on the screen to confirm.

This time on the screen appears an item that allows you to store and rename the image you just scanned. Then select the place to save the file and check the Word entry so that the app turns your scan file into a Document file. Click the check mark in the upper right corner of the screen to make the app move the image file into words. You need to ensure Internet connection so that the app can operate efficiently.
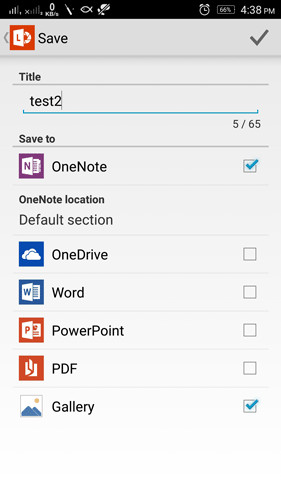
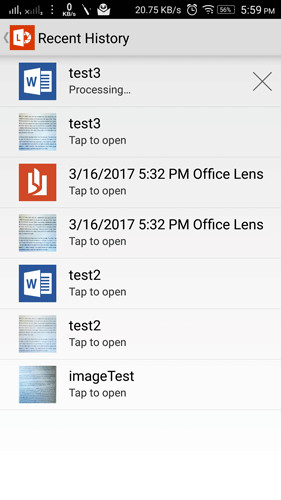
Once finished, the app will store the file as a document and be saved inside the OneDrive account. You can use Microsoft Word to open and edit this file when needed.
Download the Microsoft Office application for Android
Good luck!
FAQ
What is the main benefit of instructions for using the office lens application to convert image?
The main benefit is a clearer understanding of the topic and a practical way to apply the information covered in this guide.
What should I check before using instructions for using the office lens application to convert image?
Confirm compatibility, review the required settings, protect important data, and use the latest supported version whenever possible.
What should I do if the result is different?
Repeat the steps carefully, verify permissions and version differences, and consult the product's official support documentation for changes not shown in the article.
Related Articles
 Using Google Lens to Convert Images into Words, Find Information9 minutes read
 OneDrive for Android Updates with Office Lens3 minutes read
 How to Convert a PDF to a JPG Image6 minutes read
 10 Ways Google Lens Makes Life Easier on Android10 minutes read
 How to Convert a JPG Image to a PDF5 minutes read
 How to Convert Money into Words in Excel, Without an Add-in4 minutes read
Reader Comments 0
Sign in with email or Google to join the discussion.