Instructions for configuring RIPng routing protocol for IPv6
If you are interested in IPv6 technology, you may know that the exhaustion of IPv4 address space is only a matter of time. 2012 is the year for network engineers and people looking to become network engineers to learn how to configure routing protocols for IPv6, especially RIPng, EIGRP and OSPFv3..
If you are interested in IPv6 technology, you may know that the exhaustion of IPv4 address space is only a matter of time. 2012 is the year for network engineers and people looking to become network engineers to learn how to configure routing protocols for IPv6, especially RIPng, EIGRP and OSPFv3.
As you will realize, configuration is similar to deploying on IPv4, but they also have some changes to work with the IPv6 network model. The article will guide users to basic RIPng configuration for IPv6.
Configure RIPng
The configuration of RIP for IPv4 is not complicated and is often used as the basis for initial configuration towards routing protocols other than actual deployment. RIPng has a similar purpose. The protocol will probably not be widely deployed, but the configuration is relatively easy, helping users familiarize themselves with the routing protocol. Table 1 shows the commands needed to configure RIPng on a network device.
1 Enter global configuration mode (router) configure # configure terminal 2 Activate IPv6 single point forwarding for the router device (config) # ipv6 unicast-routing 3 Enter the configuration mode for the router interface (config) # interface interface 4 Enable RIPng on the router (config-if) interface # ipv6 rip process-name enableTable 1 - Basic RIPng configuration commands
The configuration of RIPng is also performed in interface configuration mode. RIP for IPv4 uses the network command when in router configuration mode to find out which interface RIP will be activated. But with RIPng, instead of the network statement, each interface that only needs to be RIPng enabled is sufficient.
RIPng uses RIPv2-like multicast addresses to connect between neighboring devices with RIP enabled. The multicast address is used just like the RIP FF02 :: 9 address (very similar to 224.0.0.9). However, the optional configuration commands for RIPng made in RIP router configuration are different. Table 2 shows the commands needed to enter the RIP router configuration mode.
1 Go to router # configure terminal mode 2 Enter the RIP router configuration mode IPv6 router (config) # ipv6 router rip process-nameTable 2 - Accessing RIPng router configuration mode
The following is an example of RIPng configuration. The following figure shows the basic network model of 2 routers R1 and R2 connected to each other via the FastEthernet interface. We need to configure RIPng for 2 routers, assuming the parameters are default.
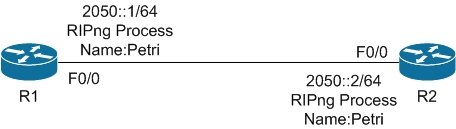
R1 (config) # ipv6 unicast-routing 3 Enter R1 configuration interface (config) # interface f0 / 0 4 Configure the interface IPv6 R1 (config-if) # ipv6 address 2050 :: 1/64 5 Activate RIPng on R1 (config-if) interface # ipv6 rip Petri enable To R2 6 In the global configuration mode R1 # configure terminal 7 Enable Ipv6 point forwarding for R1 (config) # ipv6 unicast-routing 8 Enter R1 (config) # interface f0 / 0 configuration mode 9 Configure IPv6 R1 (config-if) interface # ipv6 address 2050 :: 2/64 10 Activate RIPng on R1 (config-if) interface # ipv6 rip Petri enable
Table 3 - RIPng configuration
summary
As you can see, the configuration for RIPng in IPv6 is very simple, just like the previous RIP versions. The most important thing to remember is that the configuration no longer uses the network command for the interface anymore. Hopefully this article will help you initially join the routing protocol world of IPv6.