Table of Contents
This practical guide explains how to check and change the refresh rate of the windows screen with clear steps and useful context. It also covers common requirements, potential problems, and the details that can help you get better results.
Or if you want to reduce the refresh rate of the screen to a lower level to match the current computer hardware configuration, this is the article for you. In this article, I will help you better understand the screen refresh rate.
I. What Is the Screen Refresh Rate?
A monitor's refresh rate reflects the number of times it can draw a new image per second – the unit of measurement for screen frequency is Hertz (Hz).
Or in other words easier to understand: Screen refresh rate is the number of displayed frames per second on the screen.
Example for you to understand more easily: A screen with a refresh rate of 60Hz means it has the ability to refresh the image 60 times per second, similarly, a 120Hz screen has the ability to refresh the screen. 120 times per second.
As you can see, the higher the refresh rate of the screen, the smoother the image will be displayed, it is most obvious when you do heavy tasks, many animations, fast-paced. Gaming is the most obvious example!
Of course, in addition to the screen with a high refresh rate, other hardware parameters (CPU, GPU) must also be strong enough to make full use of the refresh rate, and the new FPS will be high.
II. How to Make the Most of the Screen Refresh Rate?
There are 3 most important factors to be able to take advantage of higher refresh rates, which are:
- The monitor supports high refresh rate.
- CPU (processor) must be powerful to provide important game instructions (including AI, physics, game logic, rendering data)
- The CPU (video card) must also be powerful enough to execute these instructions quickly and produce the graphics and display on the screen.
=> In short, the monitor can only display images at the limited speed that the system generates. So your computer's CPU and GPU need to be able to complete this process quickly.
If the computer's CPU and GPU can't feed the monitor a high enough number of frames, then obviously, the computer monitor won't be able to produce a high refresh rate image (no matter how high the screen frequency is). whatever).
If a monitor has a refresh rate of 144Hz, but the GPU only offers a limit of 30 frames per second, then the computer will certainly not be able to take advantage of that higher refresh rate.
III. How to Check and Change the Computer Screen Refresh Rate
There are many ways to see the computer screen refresh rate, you can do it the way you feel most comfortable.
Way #1. Change Screen Refresh Rate Using Windows Settings
On Windows 10
+ Step 1: You start Windows Settings by pressing the Windows + I key combination, or clicking the START button on the Taskbar.
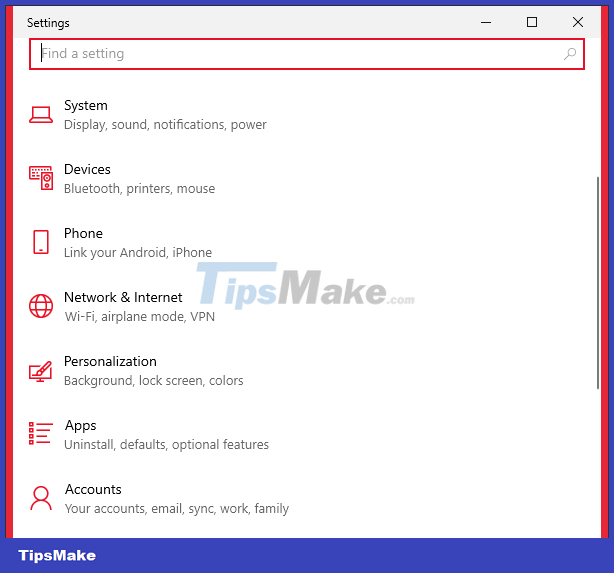
+ Step 2: You follow the following path: System => select Display => then select Advanced display settings.

+ Step 3: In the Refresh Rate section, select the scan frequency you want. Then you click Keep changes to apply.

On Windows 11
Just like on Windows 10, you press the key combination Windows + I => select System => and select Advanced display
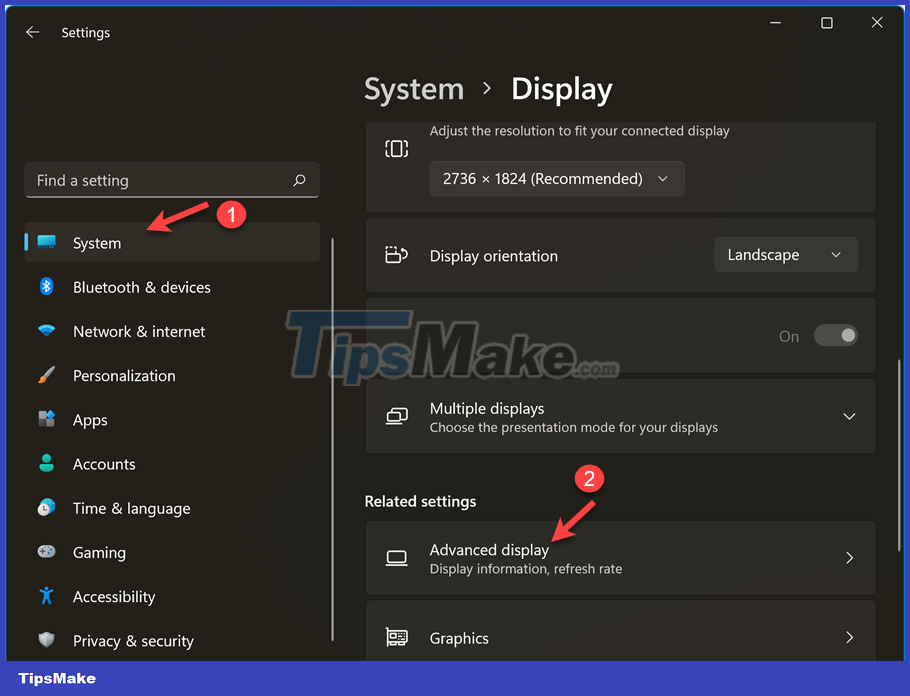
Then you scroll down to the Choose resfesh rate section and change to the screen frequency you want.
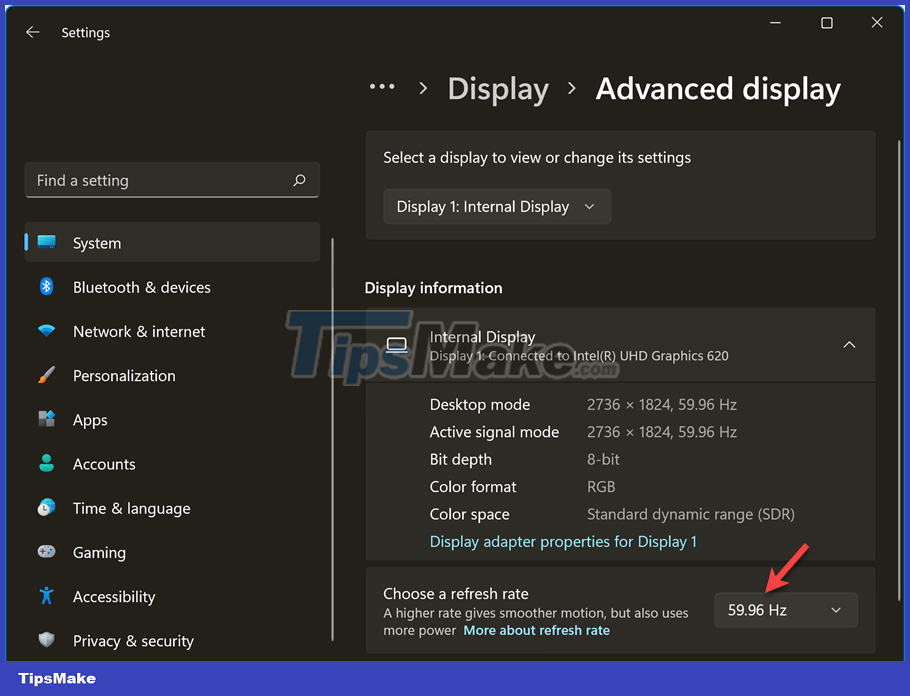
Or you can also click on Display adapter properties for Display 1 => select Monitor => and select the monitor frequency you want to use => select OK and you're done.

#2. View and Change Screen Refresh Rate with Display Adapter Properties
+ Step 1: You open the Run dialog box (using the Windows + R key combination) and copy the command below into => then press Enter.
rundll32.exe display.dll, ShowAdapterSettings 1
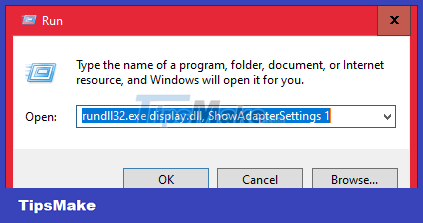
+ Step 2: You switch to the Monitor tab. In the Screen refresh rate section => you choose the refresh rate you want.

Step 3: Click OK to finish.
#3. Use the Command to See the Windows Computer Screen Refresh Rate (All Win)
+ Step 1: You open CMD by opening the Run dialog box (Windows + R) => enter the command cmd => and press Enter. After running the following command:
NOTE: You can also use this command in PowerShell!
wmic PATH Win32_videocontroller get currentrefreshrate
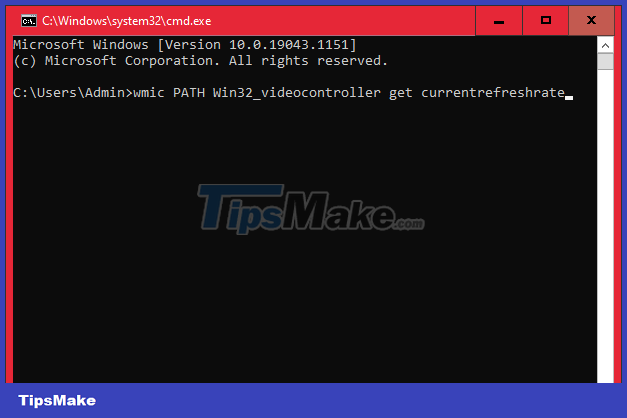
+ Step 2: Behind the CurrentRefreshRate section is the scan frequency you are using.

#4. Using the Intel Graphics Command Center Tool
If your computer is using an onboard graphics card, you can use the software here to change the scan frequency. An official tool from Intel guys!
+ Step 1: After installing on your computer, open the Intel Graphics Command Center software.

Step 2: Go to the Display tab. In the Refresh Rate section, select the scan frequency, then click keep to apply.

NOTE: In addition, there are a few more ways, you can refer to in the article: 3 ways to overclock your computer screen to play games smoother
IV. Conclusion
Ok, so in this article, I have shown you How to check and change the screen refresh rate. Through this article, I believe you have a better understanding of the screen refresh rate, right?
Not only on computers, but also on phones. You can understand the screen frequency in the way I defined above.
Hopefully this article will have the information you need, don't forget to rate 5 * for the article if you find it useful. Good luck!
Conclusion
Understanding Change the Scan Frequency of the Windows Screen makes it easier to compare options, avoid common mistakes, and apply the information in this guide more effectively. Review the relevant requirements before making changes or choosing a solution.
FAQ
How do you check and change the refresh rate of the windows screen?
Follow the steps in this guide in order, confirm the required settings or tools, and verify the result before making additional changes.
Is it safe to check and change the refresh rate of the windows screen?
It is generally safe when you follow the recommended instructions, use trusted tools, and avoid changing settings you do not understand.
What should you do if the process does not work?
Recheck the requirements, restart the device or application when appropriate, and review each step for missed settings or compatibility issues.
Related Articles
 How to Change the Refresh Rate on Windows 113 minutes read
 The Fastest and Simplest Ways to Adjust Screen Refresh Rate8 minutes read
 What Does the Refresh Rate Parameter on the Computer Screen, TV5 minutes read
 How to Change Windows 11 Refresh Speed3 minutes read
 Windows 11: Complete Guide: Frequency Screens3 minutes read
 What Is the Difference Between 60hz, 144hz and 240hz Refresh10 minutes read
Reader Comments 0
Sign in with email or Google to join the discussion.