How to Format a Floppy Disk
Need to format that ancient floppy disk? Windows and Mac both have built in formatting tools, or you can use the Windows Command Prompt for even more control. Formatting your disk will erase everything on it, so ensure that you have any...
Table of Contents
Method 1 of 3:
Using Windows Explorer
-
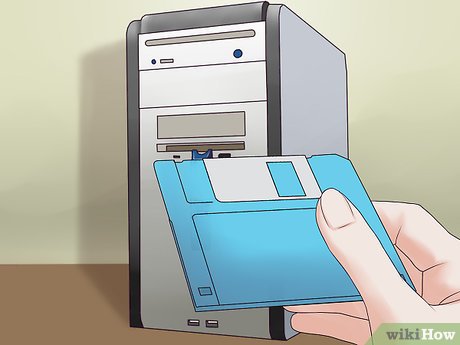 Insert the floppy disk. Make sure that the disk is inserted before you go looking for it on your computer. Ensure that the disk is inserted rightside-up.
- Make sure that the disk lock is not engaged before inserting the disk.
- When formatting a disk, all the information contained on it will be erased, so make sure you've backed up anything you need to save.
-
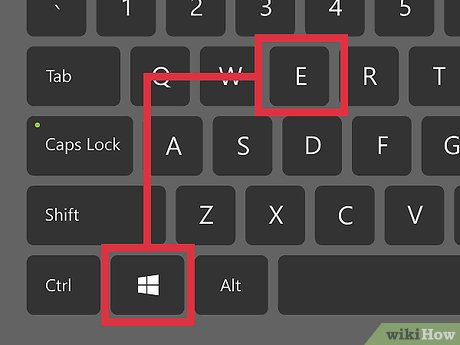 Open up your Computer/My Computer/This PC window. The label for this window will be different depending on the version of Windows you are running. In Windows XP, it is called My Computer and can be accessed from the Start menu. In Windows Vista and 7, it is called Computer and can be accessed from the Start menu. In Windows 8 it is called This PC and can be accessed from the taskbar.
- All Windows users can open this window by pressing ⊞ Win+E.
-
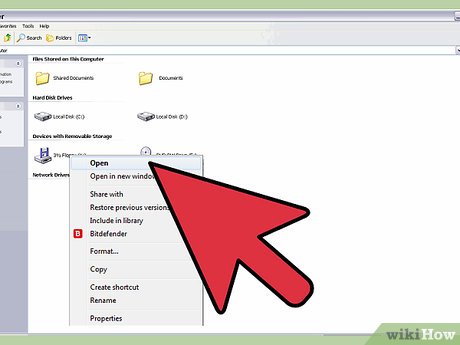 Right-click on the disk. You should see the disk in your list of drives. It should have a floppy disk icon, though not all Windows versions show the same thing. Floppy drives are usually B: or A:.
 -
 Select "Format" and choose your settings. This will open the Format window. You can use this window to choose your format settings before beginning.
- Capacity - This should be set to 3.5", 1.44 MB. Most users can leave this as is.
- File system - This should be set to FAT. Most users can leave this as is, unless you are formatting the disk for use with a specific file system. FAT is supported on Windows, Mac, and Linux.
- Allocation unit size - This should be set to Default allocation size. Most users can leave this at default.
- Volume label - Choose a name for the disk that will appear when it is inserted. Try to keep it to 16 characters or less.
- Format options. You can select "Quick Format" to format the disk quicker, but the data will not be securely deleted. The speed gains for quick formatting a floppy disk are negligible, so you're probably best leaving this unchecked. You can also choose to create an MS-DOS startup disk, which is useful if you're troubleshooting an older machine, but you won't be able to use the disk for storage.
-
 Start the format. Once you've selected your options, click Start to begin the format process. Click OK to confirm. You monitor the progress by looking at the bar at the bottom of the window.
Method 2 of 3:
Using the Command Prompt (Windows)
-
 Open the Command Prompt. You can access this from the Start menu, or by pressing ⊞ Win+R and typing cmd.
 -
 Insert the disk. Make sure that the disk is inserted before you go looking for it on your computer. Ensure that the disk is inserted rightside-up.
- Make sure that the disk lock is not engaged before inserting the disk.
- When formatting a disk, all the information contained on it will be erased, so make sure you've backed up anything you need to save.
-
 Perform a basic format. To quickly format the disk, type format x:. Replace X with the floppy drive letter. Press Y to confirm that you want to format the disk.
 -
 Add switches to modify the format process. There are several switches that you can add to the end of the format command to modify what happens. For example, to perform a Quick Format on the A: drive, you would type format /q a:.
- /fs:filesystem - Replace filesystem with FAT, FAT32, exFAT, NTFS, or UDF depending on your needs.
- /v:label - Replace label fi with the label you want to give the disk. Keep it under 16 characters for compatibility.
- /q - Performs a quick format.
- /c - Files added will be automatically compressed (NTFS only)
- /p:# - Overwrites the space on the disk with 0s and then random numbers for each count. Replace # with the number of counts you want to occur. This is best used for sensitive data you want to completely erase (Vista and later only).[1]
Method 3 of 3:
Using OS X
-
 Insert the disk. Make sure that the disk is inserted before you go looking for it on your computer. Ensure that the disk is inserted rightside-up.
- Make sure that the disk lock is not engaged before inserting the disk.
- When formatting a disk, all the information contained on it will be erased, so make sure you've backed up anything you need to save.
-
 Open the Disk Utility program. You can access this by clicking the Go menu, selecting Utilities, and then selecting Disk Utility.
 -
 Select the floppy disk. It will be listed in the left frame of the Disk Utilities window.
 -
 Click the "Erase" tab. This is located in the right frame of the Disk Utilities window.
 -
 Select the format. In the Volume Format drop down menu, select "Mac OS Standard" if you only plan on using the disk with other Macs. If you want to use it with multiple operating systems, select "FAT".
- You can label the disk by typing a label in the "Name" field.
-
 Start the format. Click Erase... to begin the formatting process. You monitor the progress by looking at the bar in the Disk Utility window.
Was this article helpful?
Your feedback helps us improve.
Related Articles
 Ransomware turns 35, how terrible was the world's first attack?2 minutes read
 Japan officially declared victory in the war on floppy disks4 minutes read
 How to assemble a floppy drive for a computer3 minutes read
 Diskcopy command in Windows6 minutes read
 Disk Management access in Windows 7 and Windows 83 minutes read
 What is a disk signature? Fix disk signature conflict error9 minutes read
Reader Comments 0
Sign in with email or Google to join the discussion.