How to use formulas and functions in Numbers on Mac
Do you use Numbers on Mac to track, log, manipulate, and analyze data? Whether you know it or not, this app provides some built-in tools for better data processing.
You can leave your computer behind and stop spending hours doing everything manually. Today's article will show you how to use formulas and functions in Numbers to make data easier to work with.
Do you already know how to use formulas and functions in Numbers on Mac?
- Use the Formula Editor
- Enter recipes quickly and easily
- Other useful formulas and functions
- Compare values
- Split text
- Clear excess space
- Combine data
- Convert to plain text
- Copy formulas and functions
Use the Formula Editor
Before you start inserting formulas and functions in Numbers, it's important to familiarize yourself with the Formula Editor.
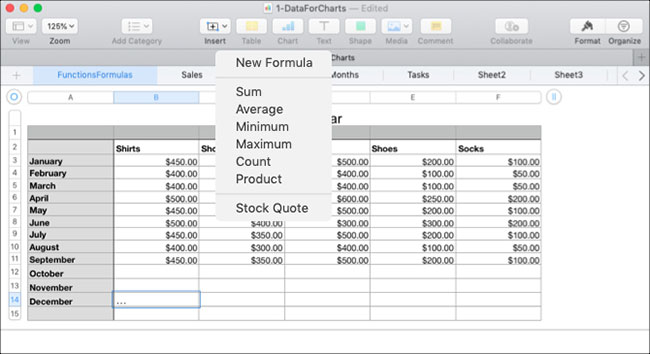
To do this easily, click a cell where you want to add a formula or function and enter Equal Sign. This is all Numbers needs to open the editor. You can also click Insert> New Formula from the toolbar to open the Functions Browser (the article will be discussed later).
You can move the Formula Editor by dragging to the left and resizing by dragging from one of the edges with a double-sided arrow.

You can click a cell or drag over a range of cells you want in your formula. They will appear in the editor. You can also use arithmetic operators to add, subtract, multiply and divide. And of course, you can enter numbers with or without decimal places.

You will click the green checkmark when finished with the editor and want to apply your formula. And if you change your mind, click the red X to close it without saving any changes.
Enter recipes quickly and easily
For your convenience, Numbers provides some basic formulas for you to use without having to enter it manually.
Select a cell you want to use the formula. Click the Insert button on the toolbar and select Sum, Average, Minimum, Maximum, Count or Product .

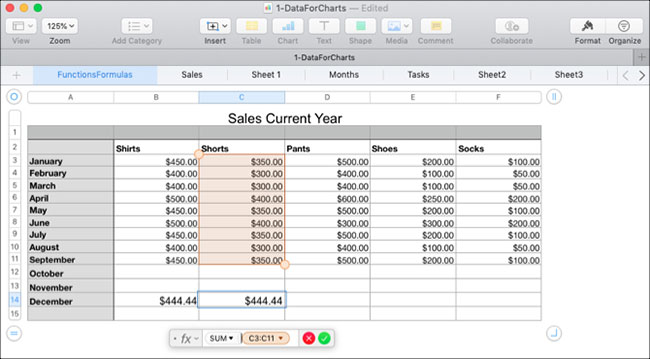
Numbers will make good predictions based on the data in the worksheet to use the cells and highlight them for you. And often, Numbers always makes the right choice. If the cells you see highlighted are correct, press the Return key to apply the formula.
If the highlighted cells are not the ones you want to use, click the cell containing the formula and the Formula Editor will open. Then, select the correct cells to display them in the editor. To complete the formula, click the checkmark to apply it.

Other useful formulas and functions
If the basic formulas or functions that the article has mentioned so far aren't enough to do what you want to do, there are some other useful ways to work with data.
Compare values
You can use comparison operators to see if the values in cells are equal, bigger, smaller, or not equal. The result of the formula will display as either True or False. This is useful if you want to compare sales, income, or expenses over months or years.
In the following example, the article wants to see if the sales from January this year are greater than or equal to the previous year.
1. Select the cell where you want the formula to be displayed and open the Formula Editor.
2. Click the first cell for the formula.
3. Enter the comparison operator. To compare 2 values greater or equal, enter <= .
4. Click the second cell for the formula.
5. Click the checkmark or press the Return key.

As you can see in the article example, this January sales were actually greater than or equal to last year with 'True' results in the formula box.
Split text
You can separate text strings if you have more information than you need or want to retrieve specific data, using the Right and Left functions. This is useful for extracting area codes from phone numbers, states from cities, or zip codes (postal codes) from address strings.
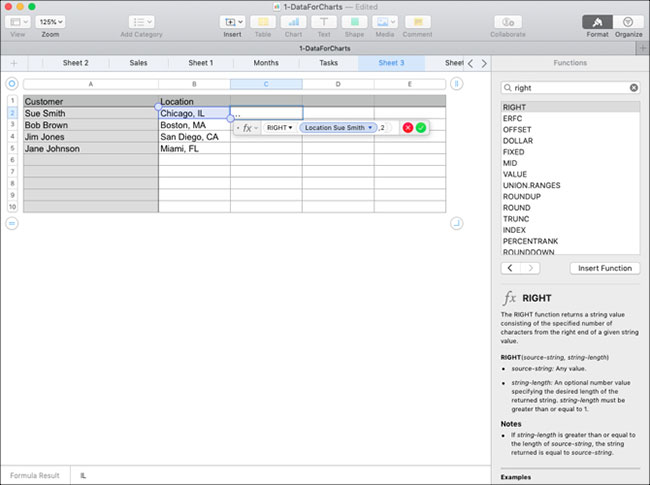
In this example, the article has a spreadsheet in which the data contains both the city name and two state abbreviations for each customer (such as Chicago, IL). The goal is to push the state information for each person into a separate school.
1. Select the cell where you want the formula to be displayed and open the Formula Editor .
2. Open Functions Browser by clicking the Format button at the top right.
3. Find 'Right' and select it from the list, then click Insert Function .
4. In Formula Editor , click 'source-string' and then click on the cell with data.
5. On the right in the editor, click 'string-length' and enter the number 2 .
6. Click the checkmark to apply the formula.

What this formula does is take two characters (step 5) from the right of the string (step 3). By applying this formula to the corresponding column, we can now see the state abbreviation for each customer.
Clear excess space
If the data in a spreadsheet comes from a database, it may not always be formatted the way you need it. Using the customer spreadsheet example above, you might have a customer first and last name with too much space between them. This can cause problems with automated email or even the mail merge feature when using those names.
With the Trim function in Numbers, you can automatically remove those extra spaces quickly.
1. Select the cell where you want the formula, and then open both the Formula Editor and the Functions Browser .
2. Find 'Trim' and select it from the list and click Insert Function .
3. In Formula Editor , click 'source-string' and then click on the cell with the data.
4. Click the checkmark to apply the formula.

Now you have a nice and clear list of customer names, there's no excess space that affects other software.
Combine data
Maybe your situation is the opposite of the example above. You have data in two different cells and want to combine them into one. You can do this with both numbers and text using the Concatenate function.
Suppose the data to be processed has a customer's first and last name split into two different cells. Email software needs those names placed next to each other.
1. Select the cell where you want the formula, and then open both the Formula Editor and the Functions Browser .
2. Find 'Concatenate' and select it from the list, then press Insert Function.
3. Click 'string', then click the first named cell and insert a comma.
4. Add a closing and opening quotation mark followed by a space between ( '' ) , then insert a comma.
5. Click in the cell containing the last name.
6. Click the checkmark to apply the formula.

All operations are completed! You already have a column with customer first and last names placed in the same field, instead of on different cells.
Convert to plain text
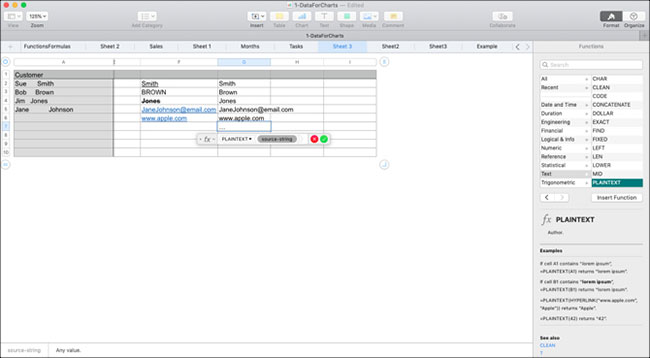
Another function in Numbers that can be very handy, especially when retrieving data from various sources, is the Plaintext function. You can have text and numbers in a spreadsheet formatted with rich text, which can include clickable links and bold, italic, or underlined names.
Using the Plaintext function, you can separate your data into plain plain text.
1. Select the cell where you want the formula, and then open both the Formula Editor and the Functions Browser .
2. Find 'Plaintext' and select it from the list, then click Insert Function.
3. Click 'source-string' and then select the cell with data.
4. Click the checkmark to apply the formula.

You will then see that your data has no rich text, HTML or other formatting.
Copy formulas and functions
With the examples that the article has shown here, you most likely want to apply formulas or functions to multiple cells. So you can easily drag to copy the formula to adjacent cells in rows or columns, depending on how your data is presented.
Select a cell with the formula you want to copy. When you see the yellow dot on the border of the cell, click it and drag it to the cells you want to copy it to, then release the mouse.
That formula or function doesn't just copy into those cells, it immediately applies it to the corresponding data.

The manipulation and analysis of data in Numbers spreadsheets can be made much easier with formulas and functions. To handle both numbers and text, try these formulas and explore some of the other built-in functions that Numbers provides. You will never know which tools are most useful to you until you try them out.
To learn more about Numbers, refer to the article: How to use conditional formatting in Numbers on Mac for more details.
Hope you are succesful.
You should read it
- ★ These scary numbers are haunting all over the world
- ★ Guide to look up phone numbers with Google and Facebook
- ★ Draw the guy wearing a cowboy hat with numbers from 1 - 10 exciting poles
- ★ Official information about the number of SIM 11 transfers is about 10 numbers of carriers
- ★ How to create interactive charts and graphs on your Mac using Numbers