How to use filters on Google Meet
Using filters on Google Meet or using filters on Zoom, online learning services are now very popular to help users change video frames, or even mask their faces when calling videos, changing face or add other details to your face.
Table of Contents
Using a filter on Google Meet will make the background behind it hidden and the video call frame is more beautiful and professional when we want to hide the current space. The following article will guide you to read how to use filters on Google Meet.
Instructions for installing filters on Google Meet
Step 1. First of all, we install Filters & Stickers for Google Meet utility on the browser here.
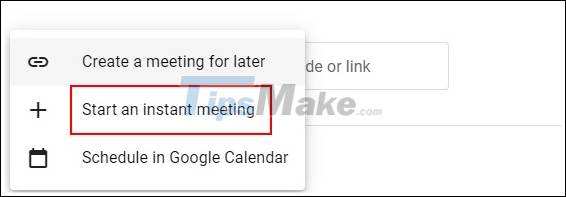
Step 2. Then you login Google.com website through your Google account. At the interface we click New meeting and then select Start an instant meeting to conduct video calls on Google Meet immediately.
Step 3. Display the video call interface and look to the left side we have the option to Add others to add the email addresses of those who want to join the group meeting, or you can share the meeting via the displayed URL.

Besides, we will also see the Filters & Stickers for Google Meet toolbar to use filters on Google Meets. You will have a choice of color filter for the frame or mask options.

Step 4. With the color filter option, you will have 13 different color filters such as Jimin, Gully, Jet, Merano, . You just need to click on the color filter you want to use.

Step 5. With mask filter, you will have some options such as hat, glasses, stickers to stick to left cheek or right cheek. Click on the sticker you want to use and then wait for the sticker to appear on the frame. If the computer has a high, stable configuration, when applying this masking filter will be faster than a slow computer.


Hope this information is useful to you. Good luck.
Was this article helpful?
Your feedback helps us improve.
Related Articles
 Instructions for using filters on Google Meet, smoothing skin3 minutes read
 How to return or livestream with Google Meet6 minutes read
 Instructions to rename Google Meet on PC and phone4 minutes read
 How to see every member on Google Meet2 minutes read
 Link download Google Meet: Free online meeting application4 minutes read
 Learn about Google Meet's new camera tools that will help your next call4 minutes read
Reader Comments 0
Sign in with email or Google to join the discussion.