How to turn a Raspberry Pi into a home automation panel
In this tutorial, you'll learn how to set up Domoticz, a powerful home automation control panel, on the Raspberry Pi to track, configure, and interact with various smart devices scattered throughout the home.
Table of Contents
Do you want to access and control all your smart devices from one location? In this tutorial, you'll learn how to set up Domoticz, a powerful home automation control panel, on the Raspberry Pi to track, configure, and interact with various smart devices scattered throughout the home.
Using Domoticz, you can read and write data from physical smart home sensors and access data from popular virtual services, like the Open Weather Map.
What to prepare
To complete this tutorial, you will need:
- Raspberry Pi runs Raspberry Pi OS
- The power cable is compatible with the Raspberry Pi model
- External keyboard and how to attach it to a Raspberry Pi
- External screen
- HDMI or micro HDMI cables, depending on the Raspberry Pi model
- Mouse or trackpad (optional)
When you have all the tools, you are ready to install Domoticz's home automation system.
Updated Raspberry Pi
Attach an external keyboard, monitor, mouse, and any other peripheral device to the Raspberry Pi, then plug the Pi into a power source.
Before you begin, you should check that your Raspberry Pi is fully updated. On the Raspberry Pi, launch Terminal and run the following command:
sudo apt update && sudo apt -y upgradeIf the Raspberry Pi installs any updates, then you should restart the Pi:
rebootInstall home automation hub Domoticz
To run the Domoticz installation script, enter the following command in Terminal:
curl -L https://install.domoticz.com | bashRead the information on the screen and if you agree, press the key Enteron the keyboard.
 Read the information on the screen and press Enter
You now have the option to disable HTTP or HTTPS. HTTPS is much more secure than HTTP, so you may want to consider disabling access via HTTP. You can move between these options with the arrow keys on your keyboard, then turn on and off HTTP / HTTPS with spaces.
If you have HTTP enabled, then Domoticz will ask which port you want to use for your HTTP connections (the default port is 8080). Assuming that you want to use this port, press the key Enter.
Domoticz will ask which port you want to use for HTTPS (the default port is 443). If you are satisfied with sticking to the default option, press Enterto move to the next screen.
Next, you will need to select an installation directory for Domoticz. By default, the installation script will automatically install Domoticz to the home directory, but you can choose a different directory if needed.
You can install Domoticz to any folder on your Raspberry Pi.
 You can install Domoticz to any folder on your Raspberry Pi
After installation, reboot the Raspberry Pi.
Access the Domoticz dashboard
To access the Domoticz control panel, you will need to know the local IP address of the Raspberry Pi. If you don't know, open Terminal on Raspberry Pi and run the following command:
hostname -IThe terminal will display your Raspberry Pi IP address.
In the address bar of the web browser, enter the IP address of the Raspberry Pi plus the port configured to use HTTP or HTTPS. For example, if you have HTTP enabled and use the default port (8080), you can access Domoticz at the following URL:
https://raspberry-pi-ip:8080 Access the Domoticz dashboard
You will now have access to the Domoticz web interface.
Add device
Now you can add all the smart home devices, sensors, applications, services, and technologies you want to monitor and control from the Domoticz dashboard. The process will vary depending on the hardware or software you are trying to add, and this tutorial will show you how to add Open Weather Map to the Domoticz dashboard, as you can create the required API key as long as charge.
Open Weather Map provides weather data for over 200,000 cities around the world, including wind speed, temperature and humidity. To access this data, you will need to create an Open Weather Map account and create an API key:
1. Visit the Open Weather Map website and sign up for a free account.
https://home.openweathermap.org/users/sign_up2. Once you are logged into your Open Weather Map account, select your username in the upper right corner.
3. Select the API keys tab .
 Select the API keys tab
4. In the Create Key box , enter a name for the key and click Generate.
5. Open Weather Map will now create API keys that you can add to the Domoticz dashboard.
To add Open Weather Map as a service:
6. Open the Domoticz control panel. In the menu bar, choose Setup> Hardware .
7. Click Add.
8. Open the Type drop-down menu . Now you can see all the smart devices, applications and services that Domoticz supports. Select Open Weather Map .
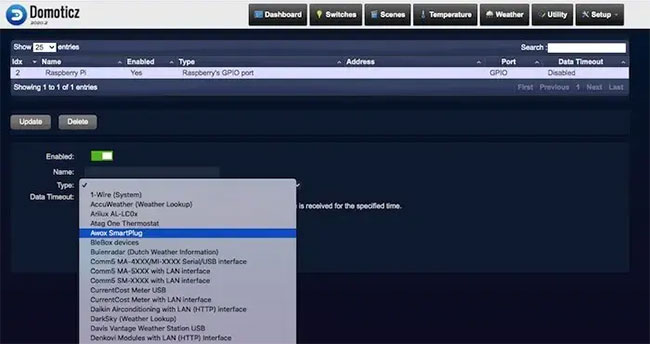 Select Open Weather Map
9. In the Name field , give the service a name.
10. In the API key , enter the Open Weather Map API key you just created.
11. In Location , enter the location you want to track. Note that while Domoticz accepts location data in a number of formats, including latitude and longitude, the author only succeeds in entering the name of the nearest city.
12. When you are satisfied with the information you have entered, click Add.
13. Assuming that Domoticz successfully connects to the hardware, service or application you just added, it will create one or more devices. To view these devices, navigate to Setup> Devices . Open Weather Map is listed as an available device.
 Open Weather Map is listed as an available device
14. Select the Add device icon .
15. In the pop-up window that appears, give this device a name.
16. Click Add device.
17. On the toolbar, select the Weather button - you will see all Open Weather Map data for the location you have chosen.
 On the toolbar, select the Weather button
If you want this information to appear on the main Domoticz dashboard, click on the small star icon. Now, if you select the Dashboard tab , you will see that the weather information is listed on the main Domoticz dashboard.
The process of adding all your smart home devices, applications and services to Domoticz will be different, but as a general rule, you will need to repeat the process of adding this item as a hardware component ( Setup > Hardware ) and then add it as a device ( Setup> Device ).
Each device and service you add to Domoticz will have its own settings, allowing you to create some unique and interesting home automation effects.
Was this article helpful?
Your feedback helps us improve.
Related Articles
 Learn about Home Assistant - Your home automation platform!8 minutes read
 What is Smart Home Smart Home?13 minutes read
 How to properly turn off the Raspberry Pi3 minutes read
 6 smarthome tools you should equip your family9 minutes read
 Utilize old computers to build Home Assistant and a free smart home system.6 minutes read
 These are the perfect single bo (SBC) tablets to replace Raspberry Pi8 minutes read
Reader Comments 0
Sign in with email or Google to join the discussion.