How to take a screenshot on the Raspberry Pi
No matter what type of computer you are using, there will definitely be times when you need to take screenshots. Perhaps you want to write instructions that show others how to perform a task, or maybe you want to share something you've seen in an app or website.
It's easy to take screenshots on any Raspberry Pi model, at least if you use Raspbian, the official Pi operating system. The following instructions are done on Raspberry Pi 4 running the latest version of the operating system, Raspbian Buster, but they will certainly work on any other model and any recent version of the operating system. .
Take screenshots with Scrot and PrtScr
 Take screenshots with Scrot and PrtScr
 Raspbian's built-in screenshot tool is called Scrot, and you can use it to take a screenshot of the entire screen at the touch of a button PrtSc. After you click PrtSrc, Scrot will save the PNG graphic file to the Home directory ( / home / pi by default), with the date and time as the file name.
However, you can also use Scrot via the command line to gain additional flexibility. For example, if you want to take a screenshot after a delay, you can open a Terminal window and type the command scrot -dfollowed by the number of seconds of delay. For example, with a delay of 5 seconds, the command would be:
scrot -d 5If you want to capture a specific window, use the -s option and then click the window you want and it will be saved. Create -sb if you want the outline of the window to be in the image.
scrot -sbAnd if you want to give the file a different name, rather than the date and time, you can name the file after scrot. For example, this command will capture the selected window and name it myimage.png:
scrot myimage.png -sbUse Gnome Screenshot
Scrot is great for the command line tool, but using a screenshot tool with a graphical interface is easier. The main graphical screen capture tool for Pi is Gnome Screenshot. You can install it by typing.
sudo apt install gnome-screenshotAs with any software installation, you'll want to make sure you have all applications and archives up to date before installation. So if you haven't done that recently, make sure you enter:
sudo apt update && sudo apt upgradeNow, you can find Gnome Screenshot in the Accessories menu , listed as Screenshot.
 Find Gnome Screenshot in the Accessories menu
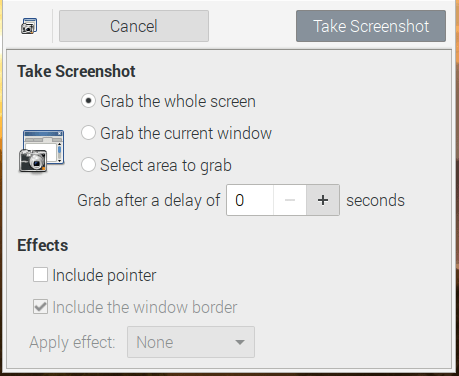
 When you open Gnome Screenshot, you have the option of capturing the entire screen, a window, or whatever part of the box you draw around. You can also select the delay and allow the mouse pointer to appear in the program (by default not).
 Screen capture options with Gnome Screenshot
 After you have taken the screenshot, Gnome Screenshot gives you the option to copy it to the clipboard, so you can paste it into an image editor like GIMP or save it with the file name of your choice.
 Gnome Screenshot gives you the option to copy to clipboard
 Create shortcuts for Gnome Screenshot
A real downside of Gnome Screenshot is that, as soon as you save an image, the application will close and you need to relaunch it to continue shooting. It will take a lot of clicks if you take a lot of photos in one session.
Luckily, if you create a customized shortcut for the Raspberry Pi, you can assign Gnome Screenshot to any key combination you want. In fact, you can change the configuration to PrtSrclaunch Gnome Screenshot instead of Scrot. In short, you need to do the following:
1. Open the file /etc/xdg/openbox/lxde-pi-rc.xml to edit.
sudo nano /etc/xdg/openbox/lxde-pi-rc.xml2. Add the following code somewhere in the section .
Gnome Screenshot will be assigned CTRL+ ALT+ PrtScr, but you can also override the normal start command PrtSrc Scrot by editing it in this section.