How to turn a Raspberry Pi into a WiFi Bridge
Today, it seems that every device supports WiFi, but not all devices actually have wireless Internet connectivity. This is where the Raspberry Pi works. You can turn a Raspberry Pi into a WiFi Bridge.
Table of Contents
Today, it seems that every device supports WiFi, but not all devices actually have wireless Internet connectivity. This is where the Raspberry Pi works. You can turn a Raspberry Pi into a WiFi Bridge.
If you want to reuse an old, only Ethernet-based desktop and need a quick, easy way to convert WiFi signals into an Ethernet connection, you can use the Raspberry Pi.
Things to prepare
To complete this tutorial, you will need:
- Raspberry Pi model with WiFi module (Raspberry Pi zero, 3 and 4) running Raspberry Pi OS
- The power cable is compatible with the Raspberry Pi
- External keyboard and how to attach it to a Raspberry Pi
- HDMI or micro HDMI cables, depending on the Raspberry Pi model
- External screen
- Ethernet cable
Updated Pi
If not already done, attach an external keyboard, monitor and any other peripheral to the Raspberry Pi, then plug the Pi into the power source.
Before you begin, check that the Raspberry Pi is up to date. Open a new Terminal by clicking the Terminal's icon on the Raspbian toolbar, then running the following commands:
sudo apt update && sudo apt -y upgradeSet up network service: Install dnsmasq
Next, install dnsmasq, provide the Domain Name System (DNS) caching and the Dynamic Host Configuration Protocol (DHCP) server. Use this package to handle DNS requests. This will allow the Raspberry Pi to act as a mini router for Ethernet-only devices.
To install dnsmasq, run the following command:
sudo apt install dnsmasqConfigure Ethernet connection
Next, let's set up the eth0 interface to use a static IP address, by modifying the dhcpcd.conf file . To open this configuration file, run the following command:
sudo nano /etc/dhcpcd.confNow, the dhcpcd.conf file will open in the Nano editor. In this file, add the following information:
interface eth0 static ip_address=192.168.220.1/24 static routers=192.168.220.0Save the changes by pressing Ctrl+ O. To close the configuration file, press Ctrl+ X.
These changes can be made by restarting dhcpcd service:
sudo service dhcpcd restartReplace the dnsmasq configuration file
The dnsmasq package provides a default configuration file, but you need to replace it with your own custom settings to let dnsmasq know how to handle DHCP and DNS traffic.
Before making any changes, rename and relocate the original dnsmasq.conf file:
sudo nano /etc/dnsmasq.conf /etc/dnsmasq.conf.originalOpen the alternative configuration file to edit:
sudo nano /etc/dnsmasq.confYou should now see the dnsmasq.conf file in the Nano editor. In Nano, add:
interface=eth0 listen-address=192.168.220.1 bind-interfaces server=8.8.8.8 domain-needed bogus-priv dhcp-range=192.168.220.50,192.168.220.150,12h
You can use the Nano editor to create custom dnsmasq.conf files.
Save the changes, by pressing Ctrl+ O. To close the configuration file, press Ctrl+ X.
Allow IP forwarding
Next, enable IP forwarding so that the Raspberry Pi can accept network packets from an Ethernet connection and forward them to the router.
To enable ipv4p IP forwarding, edit the sysctl.conf configuration file.
sudo nano /etc/sysctl.confThe sysctl.conf file will now launch in the Nano editor. In this file, find the following:
#net.ipv4.ip_forward=1Delete # so this line becomes:
net.ipv4.ip_forward=1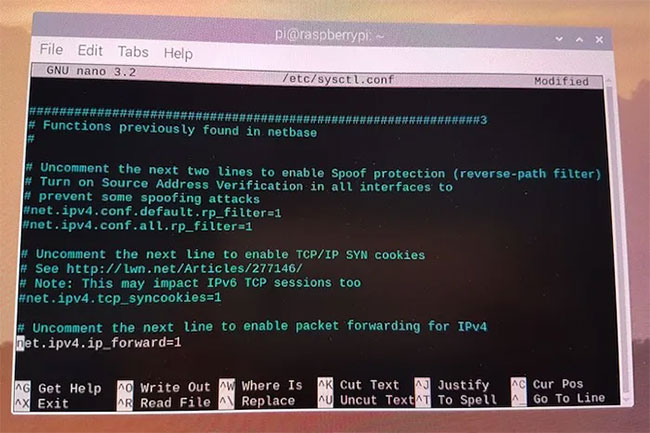
Save the changes and close the configuration file.
Now, make the new configuration file sysctl.conf valid:
sudo sh -c "echo 1 > /proc/sys/net/ipv4/ip_forward"Start forwarding traffic from Ethernet to WiFi
You have now successfully enabled IP forwarding. You can configure the firewall to forward traffic from the Ethernet interface (eth0) to a WiFi connection. With this relay, every device connected to the Raspberry Pi via Ethernet will have access to the WiFi (wlan0) connection of the Pi.
Add some rules to let the Raspberry Pi know how to forward all data packets it receives:
sudo iptables -t nat -A POSTROUTING -o wlan0 -j MASQUERADE sudo iptables -A FORWARD -i wlan0 -o eth0 -m state --state RELATED,ESTABLISHED -j ACCEPT sudo iptables -A FORWARD -i eth0 -o wlan0 -j ACCEPTSave these new rules:
sudo sh -c "iptables-save > /etc/iptables.ipv4.nat"These rules are deleted each time the Raspberry Pi restarts, so make sure they are reloaded on boot.
Determine what happens at startup by editing the rc.local file:
sudo nano /etc/rc.localNow, the rc.local file will open in the Nano editor. In the editor, find the following:
exit 0Add the following items directly on the 'exit' line :
iptables-restore < /etc/iptables.ipv4.natSave the changes and close the configuration file.
Check WiFi bridge
The final step is to start the dnsmasq service:
sudo service dnsmasq startNow you can check your WiFi bridge! Attach any Ethernet-only device to the Raspberry Pi via an Ethernet cable. The Raspberry Pi will now provide Internet connectivity for this Ethernet-only device.
Was this article helpful?
Your feedback helps us improve.
Related Articles
 How to turn off WiFi of Raspberry Pi6 minutes read
 How to properly turn off the Raspberry Pi3 minutes read
 Fix Raspberry Pi not connecting to WiFi / Ethernet4 minutes read
 How to turn a Raspberry Pi into a wireless access point8 minutes read
 How to set up a USB WiFi Adapter on a Raspberry Pi4 minutes read
 How to turn a Raspberry Pi into an IRC server7 minutes read
Reader Comments 0
Sign in with email or Google to join the discussion.