How to turn a Raspberry Pi into a NAS with OpenMediaVault
The Raspberry Pi is small, works quietly, and can connect to your home network. So it's no surprise that the Raspberry Pi NAS box is a popular Pi project. Luckily, using a Raspberry Pi as a NAS box has never been easier. Using a Linux distribution called OpenMediaVault, you can quickly and easily create a Raspberry Pi NAS box.
How to use Raspberry Pi as a NAS box
This is a pretty simple project. You'll download OpenMediaVault, install it on your Raspberry Pi, tweak some settings, and plug in external storage devices. For this project, you'll need a Raspberry Pi, the usual peripherals (monitor, keyboard, mouse, microSD card), and a computer with an SD card reader. Naturally, you'll also need USB storage devices - preferably self-powered ones with plenty of storage space for all the content you need.
Step 1: Download OpenMediaVault
Download the Raspberry Pi version of the operating system here. The downloaded file will be named omv_rpi2_rpi3_3.0.63.img.gz or something like that (the numbers at the end of the file name will change with future updates).
Step 2: Extract the disk image
Use your favorite program to unzip files - 7zip used article.
Step 3: Burn the OpenMediaVault disk image to the microSD card
In the past, make tech easier than ever to do this with another operating system - check out our guide to installing an operating system for a Raspberry Pi for more details - but you can do it under any circumstances. any way you want. Disk Utility of Mac or Win32 Disk Imager of Windows will be useful tools.
Step 4: Connect everything and launch Pi
Insert the microSD card into the Pi and connect the Pi to the local network using an Ethernet cable. Of course, you'll also want to plug in your external storage devices. Then go ahead and plug in the Pi power supply. You will find that there is no real installation and that the Pi should be up and running again without any trouble.
Step 5: Set up OpenMediaVault
When you start up your Raspberry Pi NAS, OpenMediaVault will output your IP address:
To manage the system, visit the OpenMediaVault web control panel:
eth0: [địa chỉ IP]Record and then return to the computer. Open a browser on your computer and enter the IP address of the Pi. You should see the control panel for your new Raspberry Pi NAS. Sign in with your credentials: admin (username), openmediavault (password) and do some configuration!
Step 6: Mount the drives
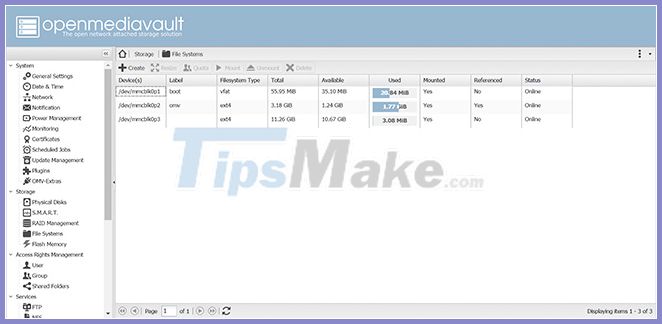 Mount the drives
On the left menu, click File Systems (located under the heading Storage ). You should see your USB storage devices in the Device (s) column . Just choose one and (assuming your device is not mounted yet) hit Mount , then select Apply. It's done!
Step 7: Create shared folders
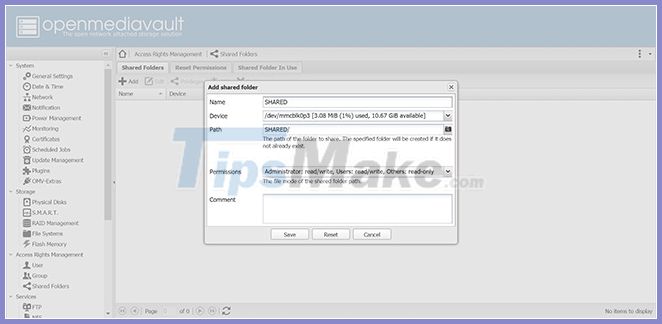 Create shared folders
The purpose of this project is to deliver files to multiple devices on the network. To do that, you need to create shared folders.
Back in the main navigation menu, click Shared Folders . It will be under Access Rights Management . Just press Add to get started - you'll be able to name a folder, choose the storage device it will be on, and specify the path (you can also keep the name as the path). Click Save when you are finished.
Step 8: Turn on SMB / CFIS
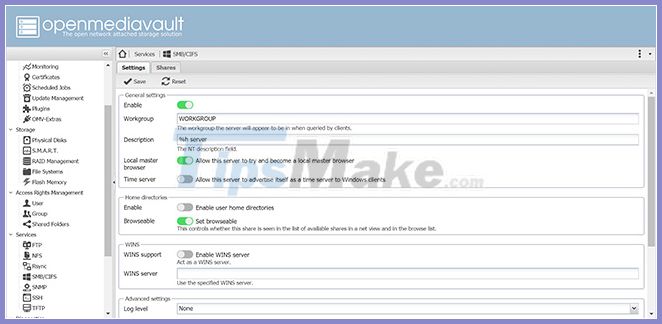 Turn on SMB / CFIS
Creating shared folders is only half the battle. Now, you need to enable SMB / CFIS so that other computers on the network can access the shared folders. This is easy: Go back to the main menu, click on SMB / CFIS (under Services ) and enable the option labeled Enable. Then click Save> Apply .
There are two tabs for the SMB / CFIS menu . You will be on Settings , but switch to Shares. Click Add and then, in the drop-down menu, select the shared folder you created in the previous step. Click Save , then repeat as needed until all shared folders are really shared!
Step 9: Add the user
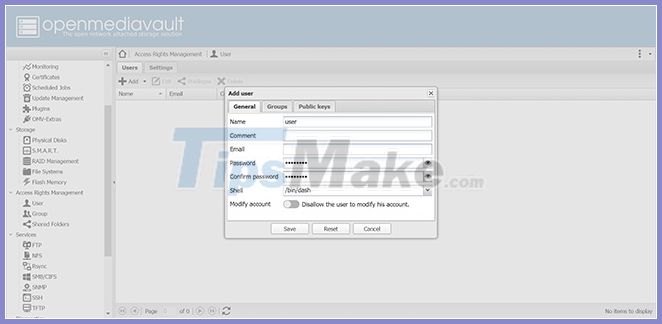 Add users
You can add multiple users to OpenMediaVault, which means you can set different permission levels for each person. To add users, click User under Access Rights Management on the main left menu. Click Add , give the user a name and password (you can also add things like an email address if you want) and remember to hit Apply.
Step 10: Access the file
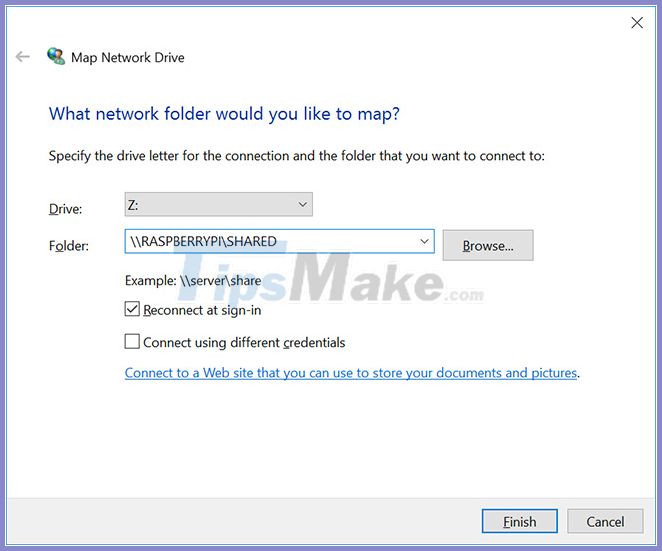
The article has covered everything you need to do with OpenMediaVault. Now, let's talk about the PC or Mac you are using to access these files. In either case, you will need to map a new shared memory from your computer.
On your PC, you'll need to use File Explorer. Click This PC , then click the Computer tab , then select Map Network Drive . You will need to select the drive letter from the drop-down box next to Drive - you can use any unused letter. In the Folder field , enter the path to the network storage drive. It will be RASPBERRYPI [folder] , where [folder] is the name of the shared folder. Click Finish and sign in using the credentials you created in step 8.
On a Mac, use Finder. Type Command + K to enter a window labeled Connect to Server . Enter smb: // raspberrypi in the Server Address field (you can also use an IP address instead of "raspberrypi"). Then click Connect , select the volume you want and click OK.
The NAS is now fully operational. Of course, this tutorial doesn't cover everything you can do with OpenMediaVault. To get the most out of the program, you should check out the OpenMediaVault wiki at:
https://openmediavault.readthedocs.io/en/5.x/