How to set up livestream Raspberry Pi security camera
After you record an individual image using your webcam / camera (USB), you might also want to view the image directly on a smartphone or on a PC from outside your home network. The article will show you how to configure livestream Raspberry Pi security camera..
After you record an individual image using your webcam / camera (USB), you probably want to see the live image as well. This can take place on smartphones or on PCs from outside the home network. The article will show you how to configure livestream Raspberry Pi security camera.
The great thing is that almost any USB camera (as well as a webcam) can be used. Depending on the location, for example, a camera without an infrared filter may be more useful for night recording.
Equipment required
If you want to connect a USB camera, the Raspberry Pi obviously has a blank USB port. However, you can also use the official camera, available in two versions:
- The green standard version has 8MP : Can record videos at 1080p. Because it is equipped with an infrared filter, it is particularly suitable for recording daylight or where there is enough light radiation.
- Black NoIR version : The specifications (resolution, etc.) are the same, but no IR filter is installed, which makes it better to record bad lighting conditions. This option is especially recommended for dark scenes.
Both cameras can be directly connected via CSI connectors and do not use USB ports. Newer Zero models (from 2nd generation) now also have a CSI port.
Also, any USB webcam can be used as long as the corresponding drivers for Linux are available. If the Raspberry Pi doesn't have a built-in WiFi adapter, it needs to be retrofitted as network connection or the Internet cannot be avoided.
Prepare for the livestream
Before activating the Raspberry Pi camera stream or USB webcam, you need to update the packages:
sudo apt-get update sudo apt-get upgradeYou can then install the Motion tool, which makes livestreaming possible.
sudo apt-get install motion -yThe installation will take a while.
If everything still works so far, the camera can be connected. If you are using a USB webcam, you can check if it has been detected:
lsusbIf no special driver is required, all connected cameras / video devices will be displayed with the following command:
ls /dev/video*If you are using one of the official camera modules, it is important to do the following for the camera to be displayed immediately.
sudo modprobe bcm2835-v4l2If only a single Raspberry Pi / webcam camera is connected, using / dev / video0 , the device will be assigned. If several devices are connected, you must select the device to stream.
Configure livestream Raspberry Pi
For the steps to set up some subsequent settings, we need to see the camera details:
v4l2-ctl -VFor the USB webcam for example, the article author received the following output. We will immediately specify the information for resolution, etc. in the configuration file.
pi@raspberrypi:~ $ v4l2-ctl -V Format Video Capture: Width/Height : 640/480 Pixel Format : 'YUYV' Field : None Bytes per Line: 1280 Size Image : 614400 Colorspace : SRGB Flags :Feel free to edit Motion's configuration file:
sudo nano /etc/motion/motion.confThe following lines must be adjusted (variables can be searched for by CTRL+ W):
# Start in daemon (background) mode and release terminal (default: off) daemon on . # Restrict stream connections to localhost only (default: on) stream_localhost off . # Target base directory for pictures and films # Recommended to use absolute path. (Default: current working directory) target_dir /home/pi/MonitorThe following lines should also be changed:
v4l2_palette 15 # Nummer aus der Tabelle davor entnehmen, 15 enstpricht YUYV . # Image width (pixels). Valid range: Camera dependent, default: 352 width 640 # Image height (pixels). Valid range: Camera dependent, default: 288 height 480 # Maximum number of frames to be captured per second. # Valid range: 2-100. Default: 100 (almost no limit). framerate 10Save changes with the shortcut CTRL+ Oand close with CTRL+ X. Other options (ports, etc.) can also be adjusted later (requires restart).
Now, you must enable the daemon to run the service later:
sudo nano /etc/default/motionReplace No with Yes in the following command:
start_motion_daemon=yesYou must now create the directory that was previously designated as the storage location for the captured frames and give it the necessary recording permissions:
mkdir /home/pi/Monitor sudo chgrp motion /home/pi/Monitor chmod g+rwx /home/pi/MonitorThen you can start the service:
sudo service motion startTesting the Raspberry Pi livestream surveillance camera
To check if the camera actually sends images directly, there are basically two options: A simple way is to use the browser (Mozilla Firefox, Chrome, etc.) and the name of the Raspberry Pi followed. is the port (default: 8081). If you have not changed the hostname and port, you will be able to see stream: http:/// raspberrypi: 8081 / (Alternatively, the local IP address can be used, such as 192.168.1.51:8081 ).
Some older browsers (like Internet Explorer) do not support this stream. Those users can choose to livestream on VLC Player, for example. To do this, simply open VLC Player and specify in Media menu > Open Network Stream ( CTRL+ N) the above address. This can also be done in VLC Player for smartphones and tablets (Android, Apple): Select Open Media Address in the menu and the IP address includes the port.
Depending on the framerate specified (in the configuration file), the image may be better or not. Of course, the camera must also support that frame rate.
Make livestream available outside home network
Because viewing the camera in a private network doesn't make much sense, people often want to access it from the outside. To do this, you need a fixed IP or DNS service.
Note: You can theoretically not use a static IP address, but the downside is that after each reconnection, you will get a new IP address. Because the provider (approximately once per day, usually at night) is forced to reconnect the router, the DNS service is highly recommended, because the DNS address does not change.
In addition, you must open the selected port (eg 8081) in the router to perform port forwarding. This means you can assign this port from outside the network and connect to it.
In the Port forwarding header or similar, you can specify that the port is opened for a specific local IP address. The example router looks like this:
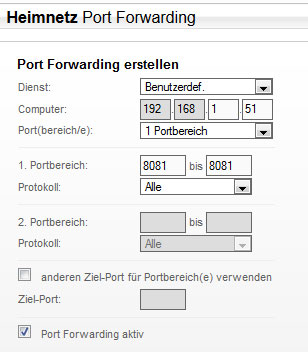 Specifies that the port is opened for a specific local IP address
The menu of most routers can be accessed via 192.168.1.1 or 192.168.0.1 with the browser.
If you use VLC Player, of course, now, you must replace the local IP address you previously specified with DNS or static IP address (the port is still the same). Some routers may fail to do this in the home network.
For home testing, you can, for example, use mobile data on your phone. Turn off WiFi and check if you can watch the livestream of the Raspberry Pi surveillance camera. Depending on your Internet connection (upload speed), the image may be a bit slow.