How to set up Spotify Connect on Raspberry Pi
Spotify Connect allows you to play all your favorite tunes through any compatible wireless product. In this tutorial, you'll learn how to set up your Raspberry Pi as a cheap, portable Spotify Connect device..
Spotify has a huge music collection and offers users many options to stream their favorite music. You can enjoy Spotify through a web browser or by installing a dedicated application on your smartphone or computer. However, these methods do not always yield the highest sound quality.
Spotify Connect solves this problem by enabling all your favorite tunes to be played through any compatible wireless product, including soundbars and independent speakers.
In this tutorial, you'll learn how to set up your Raspberry Pi as a cheap, portable Spotify Connect device.
Things to prepare
To complete this tutorial, you will need:
- Raspberry Pi runs Raspbian. If you don't have Raspbian, get the latest version and flash it to your SD card using Etcher.
- The power cable is compatible with the Raspberry Pi
- External keyboard and how to attach it to a Raspberry Pi
- HDMI or micro HDMI cables, depending on the Raspberry Pi model
- External screen
- Ethernet cable or connection via WiFi
- The cable connects to the headphones so you can attach the Raspberry Pi to audio devices such as speakers or USB sound cards for higher quality sound.
- Sign up for Spotify Premium
Are you running the latest version of Raspbian?
To get started, start up the Raspberry Pi and run the latest version of Raspbian. Start the Raspberry Pi and open the Terminal window. Enter the following commands:
sudo apt update sudo apt upgradeIf Raspbian installs any updates, then you will need to restart your Raspberry Pi by clicking the small Raspberry Pi icon in the upper left corner, then selecting Shutdown> Reboot .
Install the Spotify client
This tutorial uses the Raspotify, Spotify Connect client specifically designed for the Raspberry Pi.
Raspotify requires curl and apt-transport-https packages , so open Terminal and make sure these packages are installed on your Raspberry Pi:
sudo apt install -y apt-transport-https curlNext, add the Raspotify repository and the associated GPG key. The GPG key is especially important, as it will allow the Apt package manager to verify any file it retrieves from the Raspotify repository. In Terminal, run the following two commands:
curl -sSL https://dtcooper.github.io/raspotify/key.asc | sudo apt-key add -v -echo 'deb https://dtcooper.github.io/raspotify raspotify main' | sudo tee /etc/apt/sources.list.d/raspotify.listThe Raspotify repository has been successfully added, but currently the package manager is unaware of this repository. So, run the following Terminal command:
sudo apt updateYou can now install Raspotify:
sudo apt install raspotifyRaspotify will automatically launch, so you're ready to start streaming music to your Raspberry Pi!
Enjoy Spotify on the Raspberry Pi
You can now send music to the Raspberry Pi from the Spotify mobile app or desktop. In this tutorial, Spotify for Android is being used, so the steps may be slightly different if you use an alternate platform.
1. Launch the Spotify application.
2. Select the song you want to play.
3. Click on Devices available at the bottom of the screen.
 Click on Devices available
4. In the lower left corner, select the Devices small icon .
 Select the Devices small icon
5. Find your Raspberry Pi and click on it.
 Find your Raspberry Pi and click
The Raspberry Pi will now play the song of your choice!
Configure Spotify Connect
To improve user experience, you can make some changes to the Raspotify software.
You can edit the Raspotify setting on the network by running the following Terminal command:
sudo nano /etc/default/raspotifyThis will launch a configuration file in the Nano editor.
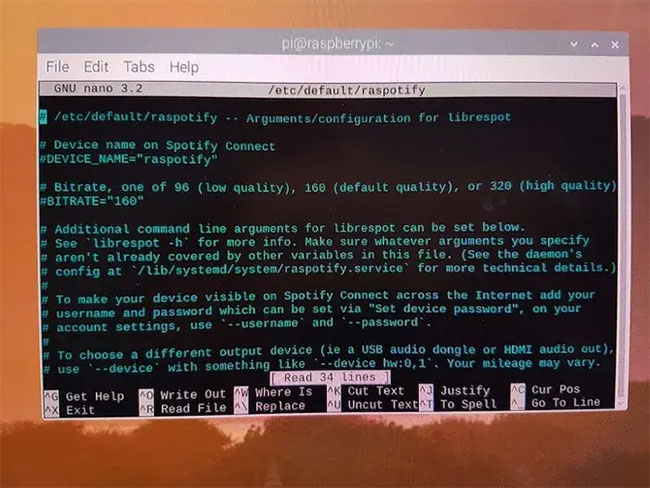 Configuration file in Nano editor
You can make many changes to this file including:
Name the Raspberry Pi
By default, your Raspberry Pi will be named raspotify (raspberry pi) . If you have multiple Raspberry Pis online, you may want to give each device a unique name - for example, Raspberry Pi Kitchen or Spotify Connect Client .
To rename a Raspberry Pi, find the following line:
#DEVICE_NAME="raspotify"And make the desired changes - for example, this tutorial uses:
DEVICE_NAME="Jessica's Office"Do not forget to delete the # symbol !
Save changes with the Ctrl+ shortcut X, then press the key yand Enteron the keyboard.
Every time you change the configuration file, you will need to restart your Raspotify service by entering the following command in Terminal:
sudo systemctl restart raspotifyCheck out the Spotify app on your smartphone or tablet and you'll notice that the Raspberry Pi now has a completely new name.
 Name the Raspberry Pi
Increase sound quality
Bitrate (bit rate) refers to the amount of data processed in a given period of time. The higher the bitrate, the better the sound quality, but the lower bitrate will consume less data (this may be a concern if you play Spotify on your smartphone).
The standard bit rate for Spotify Connect is 160 kbps, but audio enthusiasts can enjoy high quality audio by increasing this value to 320. Also, you can experiment with low quality bitrates at 96 kbps for Spotify to see if you can tell the difference.
Regardless of whether you choose low quality (96), medium quality (160) or high quality (320), you can control the bitrate setting of Spotify by editing the following line:
#BITRATE="160"Save the changes by pressing Ctrl+ X, Yand then Enter. Finally, you will need to restart the Raspotify service:
sudo systemctl restart raspotifyUltimately, the quality of sound depends on the audio device you attach to the Raspberry Pi. Don't forget to use these Spotify tips to enhance your listening experience.