Turn your Raspberry Pi into an ad blocker
While there are many ad-blockers that can remove ads from your computer, they rarely work on other devices, such as smartphones or tablets.
This article will show you how to convert a Raspberry Pi into an ad blocker all over the network, using Pi-Hole. Once completed, you will be able to block ads on laptops, computers, smartphones, tablets and any other devices connected to the network.
Block ads for the whole network with Raspberry Pi
- Things to prepare
- Install Pi-Hole on Raspberry Pi
- Choose a DNS provider
- Which blacklist should Pi-Hole use?
- Choose Internet Protocol IPv4 or IPv6 (or both)?
- Configure static IP address
- Tracking Pi-Hole with web administration interface
- Log Pi-Hole data
- Log in to your Pi-Hole account
- Resovle problem
- Update the router: Create an ad blocker all over the network
- How to block online ads on specific devices
- 1. Windows
- 2. Linux
- 3. macOS
- 4. iPhone
- 5. Android
Things to prepare
To complete this tutorial, you will need:
- Raspberry Pi runs Raspbian. If Raspbian is not installed, download the latest version and flash it using Etcher.
- The power cable is compatible with the Raspberry Pi
- External keyboard and how to attach it to a Raspberry Pi
- HDMI or micro HDMI cables, depending on the Raspberry Pi model
- External screen
- Connect Ethernet cable or WiFi
After assembling the tools, you are ready to create ad blockers across the network.
Install Pi-Hole on Raspberry Pi
First, attach an external keyboard, monitor, and any other peripheral to the Raspberry Pi, then attach the Pi to the power source.
As soon as the Raspberry Pi boots up, you're ready to download the Pi-Hole installation script. Just launch Terminal (by clicking the Terminal icon in the Raspbian toolbar), then enter the following command in the Terminal window:
curl -sSL https://install.pi-hole.net | bashPress Enter. Raspbian will download the script and start the device configuration process to use Pi-Hole.
After a few moments, the Pi-Hole setup screen will automatically launch.
After running the installation script, the Pi-Hole setup dialog will automatically launch.
Keep pressing Enterto switch through the introductory screens until you are asked to let the Pi-Hole work over WiFi ( wlan0 ) or Ethernet ( eth0 ).
 Use the arrow keys to select wlan0 or eth0
 Use the arrow keys to select wlan0 or eth0 (this guide is using WiFi) and press Enter.
Choose a DNS provider
You need to choose an upstream DNS provider, which will be responsible for answering queries for non-advertising domains.
Pi-Hole supports the following pre-installed DNS providers, but you can enter your provider by selecting Custom.
- Google (ECS)
- OpenDNS (ECS)
- Level3
- Comodo
- DNS.WATCH
- Quad9 (filtered, DNSSEC)
- Quad9 (unfiltered, DNSSEX)
- Quad9 (filtered + ECS)
- Cloudflare
This guide is using Google, but you can choose any DNS provider you like.
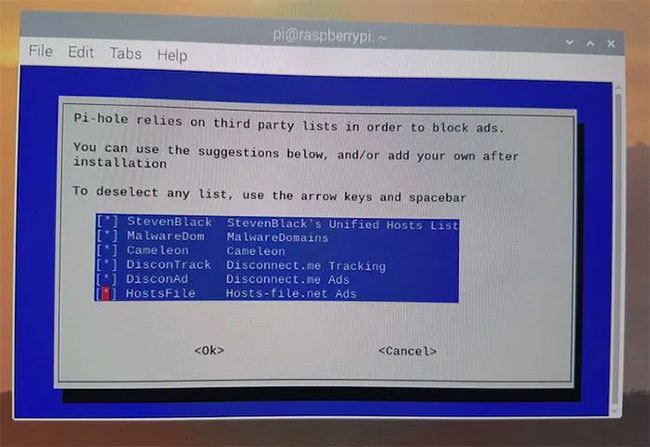
Which blacklist should Pi-Hole use?
Specifies a list that Pi-Hole should use to identify and block unwanted content.
 Specifies a list that Pi-Hole should use to identify and block unwanted content
 Unless you have a specific reason to change these settings, leave the default options as they are.
Choose Internet Protocol IPv4 or IPv6 (or both)?
It doesn't matter whether you choose IPv4 or IPv6, but if you want to block as many ads as possible, you should choose both IPv4 and IPv6.
Configure static IP address
Use current network settings as static address Pi-Hole. Assuming you are very satisfied with the information displayed on the screen, use the arrow keys to select Yes , then press Enter.
Read the disclaimer carefully and if you agree, select OK.
Tracking Pi-Hole with web administration interface
You will be asked if you want to install the Pi-Hole web administration interface. This interface provides insight on how the Pi-Hole works online, so you should choose to install the web interface when prompted.
 You should choose to install the web interface when prompted
 If you are installing the web management interface, you should also install lighttpd web server when prompted.
Log Pi-Hole data
You can choose to disable Pi-Hole logging capabilities, but you should enable it, as they provide some useful information.
You will be prompted to select the privacy mode for FTL, this is the level of information that will be included in Pi-Hole statistics. Choose one of the following options:
- Show everything : Show everything.
- Hide domains : Show and store all domains as hidden.
- Hide domains and clients : Display and store all domains as hidden and the client is 0.0.0.0.
- Anonymous mode : Hide all details except the most anonymous statistics.
- Disabled statistics : Disable all statistical processing, including query counters.
Log in to your Pi-Hole account
The setup dialog box will display the address of the Pi-Hole web administration interface and the password you need to log into this interface. Please record this information!
If you access the provided URL, you will encounter the standard Pi-Hole web interface and be able to log in with your password.
The web administration interface is divided into the following sections:
- Query log : This will display the most recent queries that have been made to the DNS server.
- Whitelist : You can specify domains that Pi-Hole should never block.
- Blacklist: Are some ads still trying to get past Pi-Hole? If you can identify the domain responsible for these fake ads, you can add it to your Pi-Hole blacklist.
- Disable: This is where you can temporarily or permanently disable Pi-Hole to see all your favorite ads again!
- Update lists: Make sure you have the latest version of the Pi-Hole ad blocking list by activating manual updates.
- Query adlists : Use this tool to check if a specific URL is included in the Pi-Hole ad blocking list.
- Tail pihole.log : This tool allows you to check the Pi-Hole log file, so you can see exactly how Pi-Hole is handling incoming requests.
- Settings : You can make some changes to the Pi-Hole configuration, including the upstream DNS provider you want to use.
This is only a brief overview of the Pi-Hole web administration interface. It is well worth the time to explore this interface in more detail!
Resovle problem
While configuring Pi-Hole, you may encounter the following error in the Terminal window:
'Could not resolve host FTL Engine not installed.'If you see this message, run the following Terminal command:
sudo nano /etc/resolv.confThis command will launch the resolv.conf file in the Nano editor. You need to add the IP address of the selected DNS provider to the resolv.conf file. For example, this tutorial is using Google as a DNS provider, so a quick search on Google suggests that 8.8.8.8 should be added to resolv.conf:
nameserver 8.8.8.8To save the changes, use the shortcut Ctrl+ O, then press Ywhen prompted.
Close resolv.conf using the Ctrl+ shortcut X.
Relaunch the Pi-Hole setup conversation by running the following Terminal command:
curl -sSL https://install.pi-hole.net | bashYou can now complete the setup dialog box without any errors.
Update the router: Create an ad blocker all over the network
You are ready to update your device or router to use Pi-Hole. If you want to block ads on all devices connected to the network, you'll need to change the router's DNS settings to point to the Raspberry Pi device.
The process of changing the router's DNS settings will vary depending on the router model, but overall, you'll need to:
- Go to the admin page of the router.
- Log in with your username and password. If you do not know this information, you most likely used the default manufacturer's username and password. Find this information on the manufacturer's website, or in the documentation that came with the router.
- Find any tab, menu or section containing the words 'DNS server' or 'DHCP server'. Note that these settings may be hidden in the Advanced setup section .
- Update the router's primary DNS server to the Raspberry Pi's IP address. If you don't know this address, you can access it by opening the Raspbian window from the Terminal and running the following command:
hostname -IFor instructions on how to update your router's DNS settings, check the manufacturer's website or the documentation that came with the router.
How to block online ads on specific devices
You can also change DNS settings for specific devices and operating systems.
1. Windows
To update DNS settings on Windows:
- Launch Control Panel.
- Navigate to Network and Internet> Network and Sharing Center> Change adapter settings .
- Select the connection you want to configure.
- Right-click Local Area Connection> Properties .
- Select the Networking tab .
- Select TCP / IPv4 or TCP / IPv6.
- Navigate to Properties> Advanced> DNS and then click OK.
- Select Use the following DNS server addresses .
- Replace the addresses in this section with the IP address of the Raspberry Pi.
Windows PC is now set up to use the Pi-Hole ad blocker.
2. Linux
If you are a Linux fan, you will need:
- Navigate to System> Preferences> Network Connections .
- Select the connection you want to configure, then click Edit.
- Select either the IPv4 Settings or IPv6 Settings tab.
- In the DNS server field , enter the IP address of the Raspberry Pi.
- Save the changes by clicking Apply.
Alternatively, you can update your DNS settings by opening the /etc/resolv.conf file .
3. macOS
To update DNS settings in macOS:
- Select the Apple logo on the Mac toolbar.
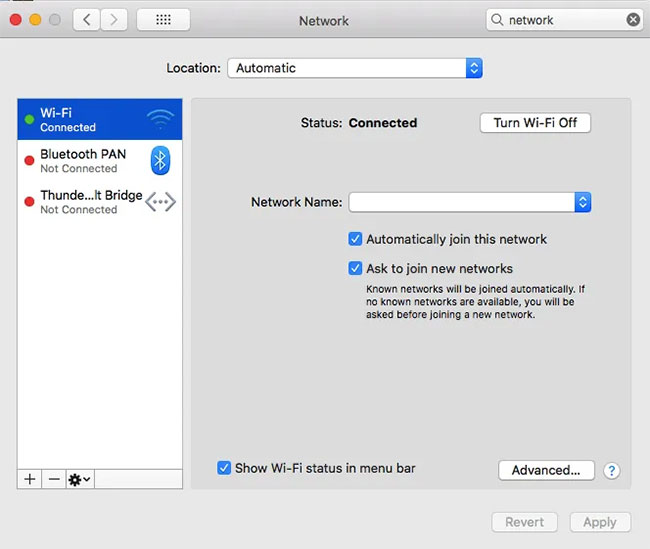
- Navigate to System Preferences> Network .
- Select the connection you want to edit.
 Select the connection you want to edit
 - Click on Advanced .
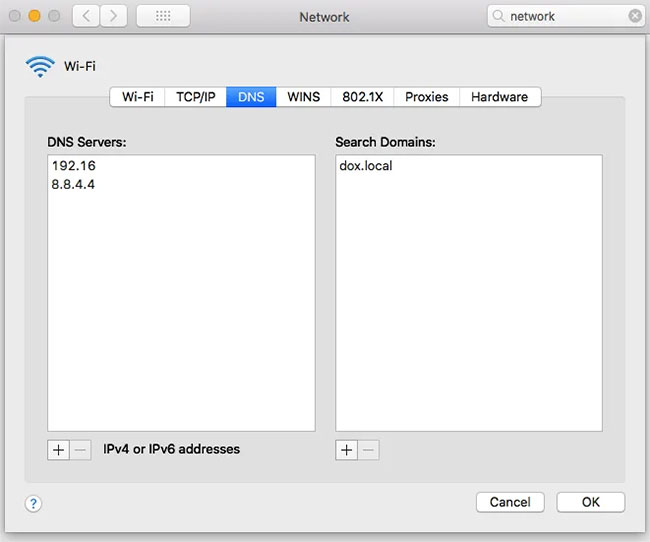
- Select the DNS tab .
 Select the DNS tab
 - Click the + icon and enter the IP address of the Raspberry Pi.
- Save the changes by clicking Apply> OK .
Pi-Hole will collate all your requests with the blacklist and block as many ads as possible.
4. iPhone
If you own an iPhone or iPad, then:
- Launch the Settings application .
- Select WiFi and tap on your home network in the list.
- Select the DNS field .
- Delete all existing DNS servers and replace them with the Raspberry Pi IP address.
5. Android
To block ads on Android:
- Launch the Settings application .
- Choose WiFi.
- Press and hold on the WiFi network you want to update.
- Select Modify network> Advanced options .
- Click DHCP , then Static.
- In DNS 1 , enter the Raspberry Pi IP address.
- Click Save.
While using the Raspberry Pi as an ad blocker, it can also be used as a WiFi access point or personal web server.