How to secure Linux Ubuntu with two-factor authentication
Today the battle between hackers and information security experts is going on. According to a study by the Bureau of Labor Statistics, the expected growth rate for the information security industry is much higher than all other industries. As innocent bystanders, we have a number of measures that can be taken to prevent bad guys from getting into the computer.
Table of Contents
Today the battle between hackers and information security experts is going on. According to a study by the Bureau of Labor Statistics, the expected growth rate for the information security industry is much higher than all other industries. As innocent bystanders, we have a number of measures that can be taken to prevent bad guys from getting into the computer.
Two-factor authentication (2FA) has been around for a while. To determine the identity of the user, you need to perform two authentication methods. Usually the first method is the username and password and the second is the verification code sent to your mobile device via text message. This means that even if your password is stolen, hackers will need access to your mobile device to be able to fully access the account.

However, be wary of fake individuals who are mobile carriers that have reportedly "confused" the SIM card to get access to your mobile phone number. Also two-factor authentication also extends beyond the verification of text messages. This tutorial will help strengthen security settings on both Ubuntu desktops and servers, combined with Google Authenticator to authenticate two factors.
- Why shouldn't SMS be used to authenticate two factors and what are alternatives?
Note, this setting means that all users of the system will need verification codes from Google Authenticator when:
- Log in to the system
- Run sudo commands
Software requirements, applications:
- Ubuntu 16.04 (Desktop or server)
- Google Authenticator application (on Google Play Store or Apple App Store)
Install Google Authenticator
As mentioned, we will use Google Authenticator to become a second line of defense against improper access. First, download this application to your mobile phone, take the same installation steps as other applications. The installation instructions below are for Android but are not much different when installed on iOS.
Open Google Play Store on your Android device and search for Google authenticator. You need to determine the correct Google Inc. application. Then click Install> Accept and wait for the installation to complete.

Next, start the terminal on the desktop or server. Run the following command:
sudo apt-get install libpam-google-authenticator
When prompted, enter your password and press Enter . If a message appears, type Y and press Enter again, then wait for the installation process to complete.
Configuration
You will now need to edit the file to add two-factor authentication to Linux. Run the following command:
sudo nano /etc/pam.d/common-auth
Below you will see the following line:
auth [success = 1 default = ignore] pam_unix.so nullok_secure
Right on that line, add the following command
auth required pam_google_authenticator.so
Your file will look like this:

Press Ctrl + X and then Y to save and close the file.
Set up for each user
The next step is to link your account with Google Authenticator. This step will run for all users who log on to your system. The example below is a single user. However, the steps will be the same for any other user on your system.
In the terminal run the following command:
google-authenticator
Looking closer, we will see:
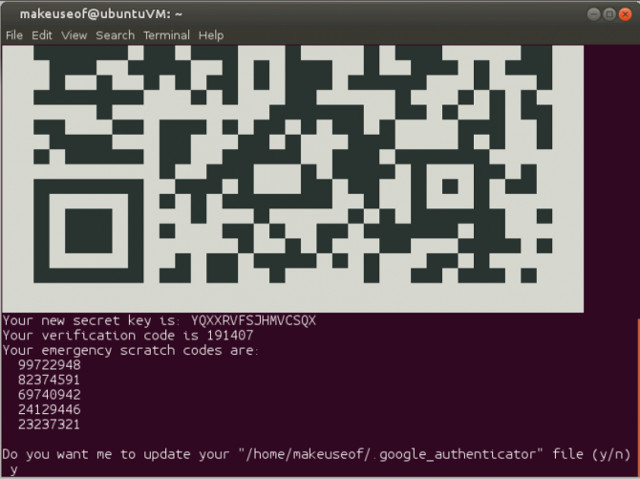
- QR code (QR code)
- Verification code
- New secret key
5 emergency scratch code
QR codes and secret keys perform similar functions. Verification code is one-time code and you can use it immediately if needed. The identification code is also a one-use code, which you can use in the absence of a mobile device. You can print and store them in case you forget or lose your mobile device.
You will also have to answer a series of questions. By default, you can answer Y for all those questions, but if you want, you can change them. However, do not close the window or terminal.

Set up mobile apps
Before continuing with any other user, please complete the account currently logged in. If this is the first time to launch Google Authenticator on a mobile device, click Begin . Also, from the main window click the plus sign icon in the bottom corner. If the resolution in the terminal window is sufficient to see the QR code, select Scan a barcode or Enter a provided key if your mobile device camera is not good. If you choose to enter the key, you will need to enter the account name to help you remember the related account. Then enter the verification key provided in the terminal window. Now just press ADD .
If performing a barcode scan, you will not have to perform the above steps. Your mobile device and system now have additional protection. The only way a hacker can hack into your system is to get the password and access the mobile device you have configured.

Add another user account
If you want to add system users, you can follow the steps below. For example, here will add slaghoople users, run the following command in the terminal window:
sudo su slaghoople
Open the Google Authenticator application on your mobile device, enter the six-digit authentication code provided by the application in the terminal window. Enter your sudo password and press Enter . You must now log in with the new user account, then run the following command:
google-authenticator
Now you can follow the same steps as for the first account. After answering the questions, open the Google Authenticator app, add another account. Enter slaghoople as your account name to help you distinguish between your two mobile devices. Choose to scan the barcode or enter the verification code. Slaghoople will now request the code from the mobile application along with the sudo password to login. Repeat the above steps if you want to add another account. Once all users have been set up, you will find that when logging in or running the sudo command requires a verification code.


Now, your Linux machine is safer than before. Hope the article is useful to you and share with friends.
I wish you all success!
Was this article helpful?
Your feedback helps us improve.
Related Articles
 Protect your GitHub account with two-factor authentication4 minutes read
 5 Multi-Factor Authentication Vulnerabilities and how to fix them5 minutes read
 Authenticate what two factors are and why you should use it5 minutes read
 Why shouldn't SMS be used to authenticate two factors and what are alternatives?6 minutes read
 How to turn on two-factor authentication to protect your Firefox account4 minutes read
 Two-factor authentication is the worst thing we have to endure7 minutes read
Reader Comments 0
Sign in with email or Google to join the discussion.