How to run Raspberry Pi Desktop on Windows or macOS
In this article, we will show you how to use a PC or Mac to run the desktop operating system of the Raspberry Pi Foundation, Debian with the Raspberry Pi Desktop.
Table of Contents
In this article, TipsMake.com will show you how to use a PC or Mac to run the desktop operating system of the Raspberry Pi Foundation, Debian with the Raspberry Pi Desktop (for brevity, the article will call it 'Raspberry Pi Desktop ' from now on).
This Raspbian-like operating system (as the name implies, both operating systems are based on Debian) allows you to use a PC or Mac as an alternative to the Raspberry Pi. That's useful when testing projects at a time when it's not convenient to use the Pi. This is also interesting as it supports the familiar Raspbian interface with PC or Mac hardware, much more powerful than the little Pi.
The easiest way to get the Raspberry Pi Desktop up and running is to install the operating system, but that will require you to dedicate a computer (or at least a hard drive partition) to the project. If you want to continue running Windows or macOS on your computer, the best way is to run your Raspberry Pi Desktop on a virtual machine - that's exactly what we'll show you in this tutorial.
How to run Raspberry Pi Desktop on Windows or macOS
Step 1: Download and install VirtualBox
Since you will be running Raspberry Pi Desktop on a virtual machine, the first step is to download the Oracle VM VirtualBox. You can download the software from the Downloads page of VirtualBox. Just choose the version that matches your operating system (there are two options: Windows version and macOS version). After downloading the executable, install VirtualBox by following the instructions of the setup wizard.
Step 2: Download Debian with Raspberry Pi Desktop
Next, you will need to download the Raspberry Pi Desktop image file from the Raspberry Pi Foundation's website.
Step 3: Launch VirtualBox and create a new virtual machine
You have now downloaded both VirtualBox and Raspberry Pi Desktop. You're ready to launch VirtualBox and create a new virtual machine.
Click New and you will see a screen like this:
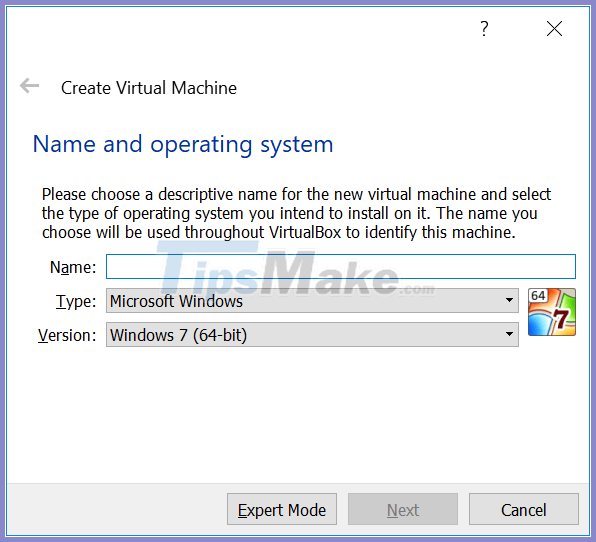
Of course, you don't want to create a Windows virtual machine, so let's change the settings a bit. First, choose a descriptive name for the virtual machine (ex: 'Raspberry Pi'), then choose Linux from the Type drop-down menu and Debian (64-bit) from the Version drop-down menu . Then, click Next.
On the next screen you can use the recommended memory capacity of 1024MB - this option corresponds to the memory capacity of the Raspberry Pi 3.
The next screen is to add the hard drive to your new virtual machine. Just click Create , unless you have some reason to modify the settings. Then, click Next on this screen and again on the next screen.
Finally, you can choose the capacity of your hard drive. The example used the recommended 8GB capacity, but you might want a larger hard drive. When you're ready, click Create.
Now, the virtual machine settings are all set up.
Step 4: Install Raspberry Pi Desktop
Click Start to begin installing Raspberry Pi Desktop. You will see a screen like this:

Browse to the folder where you saved the Raspberry Pi Desktop image file, select the file, and click Start. What you will see next is a menu titled Debian GNU / Linux installer boot menu . Use the arrow keys - or i - and Enter to select Install.
On the next screen, select your preferred keyboard layout and continue by pressing Enter.
Choose Guided - use the entire drive and keep pressing Enter to go to the Select disk to partition option and choose Partitioning scheme . Finally, click Finish partitioning and write changes to disk .
You can try to do something while the system is installed.
After a while, the installation wizard will prompt you: ' Install the GRYB boot loader to the master boot record? '(Install GRYB boot loader into Master Boot Record'. Click Yes and select / dev / sda.
When the wizard is done installing everything, you should see a screen like this:

If you've used Raspbian before, this screen is very familiar, right?
Step 5: Make the virtual machine interactive
The virtual machine is now successfully running Raspberry Desktop, but the screen size is a bit small and it doesn't get bigger when you click Maximize. You can make your machine more interactive by installing VirtualBox Guest Additions. Guest Additions make it possible to resize the screen, use the clipboard, and share files between your PC or Mac and the virtual machine.
To do this, first open up Terminal and make sure your system is up to date:
sudo apt-get update sudo apt-get upgradeYou will have to enter the commands because the virtual machine doesn't cooperate very well yet.
Now you are ready to install the VirtualBox Guest Additions:
sudo apt-get install linux-headers-$(uname -r) virtualbox-guest-dkms virtualbox-guest-x11Once Guest Extensions are installed, click the Devices menu and choose Shared Clipboard> Bidirectional .
If you restarted the virtual machine now, you should be able to use the same clipboard on both your PC or Mac and the virtual machine. You can also change the screen size. But don't restart! Instead, first add a user to the vboxsf group to enable file sharing between the virtual machine and the PC or Mac:
sudo adduser pi vboxsfNow you're ready to shut down the virtual machine and set up a shared folder. Here is the shutdown command:
shutdown -h now
Step 6: Set up shared folders
To set up shared folders, right-click on the virtual machine name and select Settings… or press Ctrl + S with the virtual machine selected.
From the menu that opens, select Shared Folders.

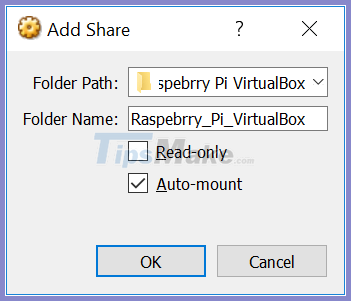
Click the button with the green plus sign to add a new shared folder.
From the many Folder Path drop-down menus , choose Other… and then choose the folder you want to share. When you're ready, click OK and choose Auto-mount.
If you restart the virtual machine and launch the file manager, you should see your share directory with the prefix 'sf_' in the / media directory . Any files you put in that folder will show up in the respective folder in / on PC or Mac and vice versa.
It's done! You now have a Raspberry Pi Desktop running on a virtual machine on a PC or Mac, and you can easily use the clipboard and manage folders while working on the next project.
Was this article helpful?
Your feedback helps us improve.
Related Articles
 How to install Windows 10 IoT Core on Raspberry Pi 39 minutes read
 26 amazing applications of the Raspberry Pi mini-computer.22 minutes read
 Parallels - Download Parallels here3 minutes read
 7 Projects for the New Raspberry Pi 5 16GB6 minutes read
 How to add an ADC to Raspberry Pi: What you need to know9 minutes read
 The 5 best options to run Android on Raspberry Pi6 minutes read
Reader Comments 0
Sign in with email or Google to join the discussion.