How to Run Chromebook Chromium OS on a Standard PC
If you have a computer, one of the most important tasks is deciding which OS to install on it, or if your OS was OEM installed, deciding to keep your preloaded OS or to up/downgrade or change OS completely. In this tutorial, you will learn...
Table of Contents
Part 1 of 3:
Downloading Chromium OS
-
 Go the the Chromium OS website. Then scroll down to the "Nightly build links" section.
 -
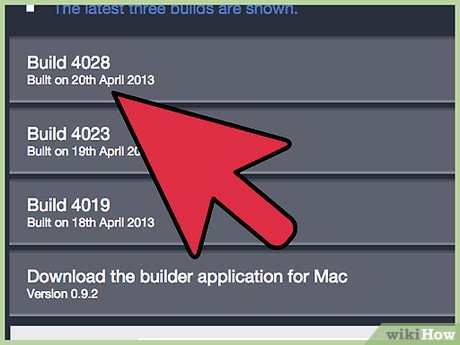 Click on the latest build of Chromium OS available (the one at the very top).
 -
 Click on the USB image next to the build number.
 -
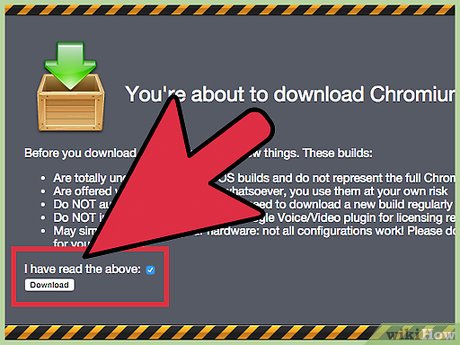 Check the checkbox and click "Download." A window will now pop up telling you things before you download. Just check the checkbox and download. Save somewhere on your hard drive.
 -
 Extract the files. Once the file has finished downloading to your HD, extract the files to somewhere easy to find, like your desktop.
Part 2 of 3:
Creating the bootable USB
-
 Download Windows Image Writer. Download the program Windows Image Writer from the following link http://sourceforge.net/projects/win32diskimager/.
 -
 Open the application once installed. Once you have installed the program, open it and you should see a screen as shown in the image accompanying this step.
 -
 Click the folder icon. Select the IMG file you downloaded earlier. Next to the white box under the text "Image File" there is a folder icon––click it and navigate to the IMG file downloaded earlier.
 -
 Select the device to write to. If you haven't done so already, insert a USB drive with a capacity of 4GB or greater. Select the appropriate drive letter mapped to your USB under the "Device" section.
 -
 Click "Write".
Part 3 of 3:
Booting into Chromium
-
 Turn off your computer. Remove the USB device from your computer, then shut it down.
 -
 Boot from the USB. Once your computer has shut down, re-insert the USB. While your computer is on the BIOS splash screen, enter the boot device menu. (This is usually done by pressing F12.)
 -
 Select your USB drive from the list and press enter. Congratulations! If you have done everything correctly, your computer will now boot into Chromium OS.
Was this article helpful?
Your feedback helps us improve.


Reader Comments 0
Sign in with email or Google to join the discussion.