How to print black and white on a Mac
This tutorial explains how to print black and white on a Mac and how to set up your own preset to print without color and what to do in case something goes wrong.
Table of Contents
Text or image documents do not need to be black and white to print in black and white. This tutorial explains how to print black and white on a Mac and how to set up your own preset to print without color and what to do in case something happens.
This article assumes that you have a printer and it can print black and white.
How to print black and white on a Mac
Black and white printing is essentially the same as color printing, but special users have to guide their Mac to communicate with the printer to print this way.
Most programs print in the same basic way and if your program is completely different, the article will assume that readers know how to access the printing options in it. Here are the basic steps for printing black and white.
1. In the menu bar, click File.
2. Find and select Print.

Note : If you are using Google Chrome, users will need to take one more step between this step and step 3. That's to select the Print using system Dialog option in the lower left corner of the window. When selecting Print using system Dialog , Mac printing options will be available.
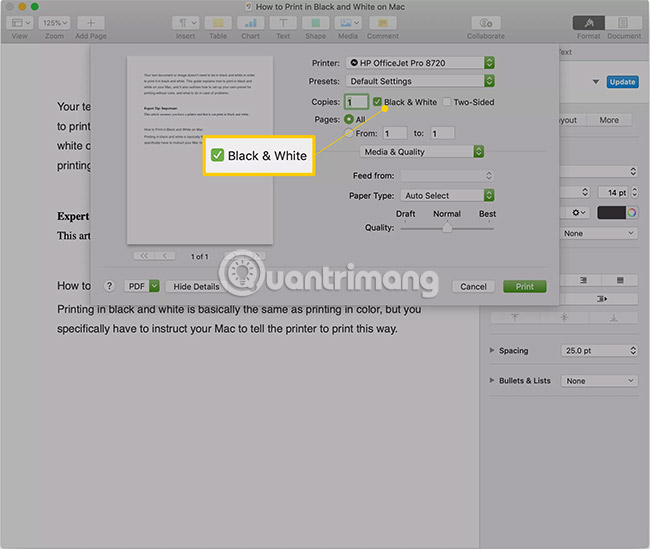
3. Select the Black & White box if you see it.
4. Click Print.
However, users may not see the Black & White checkbox when first opening the Print screen (it is usually located next to the Copies option ). In such a case, the user will need to continue to follow the description below after step 4, (as shown in the image above).
- Click the drop-down menu in the middle of the Print window and click Paper Type / Quality (can be displayed as Print Settings or Quality & Media depending on the printer or macOS version).
- Click the grouping Color Options.
- Click the Color drop-down menu and select Grayscale. If you went to Print Settings instead of Paper Type / Quality , users can see the Black option instead of the Grayscale option (don't worry, both are for black and white printing).
Depending on the printer or macOS version, users may see a different term with the word "Grayscale" or "Black". Other terms that may appear include " Black cartridge only " and "Mono", but regardless of the name, they all mention the same thing: Black and white printing.
Presets for printing black and white on a Mac

If you want to print black and white often, users can avoid the hassle of changing options every time you open the Print feature . This can be done by creating a preset, storing the specific settings selected and can be recalled quickly when printing in the future.
This is how readers can save a preset for black and white printing.
1. Open Print and select Black & White printing , as described in the section above.
2. Once you have selected the appropriate settings for black and white printing, click the drop-down Presets menu .
3. Click Save Current Settings as Preset .
4. Enter a name for the preset value (for example, ' Black and White ') and if the option appears, choose between saving the preset for All Printers or Only This Printer (Only this printer) .
5. Click OK.
Troubleshoot problems when printing black and white on a Mac
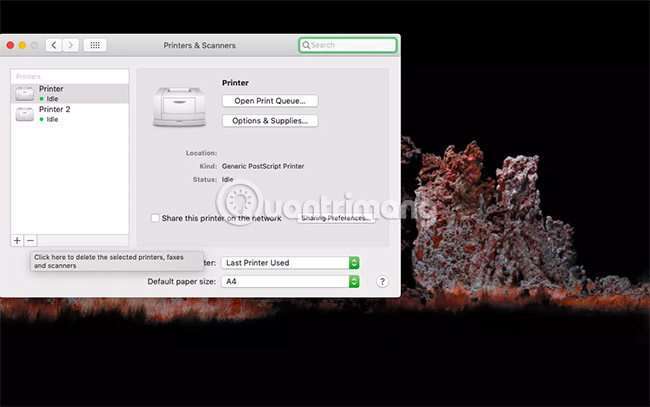
Even if there is a printer capable of printing black and white, users may still not find the option to print black and white. In that case, what the user can do is delete the printer with System Preferences and then reset it on the Mac.
1. Make sure the printer is disconnected from the Mac (or if it is a WiFi or Bluetooth printer), go to System Preferences (located in Apple Menu).
2. Click Printers & Scanners .
3. Click the printer you want to delete.
4. Click the Minus icon (-) below the Printers column .
5. Click Delete Printer.
6. Reconnect the printer to the Mac with a USB cable (or reboot as usual if it is a WiFi or Bluetooth printer).
In most cases, just reconnecting the printer is enough for the Mac to recognize it. However, users may have to take additional steps, such as downloading a new software update or if there is a WiFi or Bluetooth printer, connect it to the Mac with a USB cable. In addition, users may need to return to the Printers & Scanners window and click the Add icon again (+) to find the printer, then add it.
Hope you are succesful.
Was this article helpful?
Your feedback helps us improve.
Related Articles
 Top best black and white wallpaper for phones2 minutes read
 Make artistic black and white photos with PhotoScape3 minutes read
 5 best black and white printers currently available that you should buy, priced under 5 million VND.8 minutes read
 How to create a black and white image in Word is very simple2 minutes read
 How to transfer computer screen to black and white on Win and macOS3 minutes read
 black hole, white hole, deep hole13 minutes read
Reader Comments 0
Sign in with email or Google to join the discussion.