Table of Contents
SoftEther VPN Client Manager is the native Windows client for connecting to a SoftEther VPN Server. To use it safely, download the client from the official project, install the SoftEther VPN Client component, create a Virtual Network Adapter, and enter connection details supplied by the server administrator.
This guide is for a private or organizational SoftEther server. VPN Gate is a separate academic project that distributes a special client plug-in for volunteer-operated public relay servers; do not install that plug-in unless you intentionally want to use VPN Gate.
What you need
- A supported Windows PC and an administrator account for installing the virtual network driver.
- The VPN server hostname or IP address.
- The listener port, Virtual Hub name, and authentication method.
- A username, password, certificate, or other credentials supplied by the server administrator.
- Permission to use the server and network.
SoftEther VPN is software for building and connecting virtual private networks, not a subscription service that automatically supplies commercial exit servers. If you need the basic concept first, read TipsMake's introduction to virtual private networks.
Download and install SoftEther VPN Client
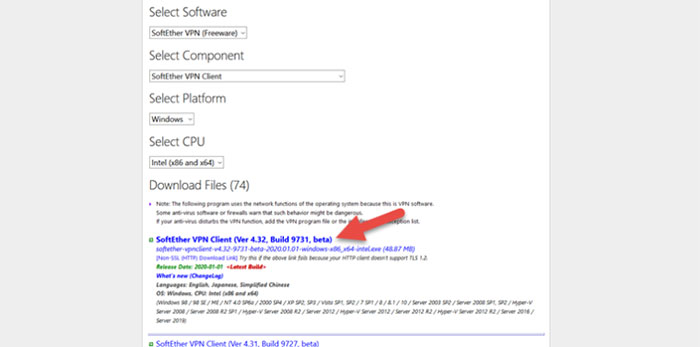
- Open the official SoftEther VPN Project site and follow its download link.
- Select SoftEther VPN Client, Windows, and the architecture offered for your system. Avoid third-party repackaged installers.
- Download the current stable build, verify any published checksum or signature when available, and scan the file according to your organization's policy.
- Run the installer as an administrator.
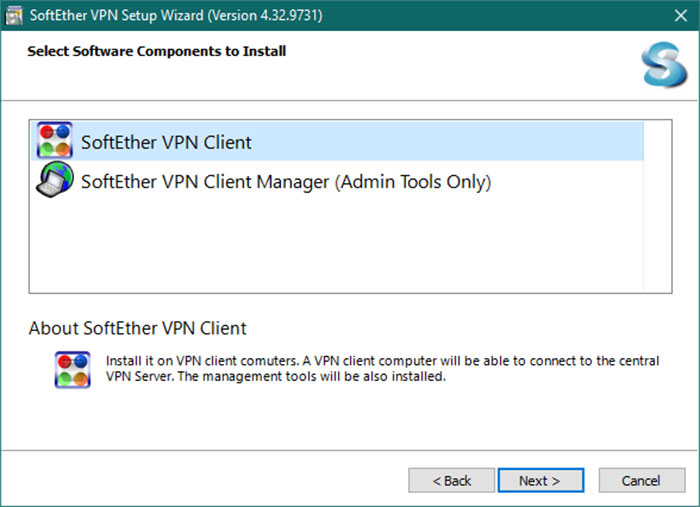
- At Select Software Components to Install, choose SoftEther VPN Client, accept the license only after reviewing it, and finish the installation.
Create a Virtual Network Adapter
Open SoftEther VPN Client Manager. The client sends VPN traffic through a virtual adapter that Windows treats like a network device.
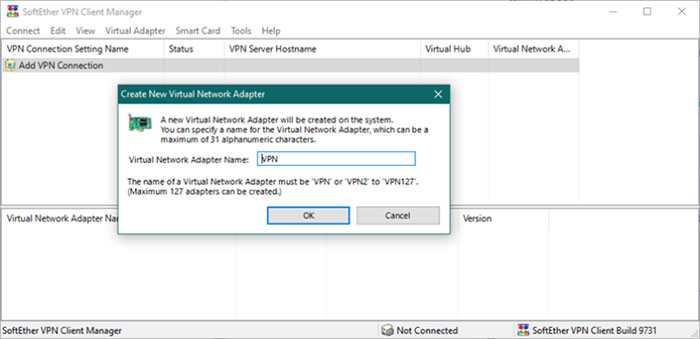
- Double-click Add VPN Connection. If no adapter exists, approve the prompt to create one. Alternatively, use Virtual Adapter > New Virtual Network Adapter.
- Enter a short descriptive adapter name, such as
WORK, and confirm. - Approve the Windows administrator or driver prompts.
- Wait until the adapter appears in VPN Client Manager and Windows Network Connections.
Only install the driver provided by the official package. If organizational endpoint security blocks it, contact the administrator rather than disabling protection controls.
Create the VPN connection setting
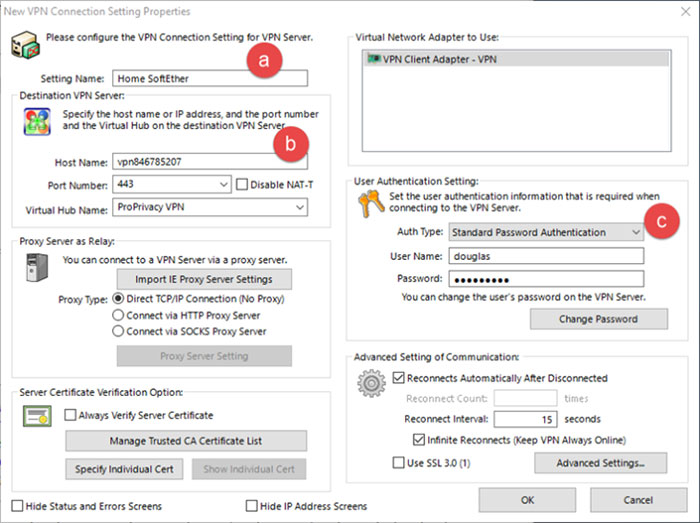
Double-click Add VPN Connection again or choose Connect > New Connection Setting. Complete the fields with information from the server administrator:
| Field | What to enter |
|---|---|
| Setting Name | A local label that helps you identify this connection |
| Host Name | The server's fully qualified hostname or IP address |
| Port Number | The SoftEther listener port specified by the administrator |
| Virtual Hub Name | The exact hub name configured on the server |
| Virtual Network Adapter | The adapter created in the previous section |
| Authentication Type | Password, certificate, RADIUS/NT domain, or another method supported by the server |
| User Name and credential | The account details issued to you; do not guess or reuse an unrelated password |
Do not accept a server certificate warning without verifying the expected certificate or fingerprint with the administrator. A successful encrypted connection to the wrong server does not protect you from that server.
Connect and verify the tunnel
- In VPN Client Manager, double-click the new connection setting or right-click it and choose Connect.
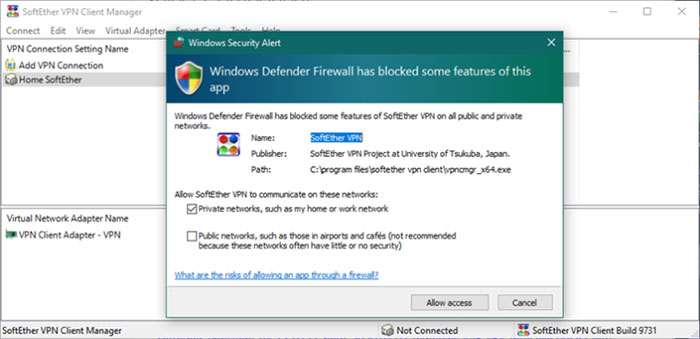
- If Windows Firewall prompts you, confirm that the program path belongs to the installed SoftEther client and allow only the network profiles required by your administrator.
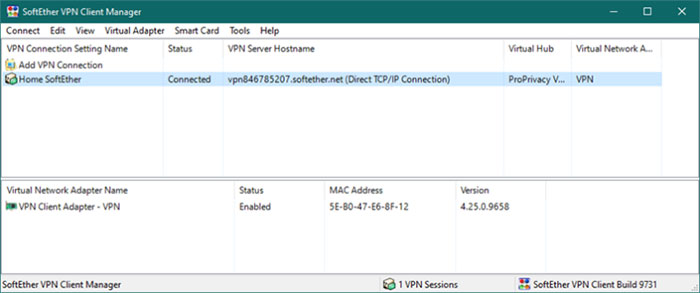
- Wait for the status to show Connected.
- Open the connection status window and check the assigned IP information, connection duration, and transferred traffic.
- Verify access to an approved internal resource or use a method supplied by your administrator to confirm the expected route and DNS settings.
Disconnect from SoftEther VPN
Return to VPN Client Manager, right-click the active connection setting, and choose Disconnect. You can also use the SoftEther client icon in the Windows notification area if it exposes the connection menu.
The native SoftEther connection is managed by SoftEther VPN Client Manager, so it may not appear as a normal profile under Windows Settings > Network & Internet > VPN. Windows Settings is the right place only when you configured a built-in Windows VPN protocol rather than the SoftEther client.
Connecting to VPN Gate is different
If you deliberately want the VPN Gate public relay list, use only the official VPN Gate Client Plug-in instructions. The special package adds a VPN Gate Public VPN Relay Servers item to Client Manager.
VPN Gate relays are operated by volunteers, not by TipsMake or a commercial VPN provider. Server availability, speed, logging, jurisdiction, and trust vary. A VPN encrypts traffic between your device and the VPN server; it does not make you anonymous, and traffic leaving the relay still depends on end-to-end protections such as HTTPS. Do not use an unknown public relay for confidential business or personal activity.
Troubleshooting
| Problem | Checks |
|---|---|
| Authentication failed | Verify the exact hub name, username, authentication type, password or certificate, and account status. |
| Connection timed out | Check the hostname, port, local firewall, network restrictions, and whether the server listener is running. |
| Virtual adapter cannot be created | Use an administrator account, update Windows, reinstall from the official package, and check endpoint-security policy. |
| Connected but no internal access | Ask the administrator to verify SecureNAT/DHCP or bridge configuration, routes, DNS, and user permissions. |
| Internet traffic does not use the VPN | The server may provide split tunneling. Confirm the intended routing policy instead of changing routes blindly. |
The SoftEther manual documents creating a server connection and managing the virtual adapter. Use those references when your organization's configuration differs from this basic password-authentication example.
Related Articles
 Instructions on How to Fake IP with SoftEther VPN Client Manager4 minutes read
 KMS Activation Deployment for Windows 10, Windows 8.1, Windows23 minutes read
 How to Install Isa Server Enterprise 2000 -- Part Iii18 minutes read
 Deploy KMS Activation on Windows Server 20089 minutes read
 Configure SSH Server and SSH Client on Windows Server 20194 minutes read
 How to Set Default Email Client in Windows 113 minutes read
Reader Comments 0
Sign in with email or Google to join the discussion.