This guide explains how to resolve Skype Audio Error Does Not Work on Windows 10, starting with the most likely causes and moving through practical troubleshooting steps.
However, many users also complain about sound errors not working in Skype, especially this error often happens on Windows 10.
This problem may occur due to various reasons related to the microphone or computer speakers which are not configured properly with Skype.
If you also have the above problems, please refer to the ways to fix this error that I will guide in the article below.
1. Check the configuration settings of the computer speakers and microphones
The steps are as follows:
Step 1: Open the Skype app and go to Tools> Options> Audio settings.

Step 2: Here, check and make sure the microphone and the speaker are properly configured. You can now test microphones and speakers from the Skype app. If the speaker and microphone are working properly, this means they have been configured properly for Skype.

Step 3: Click Save to save this change.
According to users, sometimes an update may change your default speaker or microphone, so be sure to check if your audio device is configured correctly in Skype.
2. Use the default Microsoft audio driver
The steps are as follows:
Step 1: You press the shortcut Windows + X to open the Power User menu and select Device Manager from the list.
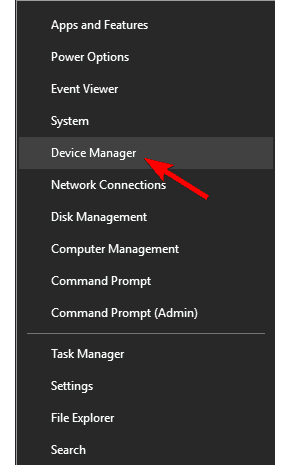
Step 2: When Device Manager opens, navigate to the audio device of the computer and right-click on the device and select Uninstall device .
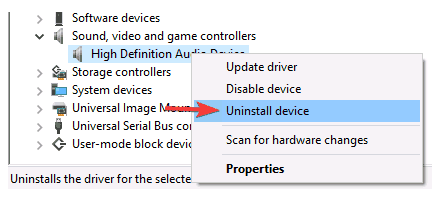
If the item above is available, select Delete the driver software for this device for this device and click Uninstall .
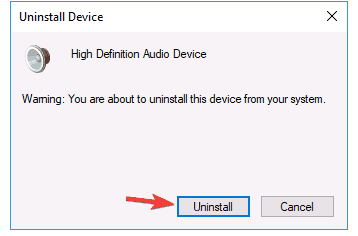
Step 3: After you remove the driver, reboot your computer. Once the computer has rebooted, the default driver will be installed and Skype's audio errors will be fixed.
3. Update the audio driver of the computer
Many users have also reported that they can fix Skype audio problems just by downloading and installing the latest drivers for computer speakers.
Therefore, you can download the latest audio driver from the motherboard or sound card manufacturer's website used on your computer.
Because there are many versions of drivers for audio cards, so choose the correct and suitable version for your device, then download and install it. However, this method will take a lot of time if you do it manually.
Therefore, you can download a driver update tool of TweakBit, a tool created by Microsoft and Norton to help users automatically update drivers more quickly.
As a result, this tool will help users limit the download and installation of incorrect driver versions. However, this tool will include some paid features to use.
4. Change the computer microphone settings
The steps are as follows:
Step 1: Right-click the sound icon on the Taskbar and select Recording Devices from the menu.
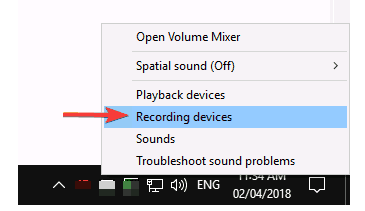
Step 2: In this window, double-click the microphone to open their properties .

Step 3: Go to the Advanced tab and make sure that the Allow applications to take exclusive control of this device box is unchecked.
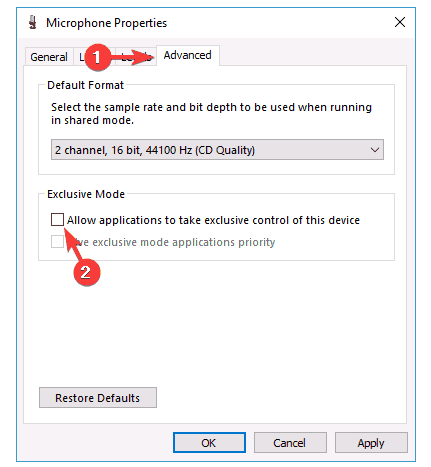
Step 4: Click Apply and OK to save this change.
5. Restart the Windows Audio service
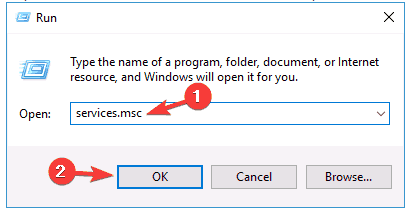
Step 1: Press the shortcut Windows + R and enter the words services. msc into the search box. Then press Enter or OK to continue.
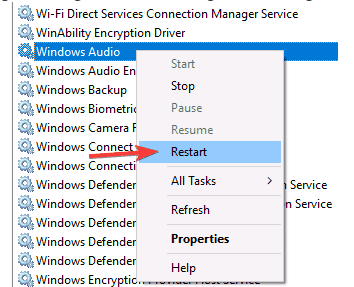
Step 2: When the Services window opens, navigate to the Windows Audio service line , right-click it and select Restart to restart. If there is no Restart option, you can simply try stopping and restarting the service manually.
6. Update / reset Skype
The steps are as follows:
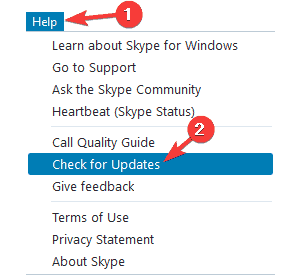
Step 1: Log in to Skype, go to the Help menu and select Check for Updates.
Step 2: Now click on Update Classic Skype.

Step 3: The update process will begin, please do not interrupt the process.
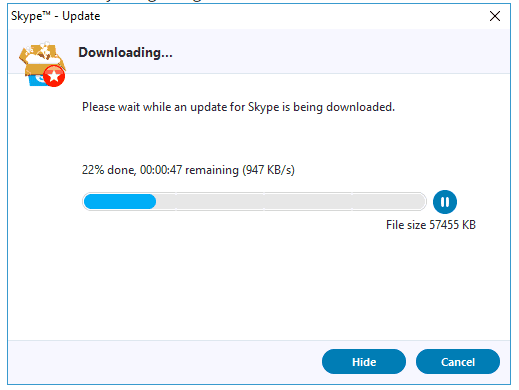
If you have installed the latest version and have audio problems, now try installing an older version of Skype and check if this fixes the problem.
In addition to updating, you should also try to reinstall Skype and delete all old Skype-related folders by manually uninstalling Skype and manually deleting all Skype folders on your computer.
7. Select the appropriate audio device
Step 1: Right-click the audio button in the lower right corner and select Playback devices.

Step 2: Now you will see some of the available devices appear, make sure that you have selected the correct playback device to set as the default by right-clicking the device and selecting Set as default.
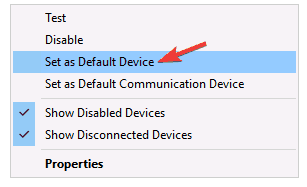
Step 3: After changing the default playback device, click Apply and OK to save the changes. Once you've changed the default audio device, check if the audio issue in Skype has been resolved.
8. Check the connection of the speaker and the microphone
If you experience any audio problems while making Skype calls, then the immediate cause of this problem is most likely due to a problem with the microphone or the speakers on the computer.
Like the headphones that people use, the computer microphone also uses the 3.5mm jack, so it's likely that you have the wrong microphone plugged in the connector port. This is just a small problem and you only need to check and connect the correct audio port on the computer
9. Try changing the DNS server
Step 1: Click the network icon in the lower right corner of the screen and select the network from the list that appears.
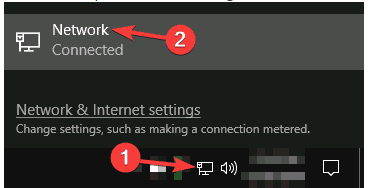
Step 2: Now click on Change adapter options.
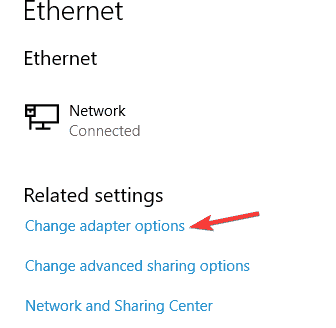
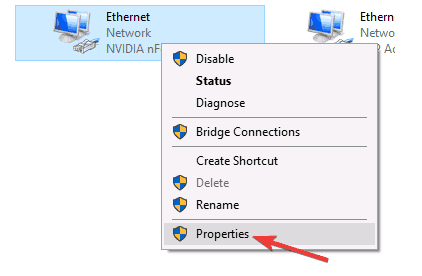
Then right-click on the network in use and select Properties from the menu that appears.
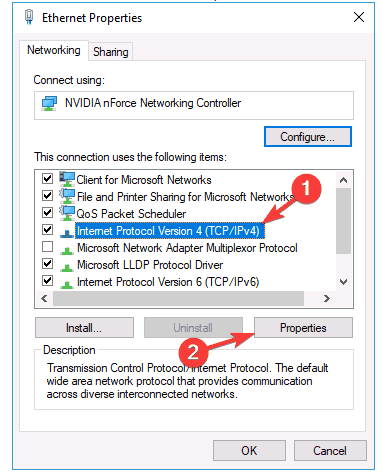
Step 3: Select the Internet Protocol Version 4 (TCP / IPv4) line and click the Properties button.
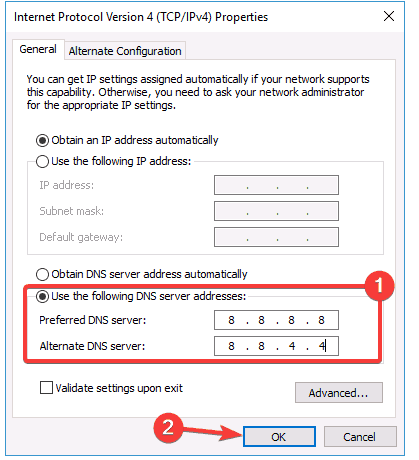
Step 4: Now click on the box Use the following DNS server addresses and enter the following information:
-
Preferred DNS server: 8.8.8.8
-
Alternate DNS server: 8.8.4.4
Step 5: Now click OK to save changes.
In addition to Google 's DNS , you can also try using OpenDNS . After changing the DNS, try to check if the audio error in Skype has been resolved or not.
10. Check network connection
If you encounter audio errors in Skype, this problem may be caused by network connection.
If unfortunately the Internet connection is unstable, Skype will automatically change the sound quality to maintain calls for users.
However, in case the Wi-Fi connection is slow, it is better to switch to using a wired connection directly with the network device to have the most stable connection.
So if possible, switch to a wired connection and check if that solves this problem.
11. Close other applications
Sometimes other applications may interfere with the Skype application and cause audio-related errors. To minimize this risk, make sure to turn off all online and download applications.
After doing this, Skype will get the most stable bandwidth without any problems or interference from other applications.
So I have shown you the ways to fix audio errors in Skype not working on Windows 10 the easiest. Hopefully this article will be helpful to you. I wish you successful implementation!






Reader Comments 0
Sign in with email or Google to join the discussion.