6 main settings must check when Skype is not working
Most of the time, Skype still works normally. But sometimes, you'll get stuck and find that Skype can't connect or doesn't work properly. These troubleshooting steps will resolve Skype's most common problems, whether your microphone is inactive or an object that sounds like a robot.
If you still find that Skype is not working after following these steps, make sure the person you are contacting also takes those steps, because the problem may come from them.
6 main settings must check when Skype is not working
- 1. Check Skype Heartbeat
- 2. Review Skype audio settings
- 3. Troubleshoot audio hardware problems
- 4. Edit Skype video settings
- 5. Make a trial call via Skype
- 6. Check bandwidth usage
1. Check Skype Heartbeat

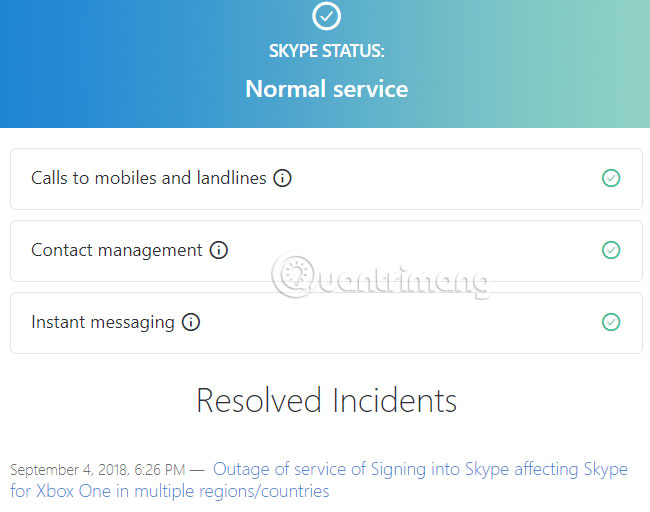
Before you take any troubleshooting steps, you should check if Skype has a problem. If Skype is not connected or you cannot use a specific Skype feature, check the Skype Heartbeat page (https://support.skype.com/en/status). You can also access this feature by clicking the Help menu in Skype and selecting Heartbeat (Skype Status).
This heartbeat page notifies you of Skype's system status. If there are any issues with the structure of Skype, you will see them here. This page also lists recent issues of Skype at the end, as a reference. You cannot do anything with these problems. Wait for Microsoft to fix them and try connecting again later.
2. Review Skype audio settings
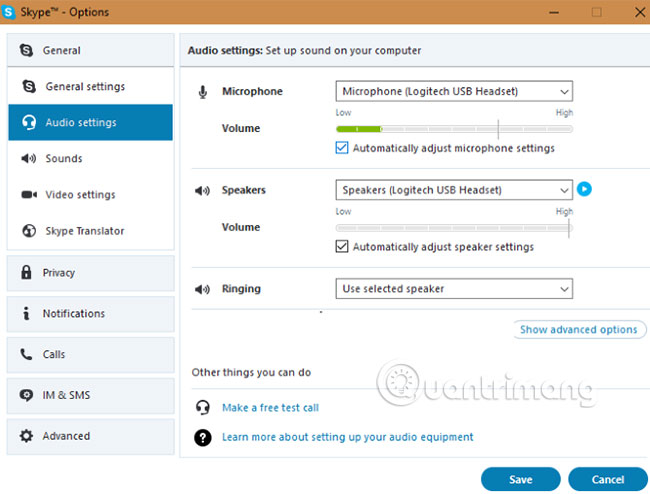
If your Skype microphone does not work, you can check the microphone (and speaker) from the Audio Settings control panel. Open the Options window in Skype by clicking Tools > Options.
To test your microphone, try saying something. You will see the green volume bar under Microphone move as you speak.

If you do not see the volume bar move, click the box next to Microphone and select another device. Keep trying different devices until you see the volume bar move as you speak. If necessary, try using your smartphone as a temporary microphone.
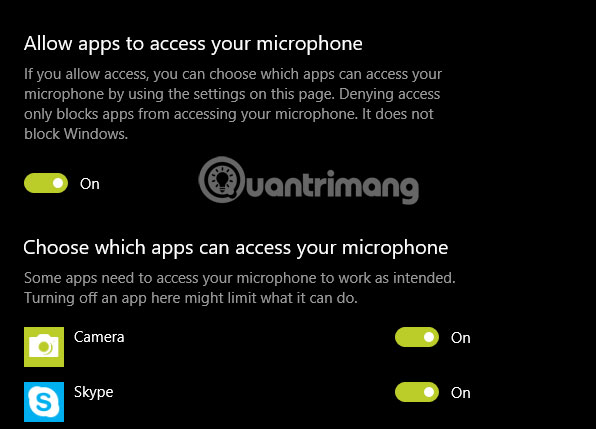
Windows 10 users may have completely blocked the application from using the microphone. To test this, go to Settings > Privacy and select the Microphone tab on the left. Enable Allow apps to access your microphone feature and ensure Skype application also has access to the microphone.

If Skype doesn't sound, check your speakers in the same way, by clicking the Play button to the right of the Speakers box . You will hear the Skype call sound. If not, select another device from the Speakers box and try again.
3. Troubleshoot audio hardware problems
If playing with the options on the Audio Settings panel does not help, check your hardware. Some microphones and headsets have volume controls or mute switches on the wire body. Therefore, you may accidentally touch this slider or switch.
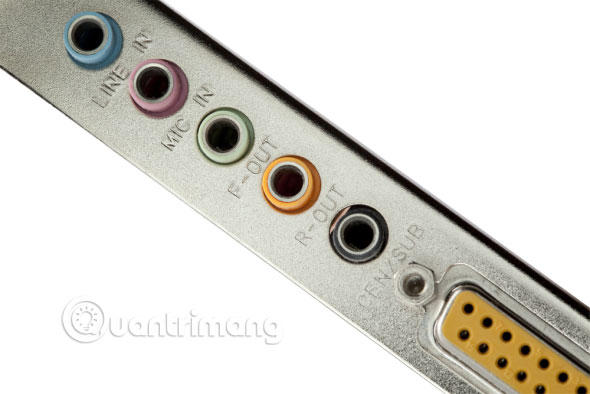
Also, check to make sure that your microphone and speakers are plugged into the correct port. You can plug the micro USB into any USB slot, while the same microphone must connect to the correct audio jack.

Microphone jacks are usually pink, although different audio hardware can sometimes use other colors.
If you are using a desktop and microphone does not work when plugged into the audio jack in front of the PC, try the audio jack on the back of the computer. You may need to troubleshoot the microphone on your computer if it doesn't work.
4. Edit Skype video settings
Assuming you have a webcam, you can configure the webcam from the Video settings control panel in Skype's Options window.

If your webcam is connected and you don't see it in this window, you may need to install the driver for it. You can usually get drivers from the webcam manufacturer's website or computer manufacturer.
As mentioned in the troubleshooting section of the microphone, you should also check the security settings of Windows 10 to see access to the camera. Go to Settings > Privacy and open the Camera in the left sidebar. Make sure you enable Allow apps to access your camera feature , as well as confirm Skype has camera access.
5. Make a trial call via Skype
If everything above works normally, make a trial call. You can do this by clicking the Make a free test call link at the bottom of the Audio settings window . You can also add a Skype user named echo123 (called Echo / Sound Test Service) to your contact list and call it.

The call inspection service will ask you to speak into your microphone after the beep. It records what you say and, after a few seconds, plays the message back to you. This ensures that everything, including your microphone, speakers and network connection, is working properly. If the call works normally, everything is fine.
At this point, if you still can't hear what someone else said on Skype, it may be a problem from them.
6. Check bandwidth usage

If you or anyone else using your network is overloading your bandwidth, by doing intensive tasks like downloading large files or streaming 4K video, Skype call quality will be very poor. . One of the clear signs of network congestion is the sound that sounds like a robot. Skype will usually display a red connection icon when this happens.
Close all file download programs (both on your computer and other computers on the network) and try making a Skype call again. If you are using a Wi-Fi network, try moving near the router to improve the connection.
Using this quick checklist, you can eliminate the common problems of Skype and make your calls of better quality. Much of what seems like a big problem has a fairly simple remedy.
Remember that for Skype group calls, a user experiencing any of these problems may affect everyone's call quality. In addition, you can always get more troubleshooting tips from the guide to improve call quality integrated into Skype. Click the Help menu and select Call Quality Guide to open this guide.
You can better exploit this application with top effective tips on Skype above.
Good luck!
See more:
- Instructions on how to delete chat history on Skype
- Guide to viewing message history on Skype
- Connect your Facebook account to Skype