Table of Contents
This practical guide explains how to fix distorted graphics in bluestacks with clear steps and useful context. It also covers common requirements, potential problems, and the details that can help you get better results.
Steps to Fix Graphics Errors in Bluestacks
Users need to correct settings to fix distorted graphics in BlueStacks. It's the easiest way to solve blurry or bad images in the game.
Open Graphics Settings
First, go to the gear icon to access the settings. People will see tabs on the left showing different categories, click Graphics.
Change Different Options
On the new window that appears, change the settings of the options as follows:
Graphics engine mode: BlueStacks usually sets this to Performance by default, but change this mode to Compatibility if you're running a game with high-end graphics.
Graphic renderer: If changing the first option doesn't help, continue to switch to OpenGL or DirectX, whichever is unchecked by default. Each of these choices affects the graphics in a different way.

Interface renderer: BlueStacks sets Auto at this feature, which means it will depend on the game. Users can change to one of the available options and test each option to see how it affects the graphics and FPS.
ASTC textures: If it still fails, try changing the options in this section, as it is directly related to visual performance in the game.
GPU in use: People can route all the graphics resources they need from the main GPU on their computer.
Save changes: This button allows to save any changes the user has made above to check if the graphic error has been fixed or not.
Restart Bluestacks
Changed settings won't take effect immediately, so restart your PC. This results in people having to do multiple reboots while testing different changes.
Uninstall and Reinstall Bluestacks
If people are having issues with BlueStacks itself and not the game, people will need to reinstall the platform. Go to Control Panel > Progams and Features > BlueStacks > right-click and select Uninstall to uninstall. Then, click on the BlueStacks download box below to install the latest version, which will include common bug fixes.
Delete Temporary Files
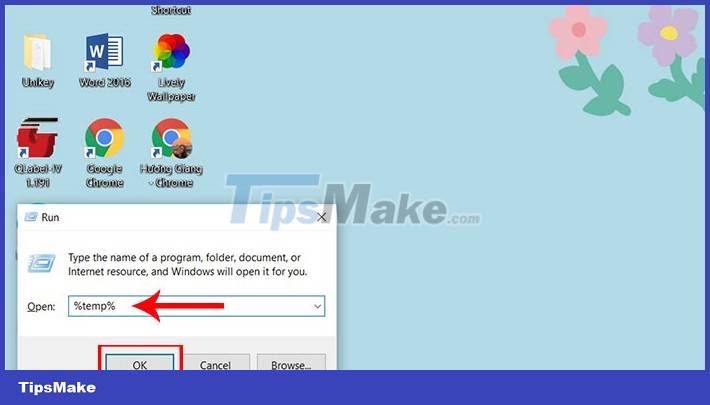
First, press the Windows + R key combination to open the Run command, then insert %temp% and press OK/Enter.
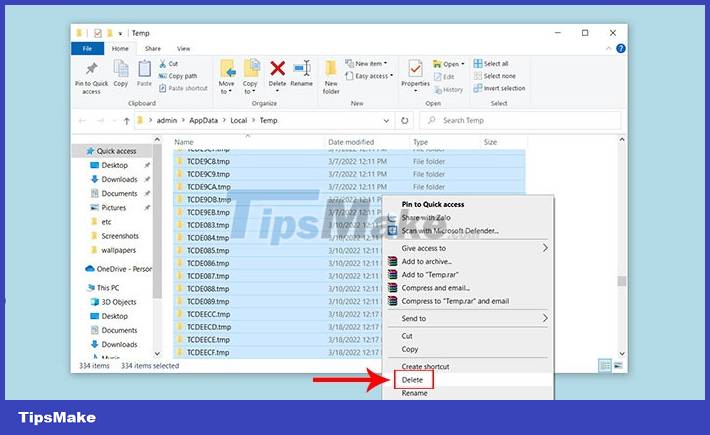
A new window appears showing all the temporary files on the computer. People won't need these, and any program that needs them will regenerate. Press Ctrl + A to select them all, right-click and click Delete to delete them.
Using Bluestacks Cleanup Tool
To uninstall BlueStack correctly, users will need to use a tool called BST Cleaner. There are two versions, V1.08 for uninstalling BlueStacks 4 Nougat 32-Bit, and v1.07 for BlueStacks 4/5. After downloading the respective file and running it, it will properly uninstall BlueStacks without any problems.
Conclusion
Understanding Bluestacks makes it easier to compare options, avoid common mistakes, and apply the information in this guide more effectively. Review the relevant requirements before making changes or choosing a solution.
FAQ
How do you fix distorted graphics in bluestacks?
Follow the steps in this guide in order, confirm the required settings or tools, and verify the result before making additional changes.
Is it safe to fix distorted graphics in bluestacks?
It is generally safe when you follow the recommended instructions, use trusted tools, and avoid changing settings you do not understand.
What should you do if the process does not work?
Recheck the requirements, restart the device or application when appropriate, and review each step for missed settings or compatibility issues.
Related Articles
 Summary of Common Errors on Bluestacks and How to Fix Each Error19 minutes read
 Bluestacks Are Heavy?: Bluestacks Configuration Requirements.5 minutes read
 Fix 25000 Error During Bluestacks Installation Process4 minutes read
 Bluestacks Just Launched Bluestacks Version X4 minutes read
 Bluestacks - Quality Android Emulator Software on PC: Key Facts12 minutes read
 Link Download Bluestacks 4.260.0.1032: Android Emulator4 minutes read
Reader Comments 0
Sign in with email or Google to join the discussion.