Table of Contents
This guide explains how to speed up BlueStacks, Make BlueStacks Run Smoother, with clear steps, practical tips, and important checks before you begin.

1. Enable Virtualization (VT) on the PC
Because BlueStacks software is a virtualization software, emulating an Android device to run Android applications, our computer needs to support and enable virtualization for the software to work smoothly. With Intel CPU models, this technology is called Intel (R) Virtualization Technology, while on AMD CPU will be called AMD Virtualization (AMD-V) Technology.
Step 1: To check if the CPU supports virtualization, please download the testing tool at
With Intel CPU : https://downloadmirror. intel. com/28539/a08/Intel(R)%20Processor%20Identification%20Utility. exe

After downloading, install the software and check if your Intel CPU supports the virtualization feature in CPU Technologies, if the Intel Virtualization Technology line has traces.
With AMD CPU : https://download. amd. com/techdownloads/AMD-VwithRVI_Hyper-V_CompatibilityUtility. zip

After downloading AMD CPU test utility and open it. We check to see if the software displays This system is compatible with Hyper-V, which means your AMD CPU supports the Virtualization feature.
Step 2: Turn on the Virtualization feature in the BIOS.
Once we know that your device supports Virtualization, we start enabling this feature in the BIOS. To access the BIOS, press F2, F10, or Del depending on the motherboard. Then you find the section Virtualization in Advanced CPU and Enabled this feature up.

2. Pause antivirus software when using BlueStacks
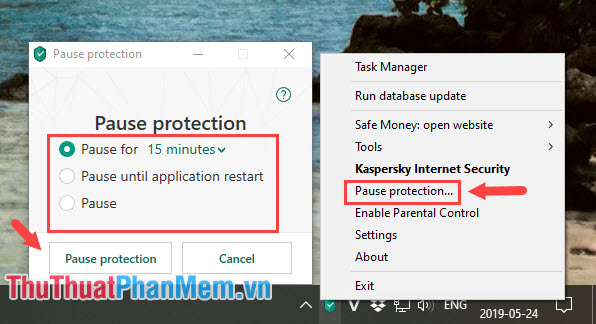
Antivirus software also causes BlueStacks to be slow and lag. To temporarily turn off the antivirus software, right-click on the icon of the antivirus software and select Pause Protection . to temporarily turn off the software.
3. Increase CPU and RAM settings in BlueStacks
By default, BlueStacks will optimize CPU and RAM cores in moderation so that your computer works smoothly for other tasks. To get the most out of your hardware on BlueStacks, follow these instructions.
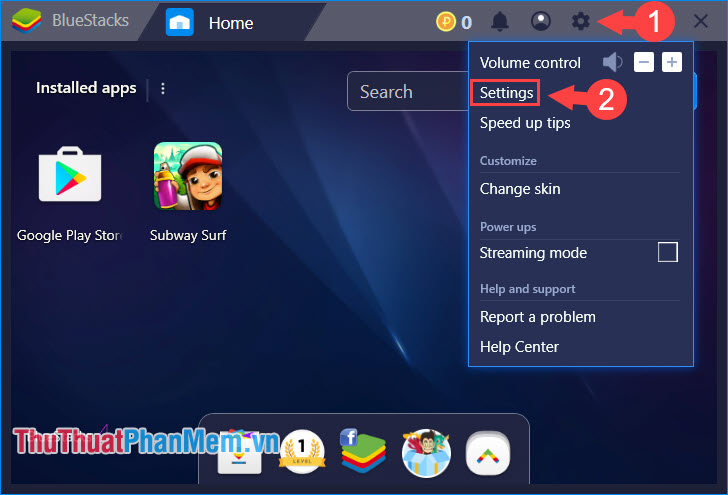
Step 1: Click on the gear icon (1) => Settings (2) .
Step 2: We move to the Engine tab (1) . Section CPU cores (2) , you set the minimum number of 2 for the software to work smoothly. If the CPU has 4-6 cores or more then we should set a minimum of 4 cores for software to work faster. Section Memory (3) we should drag the maximum slider to the right to make the most of the amount of RAM set on the machine.

4. Set the screen resolution
Step 1: Open the Registry Editor using the key combination Windows + R and type regedit => OK . After opening Registry Editor , navigate to the address HKEY_LOCAL_MACHINESOFTWAREBlueStacksGuestsAndroidFrameBuffer
Here, you pay attention to two items are WindowHeight (height) and WindowWidth (horizontal).
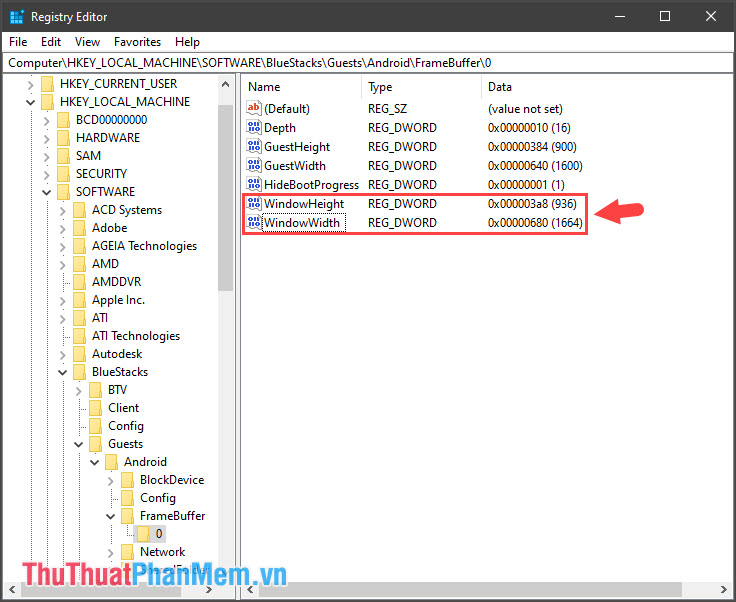
Step 2: You double-click on these two items and select the value Decimal (1) . Then you set a suitable number in Value Data (2) . We should set the index between Height: Width at below 768: 1024 for the software to work most stable, but we should not set the window too small to be difficult to use.

5. Delete applications in BlueStacks
We should remove the applications in BlueStacks to make the software launch faster and smoother. How to do the following:
Step 1: In the main menu, we click on the 3 dots (1) => Delete apps (2) .

Step 2: Click the red ( X ) (1) to delete and click Yes (2) .

With the speeding tips for BlueStacks in the article, surely we will improve the speed for BlueStacks software to be more smooth. Good luck!
FAQ
What should I know about Speed up BlueStacks, Make BlueStacks Run Smoother?
Focus on the key features, requirements, limitations, and practical use cases explained in this guide.
How do I get the best results with Speed up BlueStacks, Make BlueStacks Run Smoother?
Follow the recommended steps, use current software or information, confirm compatibility, and review settings before major changes.
Are there any risks or limitations?
Potential limitations depend on compatibility, data quality, cost, privacy, support, and how the product or method is used.
Related Articles
 Speed up Tips for Bluestacks Emulator Software5 minutes read
 Bluestacks Are Heavy?: Bluestacks Configuration Requirements.5 minutes read
 What Should I Do to Make My New Laptop Run Smoother?6 minutes read
 Bluestacks Just Launched Bluestacks Version X4 minutes read
 Bluestacks - Quality Android Emulator Software on PC: Key Facts12 minutes read
 Link Download Bluestacks 4.260.0.1032: Android Emulator4 minutes read
Reader Comments 0
Sign in with email or Google to join the discussion.