Table of Contents
This updated guide examines Click: How to Delete Your Usage History Tracks in Windows and organizes the essential facts, background, and practical takeaways in clear American English.
Part 1of 7:
Deleting App Usage History
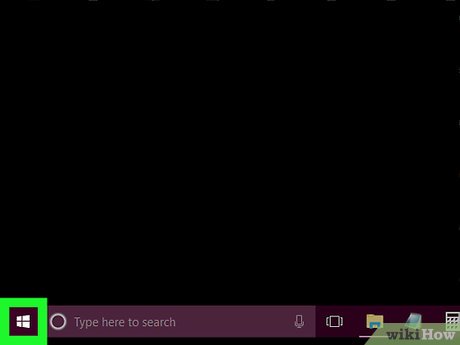 Right-click the taskbar. The taskbar is the bar at the bottom of the screen. Doing so invokes a pop-up menu.
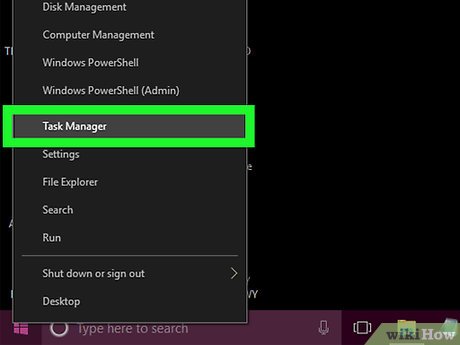 ClickTask Manager. It's near the bottom of the pop-up menu.
- Alternatively, pressCtrl+⇧Shift+Esc.
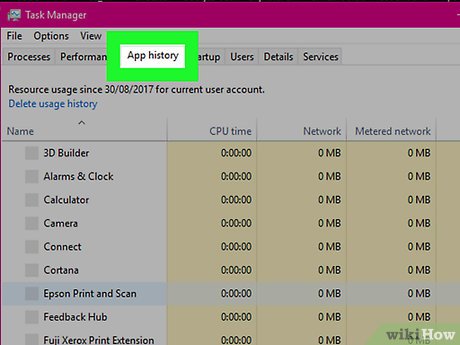 ClickApp history. This tab is at the top of the Task Manager window.
 ClickDelete usage history. It's a link near the top of the window. Doing so will reset the usage clock for each app on your computer to zero.
Part 2of 7:
Clearing File Explorer History
 Open File Explorer
 . Click the File Explorer app icon, which resembles a folder, in the taskbar at the bottom of the screen.
- You can also click Start
 , type infile explorer, and click File Explorer at the top of the Start window.
- You can also click Start
 ClickView. This tab is in the top-left section of the File Explorer window. You should see a toolbar appear at the top of File Explorer.
 ClickOptions. It's a box-shaped icon in the upper-right side of the File Explorer window. Doing so opens the Folder Options window.
- If clicking Options prompts a drop-down menu, click Change folder and search options in the drop-down menu before you proceed.
 Click theGeneraltab. You'll see this option in the upper-left corner of the Folder Options window.
 ClickClear. It's in the "Privacy" section toward the bottom of the window. Doing so will remove your recent searches from the File Explorer.
- If you pinned any folders or files to the File Explorer, they won't be cleared. You can remove a pinned folder or file by right-clicking it and then clicking Unpin from Quick access .
 Consider hiding your future search history. To do so, uncheck both the "Show recently used files in Quick Access" and "Show recently used folders in Quick Access" boxes in the "Privacy" section. Doing so will prevent future searches from appearing in the File Explorer.
 ClickOK. It's at the bottom of the Folder Options window. Your File Explorer history should now be clear.
Part 3of 7:
Clearing Start Search History
 Click Cortana's Search box. It's on the left side of the taskbar, just right of the Windows logo. The Cortana window will pop up.
- If you don't see this option, right-click the taskbar, select Cortana , and click Show search box before you proceed.
 Click
Click . It's on the left side of the Cortana window. Doing so will open Cortana's settings in the window.
 Click thePermissions & Historytab. You'll find this option on the left side of the window.
 ClickClear my device history. It's in the middle of the window. Doing so clears your computer's Cortana search history.
 ClickSearch history settings. This link is below the "My search history" heading. Clicking this link opens a Bing page with all of your searches listed in chronological order.
- You must be connected to the Internet to view this page.
 ClickView and delete search history. It's a teal button near the top of the Bing page.
 ClickClear activity. This link is on the far-right side of the page.
- You may first have to sign into your Microsoft account by clicking Sign in in the top-right corner of the page and then entering your email address and password. If so, click the Activity history tab near the top of the window before you proceed.
 ClickClearwhen prompted. Doing so will remove any web results from your Start search history.
Part 4of 7:
Clearing Internet History on Chrome
 Open
Open Google Chrome. Click or double-click the Chrome app icon, which resembles a red, green, yellow, and blue sphere.
 Click⋮. This icon is in the top-right corner of the Chrome window. Clicking it will prompt a drop-down menu.
 SelectMore tools. It's near the bottom of the drop-down menu. Selecting it opens a pop-out menu.
 ClickClear browsing data…. It's near the top of the pop-out menu. Your browsing history page will open.
 Select a time range to clear. Click the "Time range" drop-down box at the top of the menu, then click a time (e.g., Last hour for which you want to delete your browsing history.
- Selecting the beginning of time will delete all the recorded browsing history.
 Make sure "Browsing history" and "Download history" are checked. Both of these categories make up your browsing history.
 ClickCLEAR DATA. This is a blue button at the bottom of the window. Clicking it will promptly clear your browsing and download history.
Part 5of 7:
Clearing Internet History on Firefox
 Open Firefox. Click or double-click the Firefox app, which resembles a blue globe with an orange fox wrapped around it.
 Click☰. It's in the top-right corner of the page. A drop-down menu will appear.
 ClickLibrary. This option is in the middle of the drop-down menu.
 ClickHistory. It's near the top of the menu.
 ClickClear Recent History…. This is near the top of the menu. Clicking it opens a pop-up window.
 Select a time range to clear. Click the "Time range to clear" drop-down box, then click a time span (e.g., Last Hour ).
- Selecting Everything in the drop-down menu will ensure that all of your history is cleared.
 Click the "Details" drop-down icon. It's a downward-facing arrow to the left of the "Details" heading. A menu will appear.
 Check the "Browsing & Download History" box. You'll find this at the top of the menu.
- You can uncheck every other box in this menu if you please.
 ClickClear Now. This option is at the bottom of the menu. Doing so clears your Firefox history for the selected time range.
Part 6of 7:
Clearing Internet History on Edge
 Open Microsoft Edge. Click the Microsoft Edge app icon, which resembles a dark-blue box with a white "e" on it (or, in some cases, a dark-blue "e").
 Click⋯. This option is in the top-right corner of the Edge window. Clicking it prompts a drop-down menu.
 ClickSettings. It's at the bottom of the drop-down menu.
 Scroll down and clickChoose what to clear. This button is beneath the "Clear browsing data" heading.
 Make sure "Download History" and "Browsing History" are checked. You can check other items here as well, but these two items must be checked to clear your Edge history.
 ClickClear. It's in the middle of the menu. Doing so will delete your Edge browsing and downloads history.
Part 7of 7:
Clearing Internet History on Internet Explorer
 Open Internet Explorer. Click the Internet Explorer app icon, which resembles a light-blue "e" icon.
- Click "Settings"
 . This option is in the top-right corner of the Internet Explorer window. Doing so prompts a drop-down menu.
  SelectSafety. You'll see this icon near the top of the drop-down menu. Clicking it will prompt a pop-out menu to appear.
 ClickDelete browsing history…. It's at the top of the pop-out menu.
 Make sure "History" and "Download history" are checked. These two options will ensure that you clear all aspects of Internet Explorer's history.
 ClickDelete. It's at the bottom of the window. This will clear your Internet Explorer browsing history.
FAQ
What is Click: How to Delete Your Usage History Tracks in Windows about?
It provides a structured overview of click, explains the main context, and highlights practical takeaways for readers.
Why does this topic matter?
Understanding the main concepts helps readers evaluate the issue, avoid common mistakes, and make better-informed decisions.
How should readers use this information?
Use the guidance as a practical starting point, confirm details that may have changed, and follow current product, safety, or security recommendations.
Related Articles
 How to Delete Microphone Usage History on Windows 112 minutes read
 Grok Chat History Deletion Guide4 minutes read
 How to Delete Browsing History on Coc Coc?3 minutes read
 How to Delete Location History on Windows 115 minutes read
 How to Delete Netflix History3 minutes read
 How to Delete Last Camera Access History on Windows 113 minutes read
Reader Comments 0
Sign in with email or Google to join the discussion.