How to delete Watermark, delete stamps from photos in Photoshop
The Watermark is marked on an image to identify the copyright for an individual or a group of photos. If you want to delete it, then you can refer to the following tutorial of TipsMake.com us. Tutorial on how to use Photoshop to remove Watermark professionally and quickly.

Let's take an example with the image below. This photo has our Watermark TipsMake.com stamp , and we will show you how to remove this logo from the image.

With Watermark markers marked in a location with complex image and color lines. That means you can't cut it off and then fill it with color or use the brush to paint over that spot. This will make your photo worse.
Photoshop is a powerful photo editing tool, it also provides you with functions that help delete this Watermark.
First you need to open this image in Photoshop, the version that TipsMake.com uses to guide you is the Photoshop CS6 version, but do not worry, the function that TipsMake uses to delete Watermark The images are also available in other versions, and the usage and implementation are not too different.
You can click on File in the toolbar and choose Open . Or use the key combination Ctrl + O . Then select the photos you need to delete Watermark in the computer.

After the image is opened you will see it appears as a Background layer on the Layers tab on the right hand side of the Photoshop interface.
Use the key combination Ctrl + J to duplicate this image layer. This step is not a compulsory because in fact, if you follow the original image to open it, but it is possible that during the editing process, you will have some errors, so the duplicated image file. This will allow you to erase the broken layer again and again without having to reopen the image file again.

Click on the Rectangular Marquee Tool (the shortcut is M) on the vertical toolbar of Photoshop. This tool has a function of region selection, limiting the area where we can perform operations that affect the image without going beyond that selected area.

We need to localize the Watermark so that we can affect it and delete it. You drag an area close to the watermark stamped on the image. But you can see that such a rectangular array cannot follow the border of the Watermark and many areas that are not inserted by Watermark are counted into the selection. Our first purpose is to delineate the Watermark.

You can see the various functions of that Rectangular Marquee Tool . 4 functions represented by the form of image are:
- New selection: Create a new selection
- Add to selection: Add another selection to the old selection
- Subtract from selection: Delete a selection from the old selection
- Intersect with selection: Only select a selection in the old selection
In this case, we want to remove the selection from the watermark so we will need to select Subtract from selection .

You drag the mouse to make trim to reduce the excess selections.

If you do a little bit of care then you can create a selection with the watermark as shown below. You can make the selection overflow a little better than the borders too close because the pixels are too small to see clearly around the Watermark game, which can leave quite annoying traces after you remove the Watermark. .

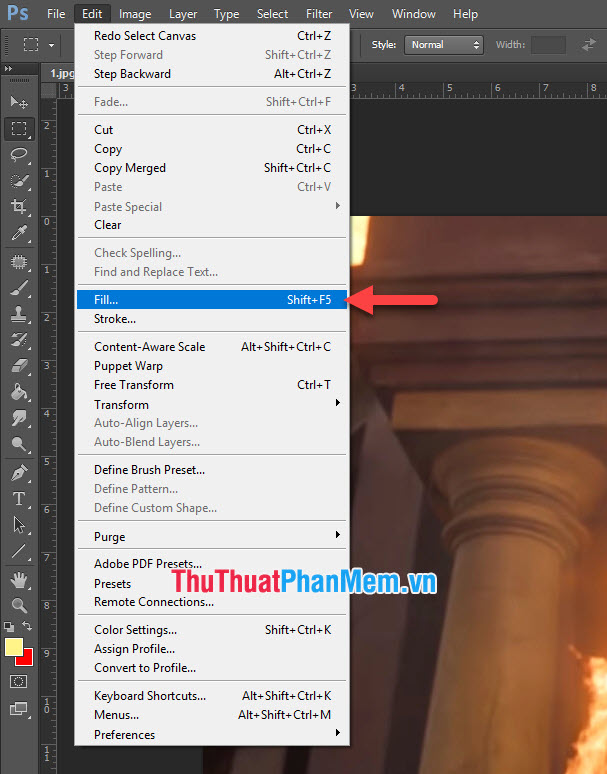
After creating a pleasant selection, click on Edit on the horizontal toolbar and select Fill in the list item. Or you can use the key combination Shift + F5 for the same function.
The Fill panel will appear, change Contents - Use to Content-Aware .
Then click OK to confirm the function.

As you will see, the Watermark will be removed quickly after the steps above. You can use the key combination Ctrl D to remove the selection and see the image holistically.
With some pictures that can be done to this step, you have finished removing Watermark from the image.

However, deleting the Watermark with this Fill function essentially makes the selection filled with the same color as the areas around the selection.
This will be done automatically so there may be many things that are not smooth and beautiful. If you use the Zoom (Z) function to zoom in on the location, the lines or strokes may be distorted.
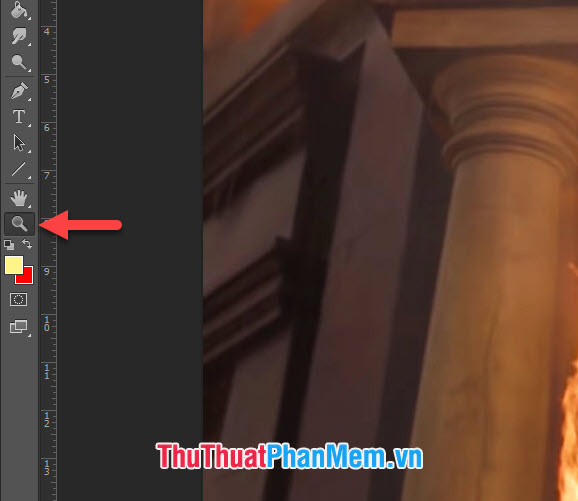
If you want to further refine and erase the lines, you can use another Photoshop function to retouch your photos.

There are two tools you can use to do this: the Path Tool (patched image) and the Clone Stamp Tool with the stamp image. Every tool has its own strengths, but in this article, TipsMake will show you how to use the Clone Stamp Tool .

The Clone Stampt Tool will use an image area in a different position to overwrite the image areas with defects to cover. The cursor of the Clone Stampt Tool will have the shape of the brush tip , we need to choose an appropriate size to be able to create a moderate brush line with the defective position. You should choose pen strokes with a thin border rather than a sharp border to create a soft transfer on the image.

After choosing the size of brush, you move the mouse to the position outside the spot with defects, which is where we will take the image to insert on the defective area.
You press the Alt button and then click the image area will be used to fix that.
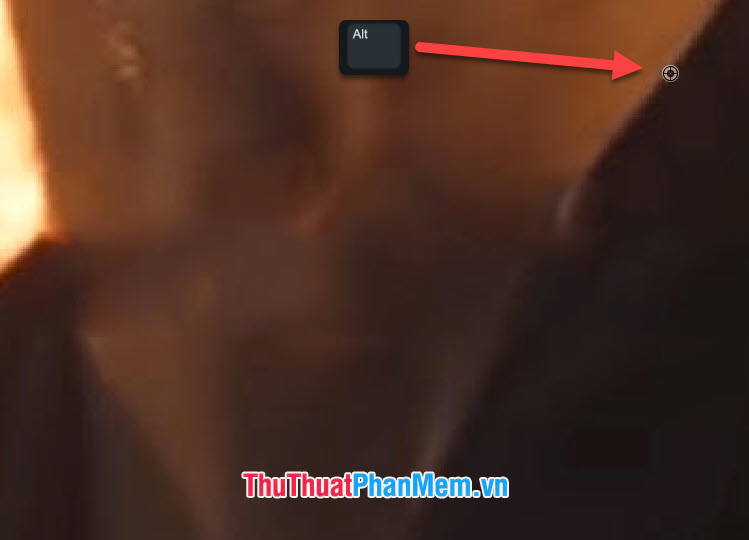
Now you hover the mouse over the location of the defect area, you will see in the circle of the brush area the image of the location you have chosen. You click slowly to be able to insert those images on the defect position.
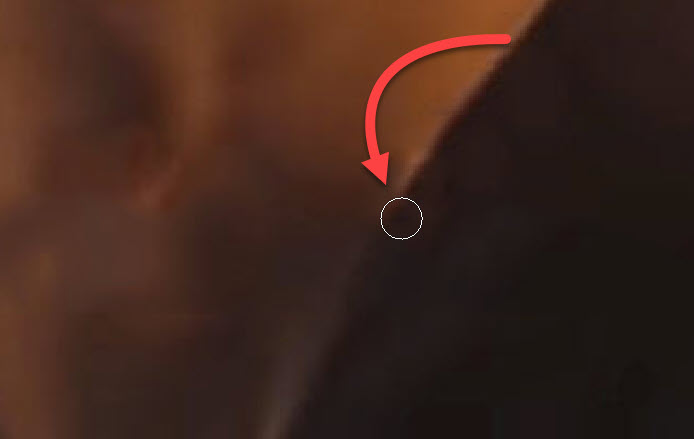
If you do it carefully, you will see that the obvious smudges created by Content-Aware have been removed by inserting the image in a different position on the image.
Finally, you will get back a watermarked photo with Photoshop.

Finally, save the image to your computer by clicking File on the toolbar and selecting Save . Or use the key combination Ctrl + S with the same function.

Do not forget to choose Fomat as JPEG or PNG to create an image file.

Note:
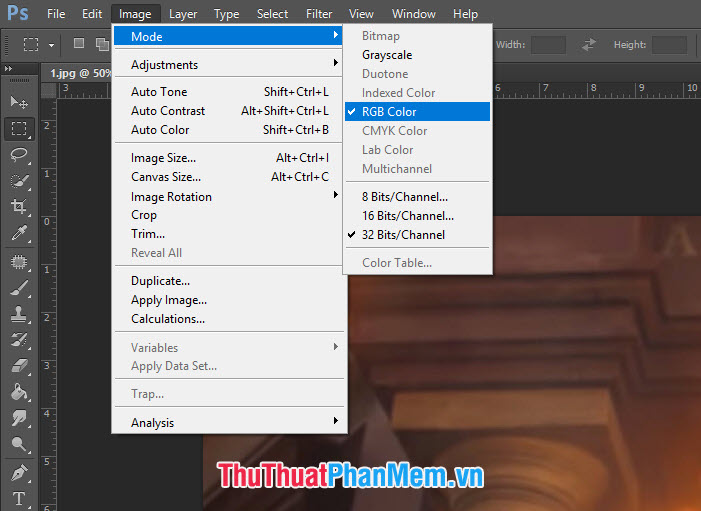
+ In case you can not use Fill for the image, you need to note that the Mode of that photo.
+ Go to Image on the toolbar, select Mode and make sure the image is in RGB Color .
Thank you for reading our article TipsMake.com on How to delete Watermark, remove stamps from photos in Photoshop. We hope this article can provide you with all the necessary skills to assist you in removing Watermark. I wish you successful implementation!
You should read it
- ★ Steps to delete selections in Photoshop are very easy and effective
- ★ Top 6 best tools to erase text on photos today
- ★ How to use Photoshop CS5 - Part 9: Delete complex backgrounds in Photoshop
- ★ How to remove watermark copyright mark, delete Watermark on PDF files
- ★ How to create and delete Watermark in Word 2016