How to create anonymous email aliases with SimpleLogin
SimpleLogin is a lightweight and easy-to-use aliases server that allows you to create permanent and anonymous email identities without creating new mailboxes.
Table of Contents
This article will show you how to install SimpleLogin server on Ubuntu and create anonymous email alias for online use.
Prepare the system
This article assumes that you are installing SimpleLogin on a VPS with at least 2GB RAM and that you have an active domain name from your DNS registrar.
To get started, import your Docker project's signing key to your machine:
curl -fsSL https://download.docker.com/linux/ubuntu/gpg | sudo gpg --dearmor -o /etc/apt/keyrings/docker.gpg sudo chmod a+r /etc/apt/keyrings/docker.gpgCreate a repository file for the Docker project:
sudo nano /etc/apt/sources.list.d/docker.listWrite the following line of code in the repository file:
deb [arch=amd64 signed-by=/etc/apt/keyrings/docker.gpg] https://download.docker.com/linux/ubuntu jammy stableRefresh your machine's archive by running the following command:
sudo apt update && sudo apt upgradeInstall dependencies for SimpleLogin
Install both Docker and SimpleLogin dependencies to your system:
sudo apt install docker-ce docker-ce-cli containerd.io docker-compose-plugin docker-buildx-plugin nginx dnsutils postfix postfix-pgsqlSelect Internet Site when the Postfix installation wizard asks for your mail server configuration type.

Press Enter to confirm the default value 'System mail name' .

Make sure that the 'core' snap package is running on your machine:
sudo snap install coreInstall the certbot snap package from the Electronic Frontier Foundation (EFF):
sudo snap install certbot --classicMake sure that your system's firewall is not blocking any ports for SimpleLogin:
sudo ufw allow 25,80,443/tcpPrepare DNS records
Go to your domain registrar and create a new 'A' record pointing to your machine's IPv4 address. Set the hostname value to a subdomain that you want for your SimpleLogin instance.

Add an 'MX' record for your root domain with the target server name set to your SimpleLogin subdomain.

Create a 'TXT' record for your root domain and set its value to the following:
v=spf1 mx ~all

Create another 'TXT' record for subdomain '_dmarc', then set its value to the following:
v=DMARC1; p=quarantine; adkim=r; aspf=r

Open Terminal, then generate a DKIM key pair using OpenSSL:
openssl genrsa -out dkim.key -traditional 1024 openssl rsa -in dkim.key -pubout -out dkim.pub.keyRun the following command and then copy its results to your system clipboard. Here is the sed script the developers used to extract the DKIM public key from its keyfile:
sed "s/-----BEGIN PUBLIC KEY-----/v=DKIM1; k=rsa; p=/" $(pwd)/dkim.pub.key | sed "s/-----END PUBLIC KEY-----//" | tr -d 'n' | sed -e '$a'Create a 'TXT' record for subdomain 'dkim._domainkey', then set the output of the previous command as the value.

Create Postgres database
In addition to using special DNS records, SimpleLogin also leverages PostgresDB to manage email aliases. To set this up, first create subfolders for the SimpleLogin Docker container:
mkdir -p ~/sl/{pgp,db,upload}Start a virtual network using Docker on your server:
sudo docker network create -d bridge --subnet=10.0.0.0/24 --gateway=10.0.0.1 sl-networkPaste the following command into the new terminal:
sudo docker run -d --name sl-db -e POSTGRES_PASSWORD=YOUR-RANDOM-PASSWORD-HERE -e POSTGRES_USER=postgres -e POSTGRES_DB=simplelogin -p 127.0.0.1:5432:5432 -v $(pwd)/sl/db:/var/lib/postgresql/data --restart always --network="sl-network" postgres:12.1Change the value for the 'POSTGRES_PASSWORD' variable with a long, random text string.
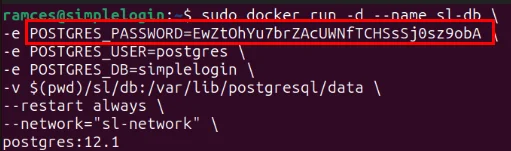
Note : You can generate this random string by running:
cat /dev/urandom | tr -dc 'A-Za-z0-9' | fold -w 32 | head -n 1Run the modified Docker command to start your database.
Configure Postfix for SimpleLogin
Start by deleting the default configuration file for Postfix, then create an empty file with the same name using your favorite text editor:
sudo rm /etc/postfix/main.cf && sudo nano /etc/postfix/main.cf
Paste the following code block into your new configuration file. Here is a Postfix sample from the developer repository that the article author modified to highlight the sections where you will add your server domain name:
smtpd_banner = $myhostname ESMTP $mail_name (Ubuntu) biff = no append_dot_mydomain = no readme_directory = no compatibility_level = 2 smtpd_tls_cert_file=/etc/ssl/certs/ssl-cert-snakeoil.pem smtpd_tls_key_file=/etc/ssl/private/ssl-cert-snakeoil.key smtpd_tls_session_cache_database = btree:${data_directory}/smtpd_scache smtp_tls_session_cache_database = btree:${data_directory}/smtp_scache smtp_tls_security_level = may smtpd_tls_security_level = may alias_maps = hash:/etc/aliases mynetworks = 127.0.0.0/8 [::ffff:127.0.0.0]/104 [::1]/128 10.0.0.0/24 mydestination = myhostname = SUBDOMAIN.YOUR-ROOT.DOMAIN mydomain = YOUR-ROOT.DOMAIN myorigin = YOUR-ROOT.DOMAIN relay_domains = pgsql:/etc/postfix/pgsql-relay-domains.cf transport_maps = pgsql:/etc/postfix/pgsql-transport-maps.cf smtpd_delay_reject = yes smtpd_helo_required = yes smtpd_helo_restrictions = permit_mynetworks, reject_non_fqdn_helo_hostname, reject_invalid_helo_hostname, permit smtpd_sender_restrictions = permit_mynetworks, reject_non_fqdn_sender, reject_unknown_sender_domain, permit smtpd_recipient_restrictions = reject_unauth_pipelining, reject_non_fqdn_recipient, reject_unknown_recipient_domain, permit_mynetworks, reject_unauth_destination, reject_rbl_client zen.spamhaus.org=127.0.0.[2.11], reject_rbl_client bl.spamcop.net=127.0.0.2, permitChange the value of 'myhostname' with your web application address, then update the value of both 'mydomain' and 'myorigin' to your root domain.

Link Postgres with Postfix
Create a new 'pgsql-relay-domains.cf' file in '/etc/postfix.' This will serve as the link between Postfix and Postgres:
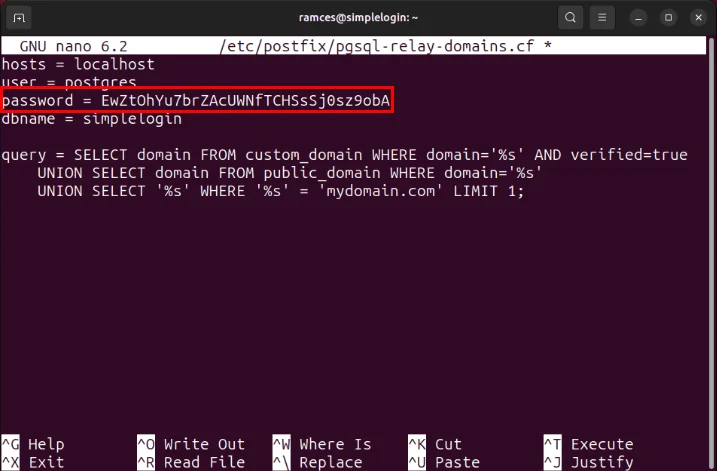
sudo nano /etc/postfix/pgsql-relay-domains.cfPaste the following code block into your new configuration file:
hosts = localhost user = postgres password = DATABASE-PASSWORD dbname = simplelogin query = SELECT domain FROM custom_domain WHERE domain='%s' AND verified=true UNION SELECT domain FROM public_domain WHERE domain='%s' UNION SELECT '%s' WHERE '%s' = 'mydomain.com' LIMIT 1;Replace 'DATABASE-PASSWORD' with your Postgres password.
Create a new 'pgsql-transport-maps.cf' in the same directory:
sudo nano /etc/postfix/pgsql-transport-maps.cfPaste the following code block into your new configuration file:
hosts = localhost user = postgres password = DATABASE-PASSWORD dbname = simplelogin query = SELECT 'smtp:127.0.0.1:20381' FROM custom_domain WHERE domain = '%s' AND verified=true UNION SELECT 'smtp:127.0.0.1:20381' FROM public_domain WHERE domain = '%s' UNION SELECT 'smtp:127.0.0.1:20381' WHERE '%s' = 'mydomain.com' LIMIT 1;Just like the previous configuration, replace 'DATABASE-PASSWORD' with your Postgres password.

Install SimpleLogin
Navigate to the user's home directory, then create an environment file for SimpleLogin.
cd && nano ./simplelogin.envWrite the following block of code in your new environment file:
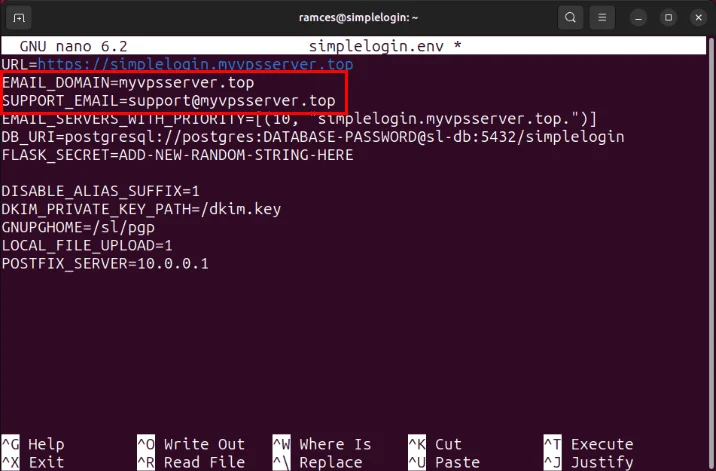
URL=https://SUBDOMAIN.YOUR-ROOT.DOMAIN EMAIL_DOMAIN=YOUR-ROOT.DOMAIN SUPPORT_EMAIL=support@YOUR-ROOT.DOMAIN EMAIL_SERVERS_WITH_PRIORITY=[(10, "SUBDOMAIN.YOUR-ROOT.DOMAIN.")] DB_URI=postgresql://postgres:DATABASE-PASSWORD@sl-db:5432/simplelogin FLASK_SECRET=ADD-A-NEW-RANDOM-STRING-HERE DISABLE_ALIAS_SUFFIX=1 DKIM_PRIVATE_KEY_PATH=/dkim.key GNUPGHOME=/sl/pgp LOCAL_FILE_UPLOAD=1 POSTFIX_SERVER=10.0.0.1Replace any instances of 'SUBDOMAIN.YOUR-ROOT.DOMAIN' with your SimpleLogin URL.
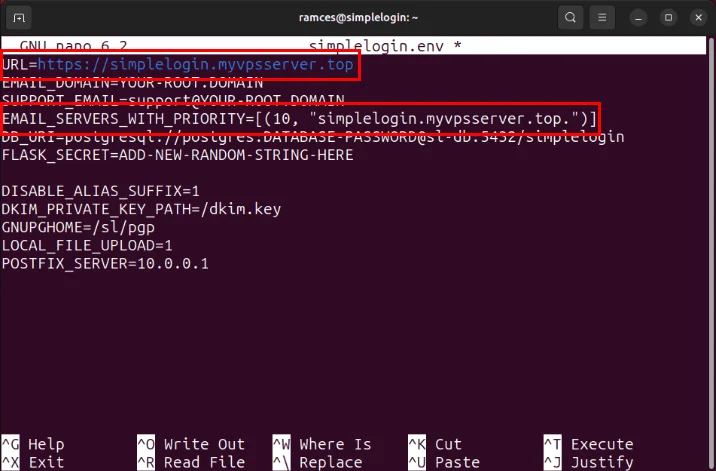
Change the value of 'YOUR-ROOT.DOMAIN' to the root domain name.
Replace the variable 'DATABASE-PASSWORD' with your Postgres password.

Generate a new random string and set it as the value 'FLASK_SECRET'

Run SimpleLogin Docker Containers
With that setup and ready, you can now fetch and run the SimpleLogin Docker Container. To get started, import the Postgres database into your SimpleLogin installation:
sudo docker run --rm --name sl-migration -v $(pwd)/sl:/sl -v $(pwd)/sl/upload:/code/static/upload -v $(pwd)/dkim.key:/dkim.key -v $(pwd)/dkim.pub.key:/dkim.pub.key -v $(pwd)/simplelogin.env:/code/.env --network="sl-network" simplelogin/app:4.6.5-beta alembic upgrade headRun the Docker container for SimpleLogin's initialization script:
sudo docker run --rm --name sl-init -v $(pwd)/sl:/sl -v $(pwd)/simplelogin.env:/code/.env -v $(pwd)/dkim.key:/dkim.key -v $(pwd)/dkim.pub.key:/dkim.pub.key --network="sl-network" simplelogin/app:4.6.5-beta python init_app.pyStart the Docker container that manages the application's user interface:
sudo docker run -d --name sl-app -v $(pwd)/sl:/sl -v $(pwd)/sl/upload:/code/static/upload -v $(pwd)/simplelogin.env:/code/.env -v $(pwd)/dkim.key:/dkim.key -v $(pwd)/dkim.pub.key:/dkim.pub.key -p 127.0.0.1:7777:7777 --restart always --network="sl-network" simplelogin/app:4.6.5-betaRun the backend email processing container for SimpleLogin:
sudo docker run -d --name sl-email -v $(pwd)/sl:/sl -v $(pwd)/sl/upload:/code/static/upload -v $(pwd)/simplelogin.env:/code/.env -v $(pwd)/dkim.key:/dkim.key -v $(pwd)/dkim.pub.key:/dkim.pub.key -p 127.0.0.1:20381:20381 --restart always --network="sl-network" simplelogin/app:4.6.5-beta python email_handler.pyFinally, start the container that manages common tasks for the SimpleLogin system:
sudo docker run -d --name sl-job-runner -v $(pwd)/sl:/sl -v $(pwd)/sl/upload:/code/static/upload -v $(pwd)/simplelogin.env:/code/.env -v $(pwd)/dkim.key:/dkim.key -v $(pwd)/dkim.pub.key:/dkim.pub.key --restart always --network="sl-network" simplelogin/app:4.6.5-beta python job_runner.pyCreate SSL Reverse Proxy with Nginx
At this point, SimpleLogin is currently running on the server at port 7777. To access it, you need to route its outgoing connection through SSL Reverse Proxy.
Create site files for your SimpleLogin instance:
sudo nano /etc/nginx/sites-available/simpleloginPaste the following block of code into your website files:
server { server_name SUBDOMAIN.YOUR-ROOT.DOMAIN; location / { proxy_pass http://127.0.0.1:7777; proxy_http_version 1.1; proxy_set_header Upgrade $http_upgrade; proxy_set_header Connection "upgrade"; proxy_set_header X-Forwarded-For $proxy_add_x_forwarded_for; proxy_set_header Host $host; } }Create a symlink for your site files in '/etc/nginx/sites-enabled/':
sudo ln -s /etc/nginx/sites-available/simplelogin /etc/nginx/sites-enabled/Apply your new settings by restarting the Nginx daemon:
sudo systemctl restart nginxRegister your SimpleLogin instance with EFF by running the following command:
sudo certbot register --agree-tos -m YOUR@EMAIL.ADDRESSRequest a new SSL certificate for your reverse proxy:
sudo certbot --nginx -d SUBDOMAIN.YOUR-ROOT.DOMAINOpen the Postfix configuration file with your favorite text editor:
sudo nano /etc/postfix/main.cfScroll down to the variables 'smtpd_tls_cert_file' and 'smtpd_tls_key_file' and replace them with the following lines of code:
smtpd_tls_cert_file=/etc/letsencrypt/live/SUBDOMAIN.YOUR-ROOT.DOMAIN/fullchain.pem smtpd_tls_key_file=/etc/letsencrypt/live/SUBDOMAIN.YOUR-ROOT.DOMAIN/privkey.pemTest that your SimpleLogin instance is running properly by opening your subdomain in a browser and creating a new account.
Create email aliases with SimpleLogin
Return to the server's terminal session, then open the application's database:
docker exec -it sl-db psql -U postgres simpleloginRun the following to enable Premium status for your main account:
UPDATE users SET lifetime = TRUE; exit
Doing so will ensure that your account will not have any limits on the number of aliases you can create for your emails.
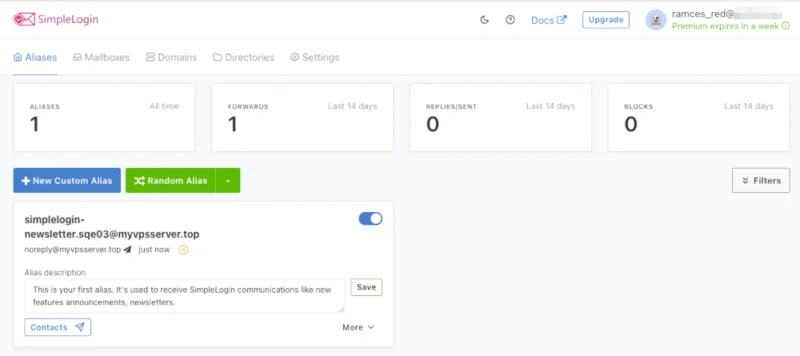
To create your first email alias, click the New Custom Alias button on the web app's dashboard.

Note : You can also create an alias with a random name by clicking the Random Alias button .
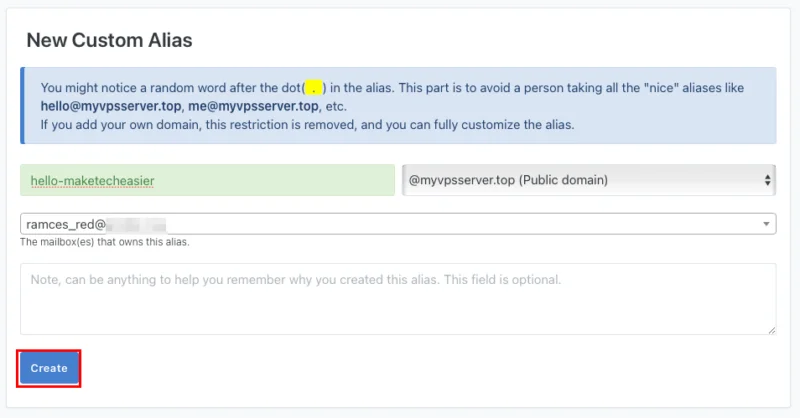
Provide a memorable name for your new email alias, then click Create .
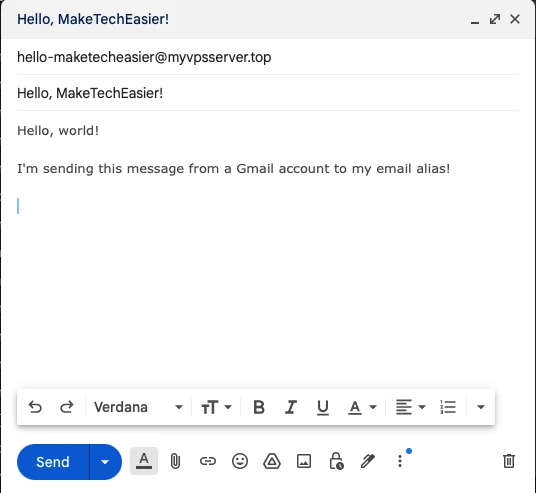
Test that your new email alias is working properly by sending mail to it from another email address.
Send email from alias SimpleLogin
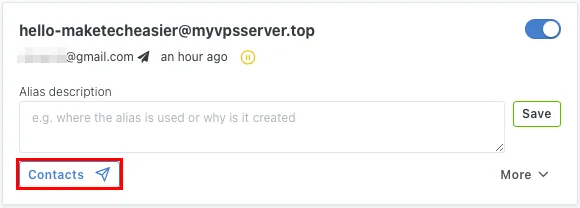
In addition to receiving messages from aliases, SimpleLogin also supports sending messages via aliases. To achieve that, the app creates a 'reverse alias' for the destination address to which you can send your email.
To do this, click the Contacts button on the alias you want to send the email from. In this case, the author wants to send from his address 'hello-maketecheasier@myvpsserver.top'.
Provide the recipient's email address, then click Create reverse-alias .
Click the Copy reverse-alias button on your new contact, then paste it into the email client's recipient field. Sending mail to this custom address will allow SimpleLogin to hide your real email by your alias to the recipient.

Hosting your own email alias server with SimpleLogin is just one step in reclaiming your digital privacy. Take control of your entire digital communication chain by hosting your own email server with Mail-in-a-Box.
Was this article helpful?
Your feedback helps us improve.
Related Articles
 Send anonymous anonymous emails with these 18 great websites8 minutes read
 How to use Mailspre to send anonymous emails4 minutes read
 5 methods of emailing are completely anonymous8 minutes read
 How to create temporary email addresses quickly with YOPmail5 minutes read
 ALIAS in SQL Server5 minutes read
 How to send an anonymous anonymous email on Eskiimo3 minutes read
Reader Comments 0
Sign in with email or Google to join the discussion.