How to create a double exposure effect using Snapseed
Snapseed is one of the most useful photo editing apps for smartphones and comes with a feature called Double Exposure.
Double exposure is a popular photography and videography technique from the film camera era. It involves exposing a film twice before developing the image for artistic effect. Nowadays, you don't need to depend on camera film to create this effect as it can be done quickly with photo editing apps.
Snapseed là một trong những ứng dụng chỉnh sửa ảnh hữu ích nhất dành cho điện thoại thông minh và đi kèm với một tính năng gọi là Double Exposure. Như tên cho thấy, tính năng này cho phép bạn hợp nhất hai hình ảnh mà không cần đổ mồ hôi. Ngoài ra, nó cũng cung cấp nhiều blending mode để bạn thử nghiệm.
Bài viết hôm nay sẽ hướng dẫn bạn cách tạo hiệu ứng phơi sáng kép bằng Snapseed.
Cách sử dụng công cụ Double Exposure trong Snapseed
Tạo hiệu ứng phơi sáng kép đẹp mắt trong Snapseed là một quá trình gồm hai phần. Đầu tiên, bạn phải chuyển hình ảnh bóng đen trên nền trắng, được hỗ trợ bởi các blending mode khi hiển thị hình ảnh thứ hai. Trước khi bắt đầu, bạn có thể tải xuống ứng dụng Snapseed miễn phí.
Đây là cách tạo hình ảnh bóng đen trên nền trắng:
Step 1. Open Snapseed and import your image.
Step 2. Go to Tools > Black and White and choose Color Filter to make your background light.

Step 3. Adjust Brightness and Contrast to get a black shadow on a white background. Keep Contrast at 100 for best results.
Step 4. Click the checkmark to save your edit.

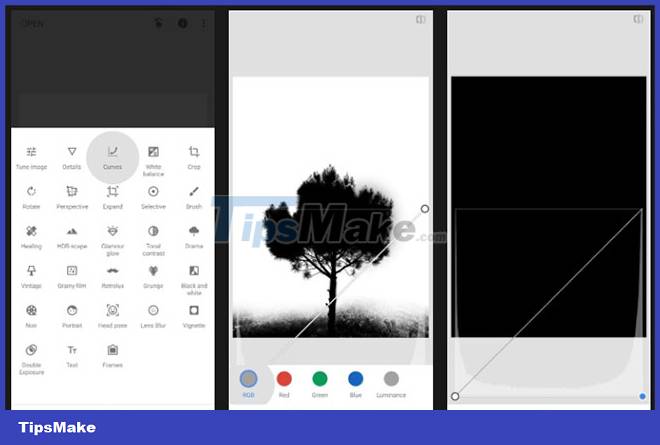
Step 5. Go to Tools > Curves and select the RGB color channel.
Step 6. Bring the right cursor all the way down to make your image completely black and save it by touching the check mark.
Step 7. Open the Edit Stack > View edits option, click on Curves and open the Slack Brush.
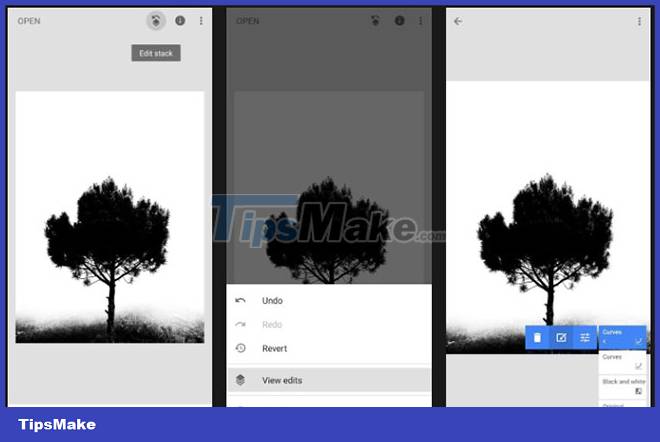
Step 8. Erase any white spots on the object using the Brush.

You have completed the first step of creating a double exposure image. Make sure the shape you want to keep is black and the part you don't want is white (usually the background). You will understand what it means when working with Blending modes.
Here's how to use the Double Exposure feature:
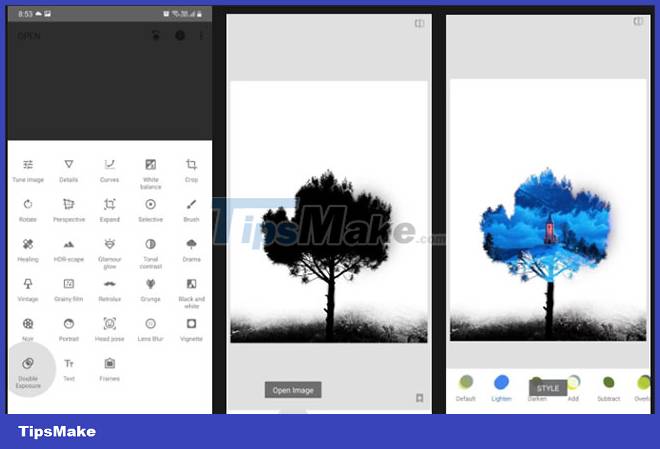
Step 1. After finishing editing to a black shadow on a white background, go to Tools > Double Exposure.
Step 2. Click the Open Image option to add a second image.
Step 3. Position the second image as you want and choose the Lighten blending mode from the Style options. The image will only display in the dark area.
Step 4. Add another image and set the Blending mode to Darken or Subtract. It will add the image on the white part.
Step 5. Go to Stack Options, open View edits, click on the closest Double Exposure edit and select the Slack Brush. Use it to remove unnecessary parts from the image.
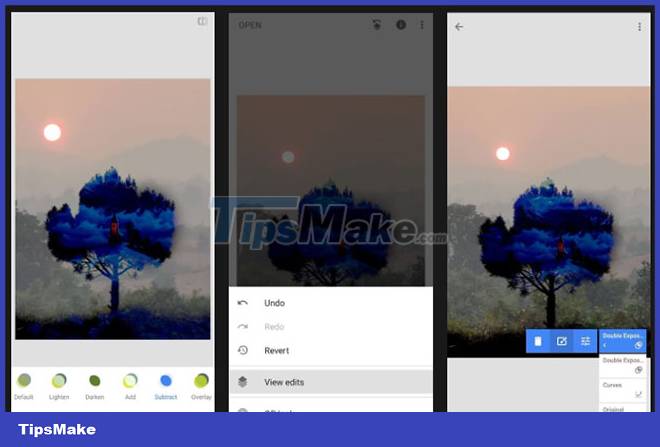
Step 6. Refine your image with some final tweaks, adding effects and filters if required before exporting the final edited result.
You already have your double exposure and can experiment with it a lot more however you like. You can add objects to another image or create something similar to a movie poster. TipsMake also has a tutorial for creating a double exposure effect in Photoshop .
Two important steps while using the Double Exposure function is to use the Blending modes properly and use the Slack Brush to mask the less important areas. Slack Brush is similar to using layers and masks in Photoshop.
- Instructions for creating double exposure images in Photoshop
- 6 mobile apps to help create double exposure effects
- How to use Photoshop CS6 (Part 3) - Create Manipulation artwork with exposure effect
- How to create artistic text using Snapseed image editing application
- How to delete an image object using the Snapseed application
- What is exposure and exposure triangle in photography?
- Admire the beautiful dual exposure wallpapers
- How to use Snapseed to edit photos on Android
- Turn on the secret of long exposures in photography
- How to Take Stunning Long Exposure Photos with Your Phone
- How to use Snapseed to edit photos on Android
- Users have more reasons to use Google Snapseed thanks to this update!
- 9 Useful Google Apps That Don't Come Pre-Installed on Android Phones
- The best photography apps on iOS and Android
- 6 mobile apps to help create double exposure effects
- Why is Snapseed better than Lightroom Mobile for editing photos on the go?
- Best photo editing app for Android and iOS
- 8 useful apps on Samsung Galaxy S21
- Google is finally getting updates to Snapseed after two years
- 5 Instagram photo editors to create better photos
-
 Quickly fix WLAN AutoConfig errors on Windows 11
-
Add your Gmail account to Outlook with POP.
-
How to use Zperiod to automatically balance chemical equations.
-
How to center a table in Google Docs
-
How do I use the Learn Step by Step mode in Perplexity?
-
Instructions on connecting Gmail to n8n via Google Cloud Console
 Quickly fix WLAN AutoConfig errors on Windows 11
 Add your Gmail account to Outlook with POP.
 How to use Zperiod to automatically balance chemical equations.
 How to center a table in Google Docs
 How do I use the Learn Step by Step mode in Perplexity?
 Instructions on connecting Gmail to n8n via Google Cloud Console
-
Application
-
Web Email
-
Website - Blog
-
Web browser
-
Support Download - Upload
-
Software conversion
-
Social Network
-
Simulator software
-
Online payment
-
Office information
-
Music Software
-
Map and Positioning
-
Installation - Uninstall
-
Graphic design
-
Free - Discount
-
Email reader
-
Edit video
-
Edit photo
-
Compress and Decompress
-
Chat, Text, Call
-
Archive - Share
-
-
System
-
Mac OS X
-
Hardware
-
Game
-
Tech info
-
Technology
-
Science
-
Life
-
Electric
-
Program
-
Mobile