Table of Contents
The current TeamViewer Remote workflow uses a session link or session code for attended support. The supporter creates a session, the remote user joins, verifies the supporter, and selects Allow access. TeamViewer still supports the older ID-and-password method, but recommends session links for a more secure and reliable connection.
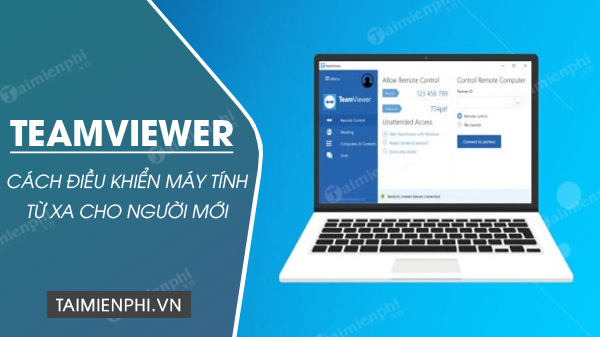
Choose attended or unattended access
| Access type | Use it for | Recommended TeamViewer method |
|---|---|---|
| Attended support | A one-time session while the other person watches and approves | Session link or code; QuickSupport can be used on the remote side |
| Unattended access | Ongoing access to a device you own or administer | TeamViewer Host or a managed full client assigned to an account |
Use attended support by default. Do not configure a permanent password or Host installation merely to solve a one-time problem.
Before the session
- Confirm that both people expect the connection and agree on the work to be done.
- Download TeamViewer only from the official TeamViewer site.
- Update unsupported or incompatible clients before connecting.
- Save open work and close unrelated email, banking, medical, identity, and password-manager windows.
- Use the correct license: TeamViewer's free tier is for personal use, while work and revenue-related access require a commercial license.
Start an attended session with a link or code
On the supporter's computer
- Open the TeamViewer Remote full client or sign in to the approved TeamViewer web client.
- Open Remote Support and go to Sessions.
- Create a new session and give it a clear internal name.
- Copy the generated session link or code and send it privately to the intended user.
- Wait until the user joins the waiting room.
- Select Join session when TeamViewer reports that the user is ready.
On the computer receiving help
If TeamViewer is already installed, open it, enter the session code in Get help, and select Connect. If the supporter sent a link, open it and allow the verified TeamViewer client to handle the request.
If TeamViewer is not installed, the invitation can direct the user to TeamViewer QuickSupport. Open the downloaded QuickSupport file from TeamViewer, accept the displayed terms if appropriate, and join the waiting room.
When the supporter starts the connection, check the supporter's displayed identity and select Allow access only if it matches the person or organization you expect. This approval grants extensive control of the visible Windows or macOS session.
Connect with a TeamViewer ID and password
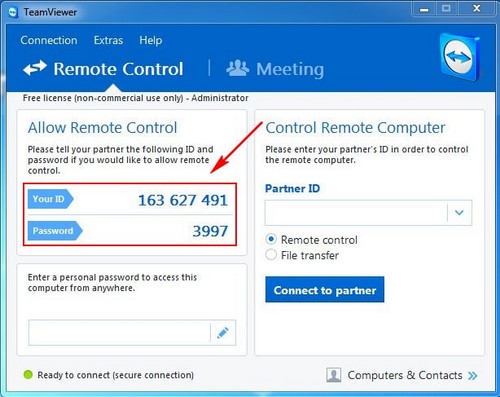
The screenshots below show the older connection flow, which remains available for technical cases that require it. TeamViewer recommends migrating attended support to session links.
On the remote computer
- Open TeamViewer and locate Your ID and the current random password.
- Send them privately to the expected supporter.
- Remain at the computer and monitor the session.
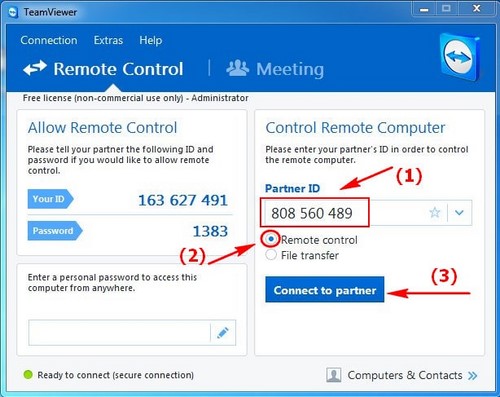
On the controlling computer
- Enter the remote computer's ID in Partner ID.
- Select Remote control, then Connect to partner.
- Enter the current password supplied by the person at the remote computer.
- Select Log On and wait for the remote desktop.
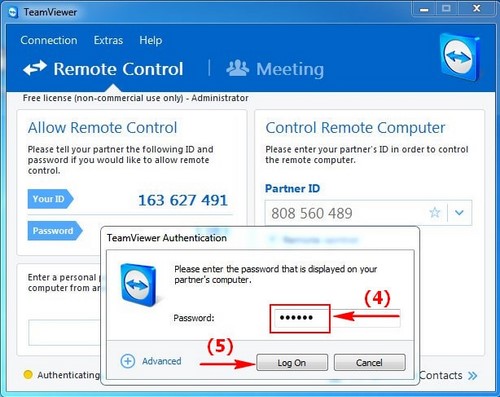
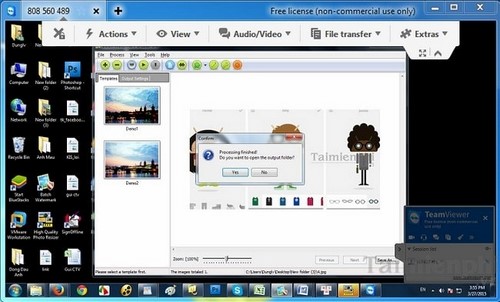
Do not publish IDs, passwords, or screenshots containing credentials. The fact that a password is temporary does not make it safe to post publicly while it is active.
Use the remote session responsibly
- Tell the remote user before installing software, transferring files, restarting, or opening administrator controls.
- Use the session toolbar to adjust scaling, display quality, monitors, clipboard, audio, chat, or file transfer as needed.
- Grant only the permissions required for the agreed task.
- Keep the remote user informed when the screen changes or the connection pauses.
- Do not open unrelated personal or business data.
- When finished, close sensitive windows, save authorized changes, and disconnect from the toolbar.
The person receiving support can end an attended session at any time. If a controller acts outside the agreed purpose, deny access or close TeamViewer immediately.
Set up unattended access only when required
Unattended access allows connection without a person approving each session. TeamViewer's current workflow uses TeamViewer Host or a managed full client assigned to a TeamViewer account.
- Install TeamViewer Host on the remote device from TeamViewer's official download page.
- Open Host and select Manage this device.
- Sign in with the authorized TeamViewer account and complete device assignment.
- Protect the account with strong authentication and review which users or groups can reach the device.
- From the local client or web app, select the managed device and connect.
Do not use a shared personal account to manage business endpoints. Document the device owner, administrators, recovery process, and removal date. Remove Host, Easy Access, assignments, or startup access when the need ends.
Administrator prompts and UAC
A normal remote session may not automatically control Windows User Account Control prompts. TeamViewer provides approved Windows Authentication and elevation workflows for authorized administrators. Do not ask a user to disclose an administrator password in chat, and do not lower UAC permanently just to make remote control easier.
If TeamViewer will not connect
- The user is not ready: confirm that QuickSupport or the full client is running and that they joined the correct session.
- The code is invalid: request a new session code from the known supporter; do not search the web for a replacement.
- Version warning: update both endpoints to supported versions from TeamViewer.
- Remote device is offline: check power, Internet access, TeamViewer service status, and account assignment.
- Password rejected: ask for the current random password again or use a session link. Do not repeatedly guess.
- Connection is slow: reduce display quality, pause high-bandwidth traffic, and use a stable wired connection when possible.
- Work network blocks access: ask the administrator. Do not bypass organizational firewall or application-control policy.
Security checks
- Never grant a remote session to an unsolicited caller claiming to be from a bank, government office, Microsoft, an online store, or TeamViewer.
- Do not transfer money, buy gift cards, reveal a verification code, or open financial accounts while an unknown controller can see the screen.
- Verify session invitations through a separate trusted channel.
- Protect the TeamViewer account and review logged-in and assigned devices regularly.
- Enable updates and remove obsolete clients.
- If a session was suspicious, disconnect, secure exposed accounts from a clean device, review installed programs and users, and contact affected services through official channels.
TeamViewer's official attended-support guide describes the session link, code, QuickSupport, waiting-room, and user-approval flow. For alternative tools, compare TipsMake's remote computer control software overview and AnyDesk remote-control guide.
Related Articles
 How to Use Teamviewer10 minutes read
 Control Remote Computers with Teamviewer4 minutes read
 How to Install the Latest Version of TeamViewer 15 to Remotely Control a PC4 minutes read
 How to Remote USB Access Using TeamViewer6 minutes read
 How to Install TeamViewer on a PC or Phone That Supports Remote PC Connection6 minutes read
 Update Teamviewer Now If You Don't Want to Be Hacked3 minutes read
Reader Comments 0
Sign in with email or Google to join the discussion.