How to connect to a hidden Wi-Fi network in Windows 10
If you're using Windows 10 and primarily use Wi-Fi rather than wired connections, you'll notice that besides the visible Wi-Fi networks, there are also hidden ones. The question is, how do you connect to these hidden networks? In this article, TipsMake will guide you through two ways to connect to hidden Wi-Fi networks in Windows 10..
Nowadays, bypassing Wi-Fi security isn't too difficult. Therefore, to protect your Wi-Fi network, you can set it up to hide it. If you've just created a hidden Wi-Fi network and want to connect to it in Windows 10, this article from TipsMake will guide you on how to connect to a hidden Wi-Fi network in Windows 10 .

How to connect to a hidden Wi-Fi network in Windows 10
What is hidden Wi-Fi?
As its name suggests, a hidden network is a network that is hidden by default. When searching for available Wi-Fi networks on your phone or computer, you will see the names of those Wi-Fi networks set to be displayed. Because hidden Wi-Fi networks do not broadcast their names, you cannot find these networks in the search results.
If the Wi-Fi network is displayed, you don't need to enter the SSID or network name. However, if the Wi-Fi network is hidden, you must manually enter the SSID along with the security type and password. Users often choose to hide the Wi-Fi network and SSID for Viettel, FPT, GPON, HUAWEI, and some other modems to make the network system more secure.
There are two ways to connect to a hidden Wi-Fi network in Windows 10. TipsMake will detail each method in the following section.
How to connect to a hidden Wi-Fi network in Windows 10
Method 1: Connect to a hidden Wi-Fi network in Windows 10 via Windows Settings
Most users are unfamiliar with this method; however, you can use Windows Settings to connect to hidden Wi-Fi networks in Windows 10 without any problems.
First, open Windows Settings by pressing Windows + I. Alternatively, click the Start Menu, then click the gear icon to open Windows Settings. Or you can type "Windows Settings" into the Cortana search box or the Taskbar search box to open it.
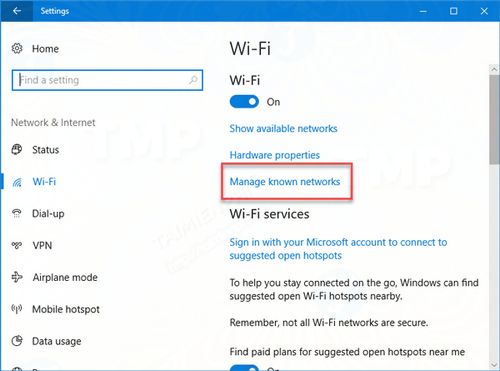
In the Windows Settings window, navigate to Network & Internet => Wifi . In the right pane, find and click the option called Manage known networks .
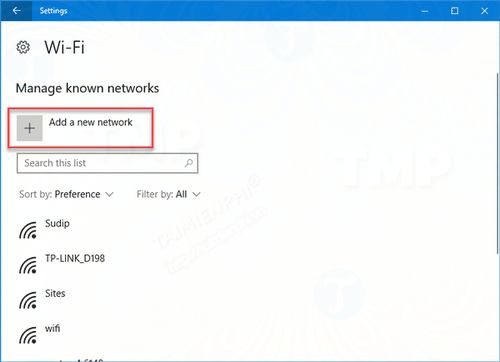
In the next window, click the " Add a new network" button.
Next, enter the network name or SSID, select the security type (Open, WPA2-Personal AES, .), enter the password if it's not open, and check the box next to the Connect automatically option.
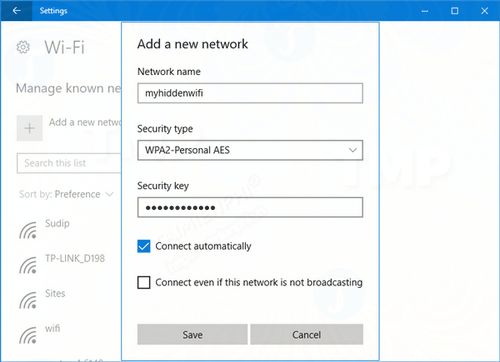
Finally, click the Save button . Your computer will immediately connect to the hidden Wi-Fi network.
Method 2: Connect to a hidden Wi-Fi network in Windows 10 via the system tray.
This method is much simpler because users don't need to open the Windows Settings window.
If your Windows 10 computer supports Wi-Fi, you will see a Wi-Fi icon in the system tray, replacing the network icon.
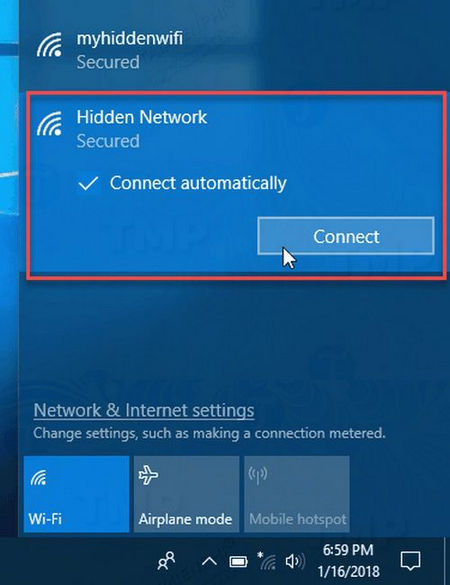
First, click the Wi-Fi icon in the system tray. Find the Wi-Fi network named Hidden Network and check the "Connect automatically" option before clicking the Connect button .
Next, enter the network name and password to connect to the hidden Wi-Fi network in Windows 10.
Above, TipsMake has guided you through two ways to connect to a hidden Wi-Fi network in Windows 10. A small note: the second method isn't very common because some users report that the Hidden Network option doesn't appear in their system tray menu. If you want to connect to a hidden Wi-Fi network in Windows 10, you can follow the first method above.