Table of Contents
To join a hidden Wi-Fi network, you need its exact network name (SSID), security type, and password. Get these details from the network owner or router settings. A hidden name is not a security feature by itself, so do not connect to an unknown network simply because it appears as Hidden Network.
Information you need
- SSID: enter it exactly, including capitalization and spaces.
- Security type: for example, WPA2-Personal or WPA3-Personal.
- Password/security key: the current Wi-Fi password.
- Enterprise details: an organization may also require a username, certificate, or other settings.
Avoid WEP and old WPA security. If you administer the router, use WPA2-AES or WPA3 where supported; hiding the SSID does not replace modern encryption and a strong password. See the Wi-Fi access protection guide for stronger controls.
Quick method from the Wi-Fi menu
- Select the network icon on the taskbar and make sure Wi-Fi is on.
- Choose Hidden Network, then Connect.
- Enter the SSID and select Next.
- Enter the password. Confirm that the network name and security information came from someone you trust.
If Windows does not show a Hidden Network entry, create a profile manually.
Create the hidden Wi-Fi profile manually
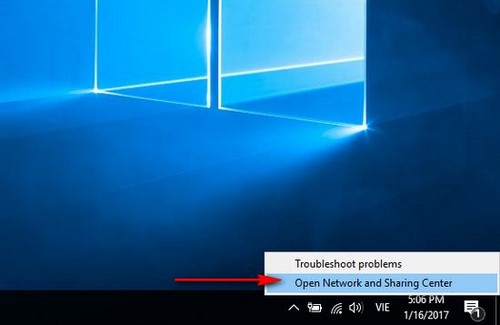
- Right-click the network icon and open Network & Internet settings. Select Network and Sharing Center; on older Windows versions this option may be available directly from the taskbar menu.
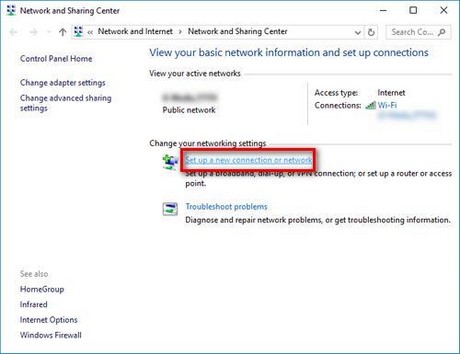
- Select Set up a new connection or network.
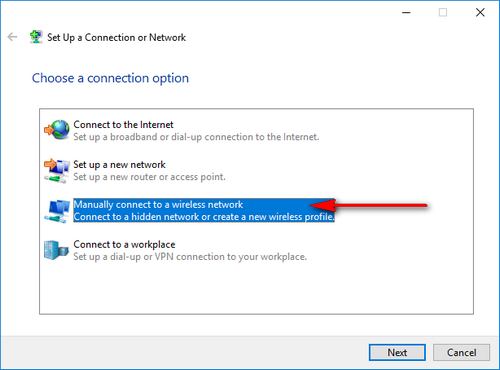
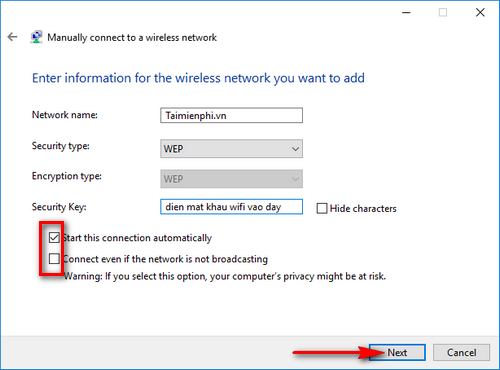
- Choose Manually connect to a wireless network.
- Enter the network name, select the matching security type, and enter the security key. Leave the encryption type at the value paired with the chosen security mode.
- Select Start this connection automatically only on a network you use regularly. Select Connect even if the network is not broadcasting only when the SSID is intentionally hidden.
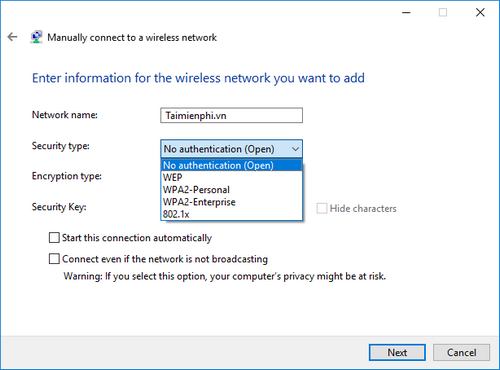
- Select Next to save the profile.
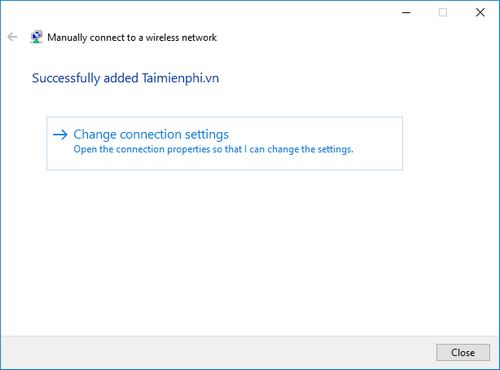
Close the confirmation window when the profile has been added.
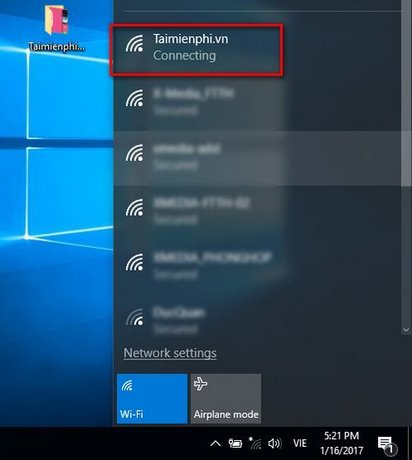
Open the Wi-Fi panel and verify that the PC connects to the intended network.
Privacy tradeoff of automatic connection
A device configured to connect when a network is not broadcasting may actively look for that network while away from it. This can reveal information about saved profiles and may increase exposure to look-alike access points. Prefer a visible SSID with strong WPA2 or WPA3 security when you control the router, and disable automatic connection for networks you rarely use.
If Windows will not connect
- Re-enter the SSID and password; both are case-sensitive.
- Confirm that the selected security type matches the router.
- Forget or delete an older profile with the same SSID, then add it again.
- Move closer to the access point and test another device.
- Restart the adapter and router, then update the Wi-Fi driver from the device manufacturer.
For adapter, driver, signal, or no-internet problems, follow the Windows Wi-Fi troubleshooting guide. If you need to confirm a password already stored on another authorized PC, use the saved Wi-Fi password instructions.
Related Articles
 Connect Your Windows 7 Computer to the Hidden Wi-Fi Network6 minutes read
 How to Connect to a Hidden Wi-Fi Network in Windows 105 minutes read
 How to Connect Laptop to TV via HDMI Port6 minutes read
 How to Connect the Network Between Two Laptops Using a Network5 minutes read
 How to Connect the Projector to a Computer, Laptop7 minutes read
 How to Connect Laptop to TV? 5 Ways to Connect the TV to Laptop6 minutes read
Reader Comments 0
Sign in with email or Google to join the discussion.